Local ISO repository in Citrix XenServer
In some circumstances, I needed to install and configure Citrix XenServer. The distribution was downloaded from the Citrix website and successfully installed on the HP server. It seems to be able to stick it in a rack and enjoy the virtual life of the servers, but it was not there. As it turned out, XenServer does not provide local storage for distributions, more precisely for ISO images. It is assumed that all distributions will lie on the network storage (to work with which there are all the tools), but if we talk about the Stand-alone server, without any network storage, then there are various ideas. One of these ideas under the cut.
So, there is a task: you need to make a repository of ISO images on the same server on which XenServer is installed.
First, go to the Citrix XenServer documentation and find an article there: docs.vmd.citrix.com/XenServer/5.0.0/1.0/en_gb/guest.html#iso_local_copies , which seems to be how very simple and quickly the task is solved. However, I do not recommend doing so. Under the operating system with a hypervisor, about 3 gigabytes is allocated on the disk, of which 1.7 gigabytes are free. Therefore, trying to copy the ISO image of Windows Server 2008 R2 with a volume of about 2.5 gigabytes, they killed XenServer completely.
')
Having climbed the Admin Guide for XenServer, we find that XenServer can connect to ISO network storages. In this regard, it is necessary to allocate space for the ISO storage on the server, make it available over the network and then connect to our XenServer. I do not pretend to the correctness of this decision, but in my case it completely suited me.
Now more in steps:
1. The screenshot shows that we have Local Storage, from which we will cut a piece to organize an ISO repository

2. It is necessary to determine the SR UUID (Storage Repositpry Universal Unique IDentificator) for the Local Storage disk, for this we enter the command:
xe sr-list type = lvm, the result of the command execution is visible in the screenshot:

from the output we need the highlighted identifier sr uuid
3. Now we define the PBD UUID (Phisical Block Device Universal Unique IDentificator) on which the Local Storage is located, for this we enter the command:
heh pbd-list sr-uuid = ... (here we indicate the number we received in the previous step)
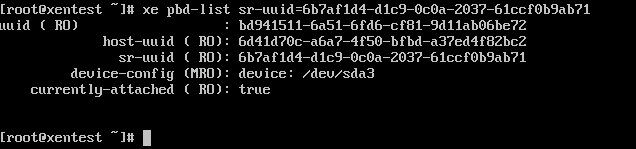
from the information received, we will need a distinguished identifier pbd uuid
4. Unmount Local Storage, for this we enter:
xe pbd-unplug uuid = ... (the number obtained in step 3 is indicated here)

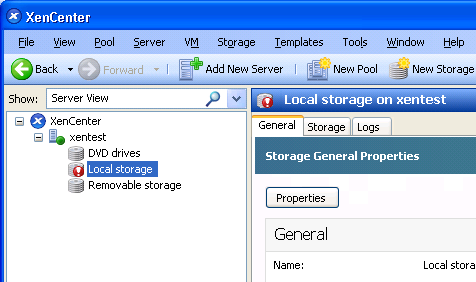
after that, in the XenCenter console, the Local Storage storage will be highlighted with an exclamation mark:
5. Now delete the Local Storage command:
xe pbd-destroy uuid = ... (specify pbd uuid, obtained in step # 3)

notice that local storage is now gray
6. Now delete the link to Local Storage:
xe sr-forget uuid = ... (specify the sr uuid obtained in step 2)

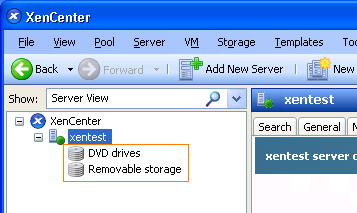
Now Local Storage disappeared altogether:
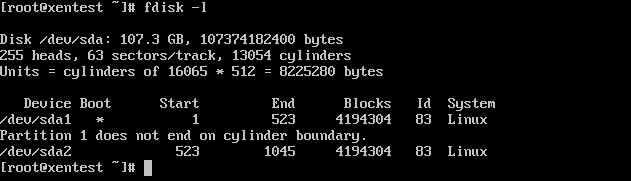
7. Next, we look at which partitions we have on the disk using the fdisl -l command.

We see that we have 3 partitions, the largest of which / dev / sda3 (Linux LVM) is the same partition on which Local Storage was located
8. Delete this section:
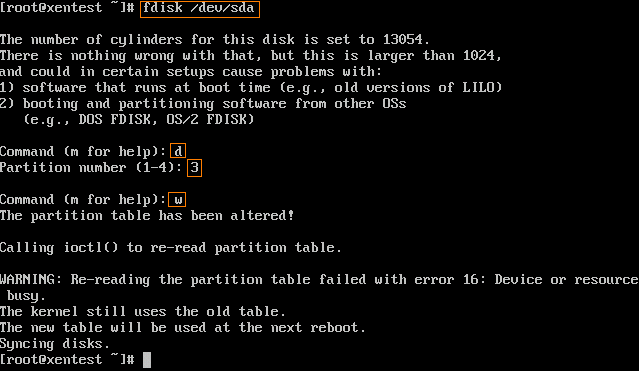
commands and values entered are highlighted.
Check that the required partition is removed with fdisk -l
9. Now, instead of the deleted partition, we will create two, using the fdisk command as well:
Section under ISO images (/ dev / sda3)

Section under Local Storage (/ dev / sda4)
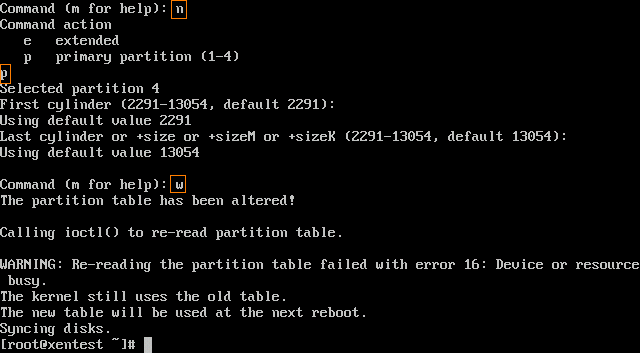
commands and values entered are highlighted.
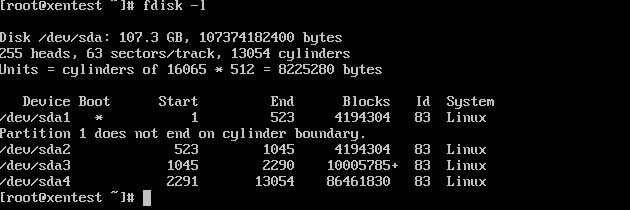
Let's see the current state of the sections:
10. In order for the changes to take effect, you must restart the server.
11. Format the partition, which was taken under the ISO repository (/ dev / sda3):
mkfs -t ext3 / dev / sda3

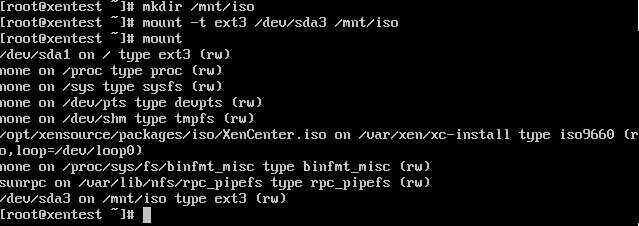
12. Create a mount point in the file system to which we will mount the newly created partition, and mount it:
mkdir / mnt / iso
mount -t ext3 / dev / sda3 / mnt / iso
for automatic mount when the server starts, we will write the mount line in the / etc / fstab file:
/ dev / sda3 / mnt / iso ext3 defaults 0 0
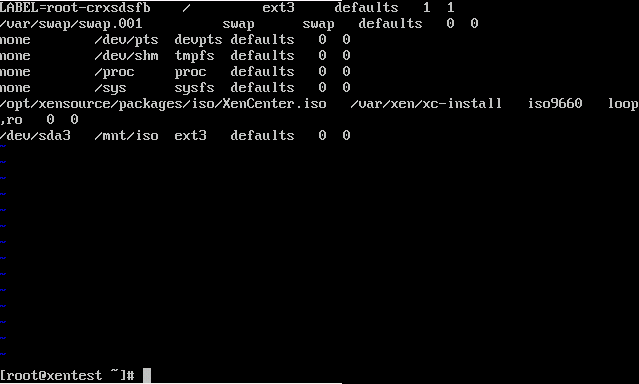
13. Now the mount point / mnt / iso needs to be made accessible over the network. To do this, add a line to the / etc / exports file:
/ mnt / iso 127.0.0.1/255.255.255.255 (rw,no_root_squash) - note that there is no space between the address and the opening bracket!

in order for the changes in the file to take effect immediately we make the command:
exportfs -r
and to check that we all wrote correctly, enter the command:
exportfs

14. We start the NFS service:
service nfs start
then turn on the service start when the server is loaded:
chlconfig nfs on

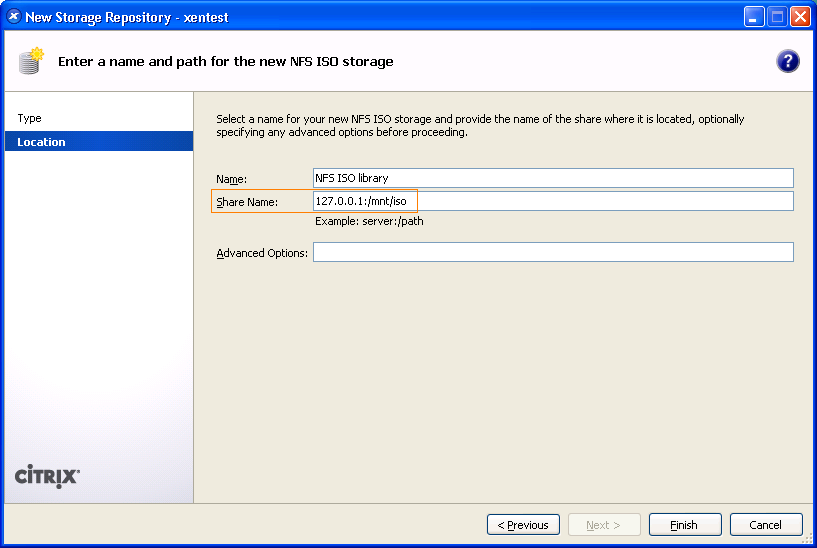
15. Now we need to connect this drive through XenCenter. In the XenCenter menu, select the New Storage item, in the appeared window select the NFS ISO item, click Next.
Next, fill in the fields in the next window: In the Share Name field we write the following: 127.0.0.1:/mnt/iso
A new repository has now appeared in the XenCenter console:
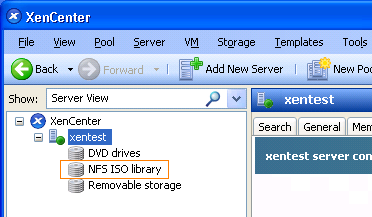
The creation of the ISO repository is over. Copy iso-images to / mnt / iso and use.
16. However, we still have to return the section for virtualki. To do this, on the remaining / dev / sda4 create an lvm and connect it to the XenServer:
xe sr-create type = lvm content-type = user device-config: device = / dev / sda4 name-label = "Local Storage"

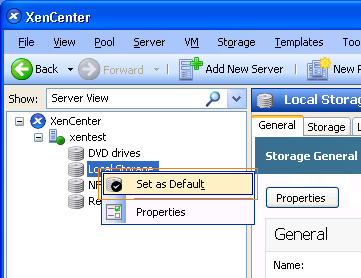
Notice that Local Storage has appeared on the left side of XenCenter. Click on it with the right mouse button and from the context menu choose Set as Default
Mission accomplished.
A few additions:
If you need to provide access to the iso-repository on the network, then for this you need:
1. Correct the / etc / exports file by adding IP addresses from which to access.
2. Correct the file / etc / sysconfig / portmap, remove the -l parameter, the line should look like this: PMAP_ARGS = ""
3. Fix the file / etc / sysconfig / iptables
So, there is a task: you need to make a repository of ISO images on the same server on which XenServer is installed.
First, go to the Citrix XenServer documentation and find an article there: docs.vmd.citrix.com/XenServer/5.0.0/1.0/en_gb/guest.html#iso_local_copies , which seems to be how very simple and quickly the task is solved. However, I do not recommend doing so. Under the operating system with a hypervisor, about 3 gigabytes is allocated on the disk, of which 1.7 gigabytes are free. Therefore, trying to copy the ISO image of Windows Server 2008 R2 with a volume of about 2.5 gigabytes, they killed XenServer completely.
')
Having climbed the Admin Guide for XenServer, we find that XenServer can connect to ISO network storages. In this regard, it is necessary to allocate space for the ISO storage on the server, make it available over the network and then connect to our XenServer. I do not pretend to the correctness of this decision, but in my case it completely suited me.
Now more in steps:
1. The screenshot shows that we have Local Storage, from which we will cut a piece to organize an ISO repository
2. It is necessary to determine the SR UUID (Storage Repositpry Universal Unique IDentificator) for the Local Storage disk, for this we enter the command:
xe sr-list type = lvm, the result of the command execution is visible in the screenshot:
from the output we need the highlighted identifier sr uuid
3. Now we define the PBD UUID (Phisical Block Device Universal Unique IDentificator) on which the Local Storage is located, for this we enter the command:
heh pbd-list sr-uuid = ... (here we indicate the number we received in the previous step)
from the information received, we will need a distinguished identifier pbd uuid
4. Unmount Local Storage, for this we enter:
xe pbd-unplug uuid = ... (the number obtained in step 3 is indicated here)
after that, in the XenCenter console, the Local Storage storage will be highlighted with an exclamation mark:
5. Now delete the Local Storage command:
xe pbd-destroy uuid = ... (specify pbd uuid, obtained in step # 3)
notice that local storage is now gray
6. Now delete the link to Local Storage:
xe sr-forget uuid = ... (specify the sr uuid obtained in step 2)
Now Local Storage disappeared altogether:
7. Next, we look at which partitions we have on the disk using the fdisl -l command.
We see that we have 3 partitions, the largest of which / dev / sda3 (Linux LVM) is the same partition on which Local Storage was located
8. Delete this section:
commands and values entered are highlighted.
Check that the required partition is removed with fdisk -l
9. Now, instead of the deleted partition, we will create two, using the fdisk command as well:
Section under ISO images (/ dev / sda3)
Section under Local Storage (/ dev / sda4)
commands and values entered are highlighted.
Let's see the current state of the sections:
10. In order for the changes to take effect, you must restart the server.
11. Format the partition, which was taken under the ISO repository (/ dev / sda3):
mkfs -t ext3 / dev / sda3
12. Create a mount point in the file system to which we will mount the newly created partition, and mount it:
mkdir / mnt / iso
mount -t ext3 / dev / sda3 / mnt / iso
for automatic mount when the server starts, we will write the mount line in the / etc / fstab file:
/ dev / sda3 / mnt / iso ext3 defaults 0 0
13. Now the mount point / mnt / iso needs to be made accessible over the network. To do this, add a line to the / etc / exports file:
/ mnt / iso 127.0.0.1/255.255.255.255 (rw,no_root_squash) - note that there is no space between the address and the opening bracket!
in order for the changes in the file to take effect immediately we make the command:
exportfs -r
and to check that we all wrote correctly, enter the command:
exportfs
14. We start the NFS service:
service nfs start
then turn on the service start when the server is loaded:
chlconfig nfs on
15. Now we need to connect this drive through XenCenter. In the XenCenter menu, select the New Storage item, in the appeared window select the NFS ISO item, click Next.
Next, fill in the fields in the next window: In the Share Name field we write the following: 127.0.0.1:/mnt/iso
A new repository has now appeared in the XenCenter console:
The creation of the ISO repository is over. Copy iso-images to / mnt / iso and use.
16. However, we still have to return the section for virtualki. To do this, on the remaining / dev / sda4 create an lvm and connect it to the XenServer:
xe sr-create type = lvm content-type = user device-config: device = / dev / sda4 name-label = "Local Storage"
Notice that Local Storage has appeared on the left side of XenCenter. Click on it with the right mouse button and from the context menu choose Set as Default
Mission accomplished.
A few additions:
If you need to provide access to the iso-repository on the network, then for this you need:
1. Correct the / etc / exports file by adding IP addresses from which to access.
2. Correct the file / etc / sysconfig / portmap, remove the -l parameter, the line should look like this: PMAP_ARGS = ""
3. Fix the file / etc / sysconfig / iptables
Source: https://habr.com/ru/post/86769/
All Articles