MVC 2: Complete Localization Guide
 In this article, we will look at all aspects of localizing an ASP.NET MVC based web application. I am using the latest available MVC 2 RC 2 version at the time of writing this topic.
Before we begin, I would like to thank the MVC team, great job guys, I enjoy the process of writing web applications when I use this framework. I was looking for a framework of this type, after some experience with Ruby on Rails.
We will consider the following issues:
- Validation of views
- Simple crop switching mechanism
- Localization of model validation messages
- Localization of the DisplayName attribute
- Cache and localization
View localization
Of course, resource files will be used for localized text, but we will not use standard asp.net folders for storage.
')
I suggest the following directory structure:

Views - resource files for aspx pages. Models - resource files for localizing view models.
The Views directory contains subfolders for each controller in which resource files are located (the number of files depends on the set of supported languages).
Models contains subdirectories for each view model group. For the generated Account models (LogOn, Register, ChangePassword), we have an Account folder and resource files for each language culture.
Resource files
A few words about the rules for naming resource files. Resource files have the following name format:
[RESOURCE-NAME]. [CULTURE] .resx
RESOURCE-NAME is the file name. It can be absolutely anyone. It is used to group when we have several resource files with the same resource-name - they constitute a single resource with different cultures specified in CULTURE.
CULTURE - indicator of the resource file culture. Cultures are of two types: neutral and accurate . Neutral cultures consist only of a language code ( en , ru , de , etc.). Exact cultures consist of a language code and a region code ( en-US , en-UK )
There is also a special meaning for resource files that have no culture defined, they are called “default” or “fall-back” cultures. As you can guess by name, they are used for resource files if the text was not found in a specific culture resource file or when there is no file for a given culture. I strongly recommend that you use the basic resource files, especially if the user has the ability to somehow install an unsupported culture.
A few examples of resource files:
MyStrings.en-US.resx - US English
MyStrings.en-UK.resx - English United Kingdom
MyStrings.en.resx - neutral English (default for English)
MyStrings.ru.resx - neutral Russian
MyStrings.resx - the base resource file.
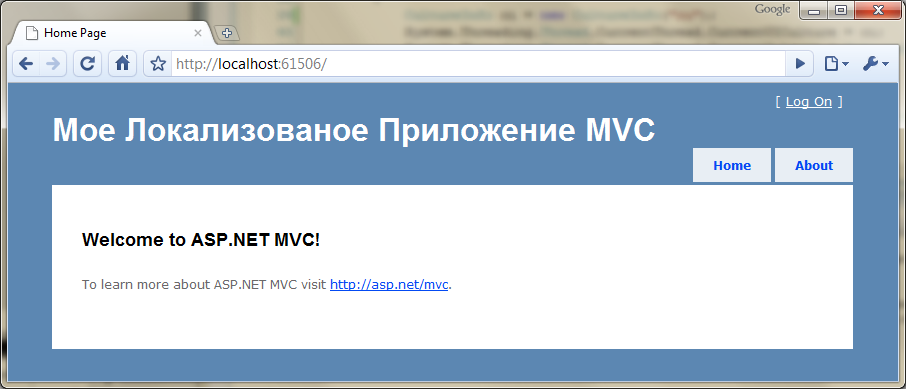
Great, now we are ready to localize something and see how it works. I will show you a small example of the localization of the header in the created web application. In the example I will use two languages: English (by default) and neutral Russian, but you can use any other languages.
First of all, create a folder structure, as I described above, we will need resource files for the parent Site.Master page. I will create a Shared directory in Resources \ Views and add two resource files:
SharedStrings.resx - the basic resource file with data in English.
SharedStrings.ru.resx - the basic resource file with data in Russian.
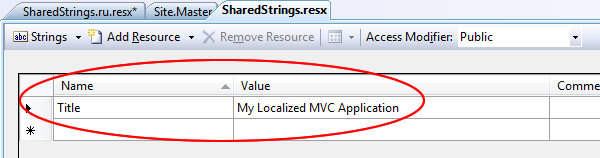
Add and fill in the “Title” property in both files.
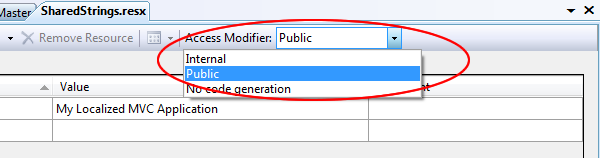
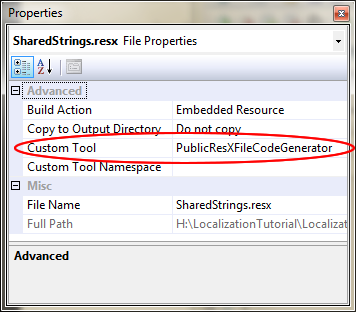
Important! Make sure that the access modifiers for each resource file are set to public . Also check that the resource files have the value of the “Custom Tool” property equal to “PublicResXFileCodeGenerator” . Otherwise, resource files will not be compiled and available.
A few words about the resource file namespace. The files created in this way will have the following namespace:
[PROJECT-NAME] .Resources.Views.Shared
To improve readability and compliance with the naming rules, I changed the properties of the Custom Tool Namespace of resource files to ViewRes (for view resource files).
It's time to make changes to the Site.Master page.
< div id ="title" >

< h1 > My MVC Application </ h1 >
</ div >< div id ="title" >
< h1 > <% =ViewRes.SharedStrings.Title %> </ h1 >
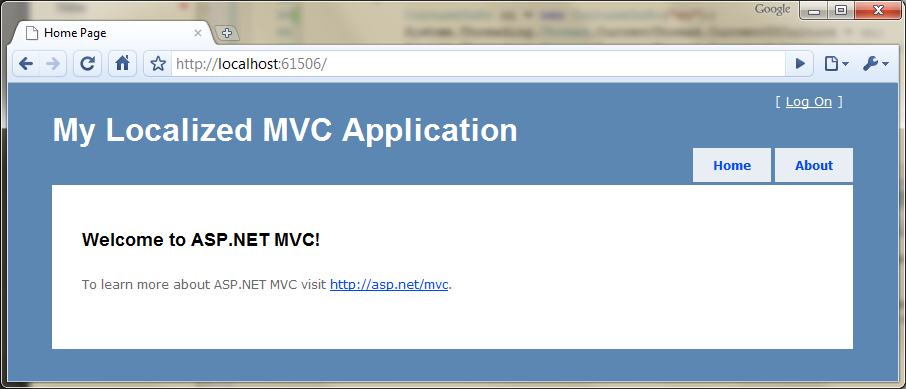
</ div >Run the application and make sure that everything works and you see the title in the right place (it should now be read from the resource file). If everything works, let's move on to showing how to change the culture.
To change the culture, we need to change the CurrentCulture and CurrentUICulture properties of the CurrentThread object for each request !!! To do this, we will place the code that changes the culture in the Application_AcquireRequestState Global.asax method (this method is an event handler and is called for each request)
Add the following code to the Global.asax.cs file:
protected void Application_AcquireRequestState( object sender, EventArgs e)
{
//Create culture info object
CultureInfo ci = new CultureInfo( "en" );

System.Threading.Thread.CurrentThread.CurrentUICulture = ci;
System.Threading.Thread.CurrentThread.CurrentCulture = CultureInfo.CreateSpecificCulture(ci.Name);
}
Run the application again and make sure that it works. Next, we change the string parameter of the CulturInfo constructor (in my case it will be “ru”) and rerun the project. You should have the following:
That's all. We localized the Site.Master title and you can do this with any text.
Simple crop switching mechanism
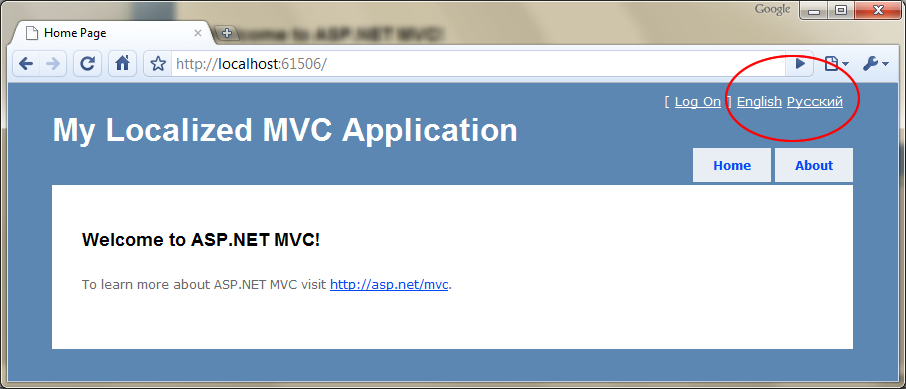
In the previous chapter, we successfully localized the application title, but there was no possibility to change the culture in real time. Now we are going to create a mechanism that will help us monitor culture settings in real time.
The repository for the user-selected culture will be the session object. And to change the culture, post links for each language on the master page. Clicking links will trigger some action in the Account controller, which changes the session value to the corresponding culture.
Add the following code to the AccountController class:
public ActionResult ChangeCulture( string lang, string returnUrl)
{
Session[ "Culture" ] = new CultureInfo(lang);
return Redirect(returnUrl);
}
We have an action method with two parameters, the first is the culture code, the second is the address for redirecting the user back to the original page. All you need is to set a new collection culture for the session, but do not forget to add a check of the received user data to prevent the installation of an unsupported culture.
Now create a simple user control that contains references to cultures. Add a new partial view (partial view) to the Views \ Shared directory, name the file CultureChooserUserControl.ascx and paste the following into it:
<% = Html.ActionLink( "English" , "ChangeCulture" , "Account" ,
new { lang = "en" , returnUrl = this .Request.RawUrl }, null ) %>
<% = Html.ActionLink( "" , "ChangeCulture" , "Account" ,
new { lang = "ru" , returnUrl = this .Request.RawUrl }, null ) %>
So, we have created two links, the first for English, and the second for Russian. It's time to put this control on the Site.Mater page. I will add it in, next to the login form.
Find and replace in the <div id = "logindisplay"> code with the following:
< div id ="logindisplay" >
<% Html.RenderPartial( "LogOnUserControl" ); %>
<% Html.RenderPartial( "CultureChooserUserControl" ); %>
</ div >
What is left to do? And the most important thing remains, we place the object of information about the culture in the session, but do not use it anywhere. Again make changes to the Global.asax.cs file Application_AcquireRequestState method:
protected void Application_AcquireRequestState( object sender, EventArgs e)
{
//
if ( HttpContext .Current.Session != null )
{
CultureInfo ci = (CultureInfo) this .Session[ "Culture" ];
// ,
//
//
if (ci == null )
{
// -
string langName = "en" ;
// HTTP
if ( HttpContext .Current.Request.UserLanguages != null && HttpContext .Current.Request.UserLanguages.Length != 0)
{
//
langName = HttpContext .Current.Request.UserLanguages[0].Substring(0, 2);
}
ci = new CultureInfo(langName);
this .Session[ "Culture" ] = ci;
}
//
Thread.CurrentThread.CurrentUICulture = ci;
Thread.CurrentThread.CurrentCulture = CultureInfo.CreateSpecificCulture(ci.Name);
}
}
Having launched the application, we will get the next page, clicking on the links will reload the page with the selected culture:
Localization of model validation messages
I found an excellent solution to this problem, published by Phil Haak, but since this article should be a complete guide, I can not touch on this issue, and there are certain ambiguities that I would like to clarify. But above all, I recommend reading the post by Phil Haak
I will explain how to localize validation messages for the Account model, especially for RegistrationModel. I also want to describe how to localize validation messages to Membership, which are registered directly in the code of the AccountController controller.
So, let's create ValidationStrings.resx and ValidationStrings.ru.resx in the Resources \ Models \ Account folder (make sure that the access modifiers are public). As you may have guessed, we will store validation messages in these files.
I created the following properties in both files (example English):

We need to change our models as follows (example RegisterModel):
[PropertiesMustMatch( "Password" , "ConfirmPassword" ,
ErrorMessageResourceName = "PasswordsMustMatch" ,
ErrorMessageResourceType = typeof (ValidationStrings))]
public class RegisterModel
{
[Required(ErrorMessageResourceName = "Required" , ErrorMessageResourceType = typeof (ValidationStrings))]
[DisplayName( "Username" )]
public string UserName { get ; set ; }
[Required(ErrorMessageResourceName = "Required" , ErrorMessageResourceType = typeof (ValidationStrings))]
[DataType(DataType.EmailAddress)]
[DisplayName( "Email" )]

public string Email { get ; set ; }
[Required(ErrorMessageResourceName = "Required" , ErrorMessageResourceType = typeof (ValidationStrings))]
[ValidatePasswordLength(ErrorMessageResourceName = "PasswordMinLength" ,ErrorMessageResourceType = typeof (ValidationStrings))]
[DataType(DataType.Password)]
[DisplayName( "Password" )]
public string Password { get ; set ; }

[Required(ErrorMessageResourceName = "Required" , ErrorMessageResourceType = typeof (ValidationStrings))]
[DataType(DataType.Password)]
[DisplayName( "Confirm password" )]
public string ConfirmPassword { get ; set ; }
}
We will add the ErrorMessageResourceName and ErrorMessageResourceType properties to the Required , PropertiesMustMatch and ValidatePasswordLength attributes, where ErrorMessageResourceType is the type of resource class in which messages are stored, and ErrorMessageResourceName is the property name. Unfortunately, there is no strictly typed version of the property reading, so make sure that these magic strings have the correct values.
We are almost at the goal, the detail remained small. We have two own validation attributes PropertiesMustMatchAttribute and ValidatePasswordLenghtAttribute , in which we have to change CultureInfo.CurrentUICulture in the FormatErrorMessage method to CultureInfo.CurrentCulture , otherwise in our case it will earn nothing.
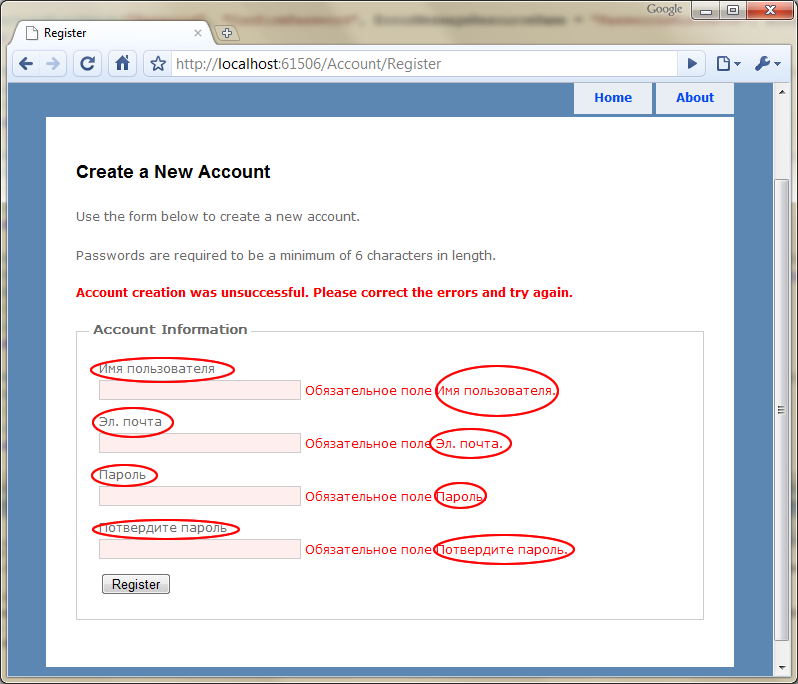
Run the application, go to the registration page, select the language for changing the culture and get approximately the following when sending an empty form:
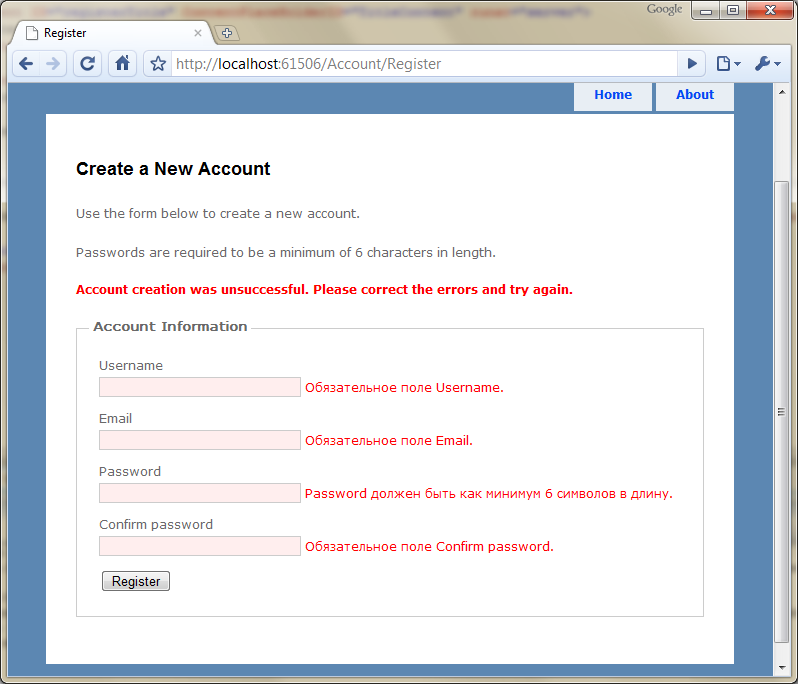
Oh, as you noticed, we forgot to localize the property names in the view models and got a little porridge. To do this, we need to localize the values of the DisplayName attribute, but this is not as simple as it seems at first glance. I will talk about this in the next chapter, and now let's finish the remaining detail. This is the localization of validation messages Membership API.
Open AccountController and navigate to the end of the file, there should be an ErrorCodeToString method that creates an error message if the user registration failed. All messages are hard coded. All we need to do is create the appropriate properties for each message in the already created ValidationStrings resource file and put them there instead of text in the ErrorCodeToString method.
That's all with the validation model. It's time for DisplayName!
Localization of the DisplayName attribute
As we noted in the previous chapter, the DisplayName value participates in validation messages that use parameters for formatting. Another reason to think about the DisplayName attribute is the text field labels in the HTML form, they were created with the participation of the DisplayName value.
The real problem is that the DisplayName does not support localization; there is no way to associate it with the resource file, from where it will take the value.
This means that we need to extend the DisplayNameAttribute and rewrite the DisplayName property so that it returns the localized name. I created an inherited class and called it LocalizedDisplayName.
public class LocalizedDisplayNameAttribute : DisplayNameAttribute
{
private PropertyInfo _nameProperty;
private Type _resourceType;

public LocalizedDisplayNameAttribute( string displayNameKey)
: base (displayNameKey)
{

}

public Type NameResourceType
{
get
{
return _resourceType;
}
set
{
_resourceType = value ;
// nameProperty, set'
_nameProperty = _resourceType.GetProperty( base .DisplayName, BindingFlags.Static | BindingFlags.Public);
}
}

public override string DisplayName
{
get
{
//,nameProperty null
if (_nameProperty == null )
{
return base .DisplayName;
}

return ( string )_nameProperty.GetValue(_nameProperty.DeclaringType, null );
}
}
}
An important detail is the understanding that we need to read the value of a property every time it is requested, so the GetValue method is called in the get'er of the DisplayName property, and not in the constructor.
To store the displayed names, I created the Names.resx and Names.ru.resx resource files in the Resources \ Models \ Account folder and created the following properties.
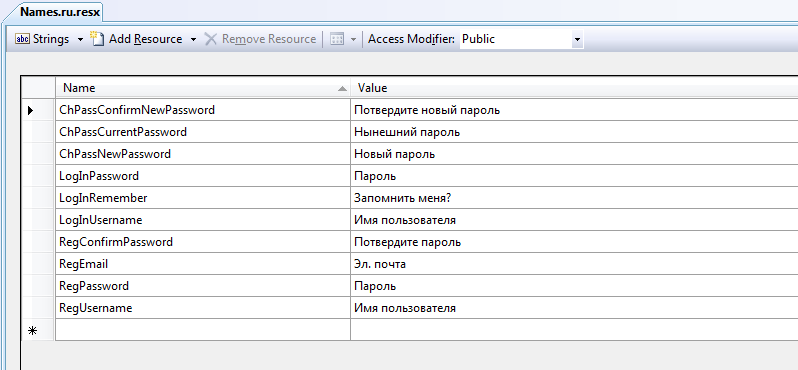
Now we need to replace the DisplayName attribute with LocalizedDisplayName and provide the class type of the resource. The modified RegisterModel code will look like this:
[PropertiesMustMatch( "Password" , "ConfirmPassword" ,
ErrorMessageResourceName = "PasswordsMustMatch" ,
ErrorMessageResourceType = typeof (ValidationStrings))]
public class RegisterModel
{
[Required(ErrorMessageResourceName = "Required" , ErrorMessageResourceType = typeof (ValidationStrings))]
[LocalizedDisplayName( "RegUsername" , NameResourceType = typeof (Names))]
public string UserName { get ; set ; }

[Required(ErrorMessageResourceName = "Required" ,ErrorMessageResourceType = typeof (ValidationStrings))]
[DataType(DataType.EmailAddress)]
[LocalizedDisplayName( "RegEmail" , NameResourceType = typeof (Names))]
public string Email { get ; set ; }

[Required(ErrorMessageResourceName = "Required" , ErrorMessageResourceType = typeof (ValidationStrings))]
[ValidatePasswordLength(ErrorMessageResourceName = "PasswordMinLength" ,
ErrorMessageResourceType = typeof (ValidationStrings))]
[DataType(DataType.Password)]
[LocalizedDisplayName( "RegPassword" , NameResourceType = typeof (Names))]
public string Password { get ; set ; }

[Required(ErrorMessageResourceName = "Required" , ErrorMessageResourceType = typeof (ValidationStrings))]
[DataType(DataType.Password)]
[LocalizedDisplayName( "RegConfirmPassword" , NameResourceType = typeof (Names))]
public string ConfirmPassword { get ; set ; }

}
* This source code was highlighted with Source Code Highlighter .
Run the application and make sure that it works, it should look like this:
Cache and localization
A strange chapter, isn't it? Are you thinking how to combine caching and localization? Well, let's imagine the following scenario: open HomeController and add the OutputCache attribute to the Index action method:
[OutputCache(Duration=3600, VaryByParam= "none" )]
public ActionResult Index()
{
ViewData[ "Message" ] = "Welcome to ASP.NET MVC!" ;

return View();
}
Launch the application and try to change the language on the Index page to check that the title is still loyal.
Damn it! You probably thought that caching and lokazilatsiya can not be used together? Do not worry, there is a solution to this problem :)
What do you know about OutputCache, or rather, what do you know about the VaryByCustom property? It's time to use it.
When we request the Index page for the first time, OutputCache caches the page. In the second query (when we click on the language selection link) OutputCache thinks that nothing has changed and returns the result from the cache, therefore the page is not re-created. That's why the choice of language did not work. To resolve this problem, we need to somehow tell OutputCache that the version of the page has changed (as in the case when the action gets a certain parameter and we pass it to the properties of VaryByParam).
VaryByCustom is an ideal candidate for our solution to the problem and there is a special method in the System.Web.HttpApplication class in the Global.asax.cs file. We will rewrite the standard implementation of this method:
public override string GetVaryByCustomString( HttpContext context, string value )
{
if ( value .Equals( "lang" ))
{
return Thread.CurrentThread.CurrentUICulture.Name;
}
return base .GetVaryByCustomString(context, value );
}
First, the method checks if the value of the parameter matches “lang” (no special value, a simple string that is used as the value of VaryByCustom) and, if so, returns the name of the current culture. Otherwise, it returns the value of the standard implementation.
Now we add the VaryByCustom property with the value “lang” to each OutputCache attribute that you want to use in localization and that's it. The updated Index action method is as follows:
[OutputCache(Duration=3600,VaryByParam= "none" , VaryByCustom= "lang" )]
public ActionResult Index()
{
ViewData[ "Message" ] = "Welcome to ASP.NET MVC!" ;
return View();
}
Try to start the application again and enjoy working the switching of crops.
We finished the last chapter and, I hope, I did not miss anything.
Source: https://habr.com/ru/post/86331/
All Articles