Bedside table do it yourself in 15 minutes
In fact, together with the purchase of components, it took a little more time than in the title, but not by much :)
There was a problem to urgently find a table for the laptop, so that you can use it in bed. On Sunday around 18-00. Time for everything about everything for about two hours. You can, of course, more, but it is very desirable to meet the deadline. We take a taxi and start to fly around the stores, the parallel call-up of potential owners did not succeed, the stores are empty :(
The head is visited by thoughts to try to collect the necessary device "from scrap materials." Unfortunately, there is nothing at hand, which means we are going to the construction hypermarket, where not so long ago, blanks for shelves made of laminated chipboard with processed edges and of various sizes were noticed. A plan like this:
- take three shelves. more - tabletop, smaller - legs
- several door hinges, because the table is preferably folding
- a couple of bars that will limit the rotation of the legs in the "unfolded state" without letting them turn out.
Shelves are found, loops too, on the spot we are trying to estimate what's what ... The future design does not inspire confidence. And then, miracle, next to the shelves are found wonderful wall mounting for these shelves! With retainer!
It is decided that we use them!
')
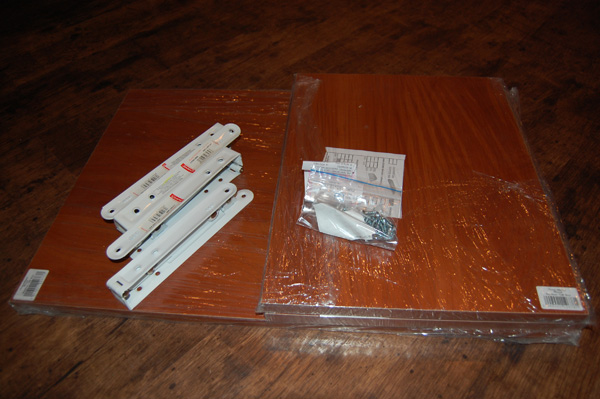
So, the kit is purchased and delivered home. Here on it that assembly also is required about 15 minutes.
Shelf 60x40, two shelves 40x31, three dozen 4x16 screws and four wonderful fixings. The total cost is ~ $ 20, of which a little more than half went to the mounts.
That same "wonderful" mount. Further I will call them "loops", it is painfully similar, and what they are called in fact I do not know: ")
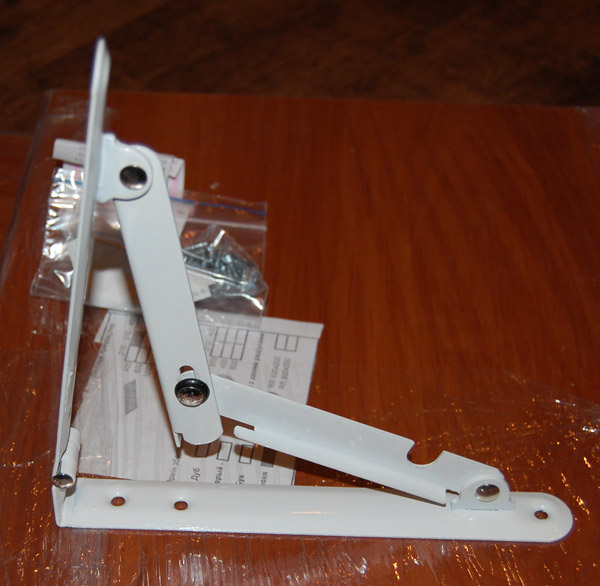
Actually a retainer that does not allow the legs to fold during operation. Now the “loop” is half-open and has not yet been fixed:

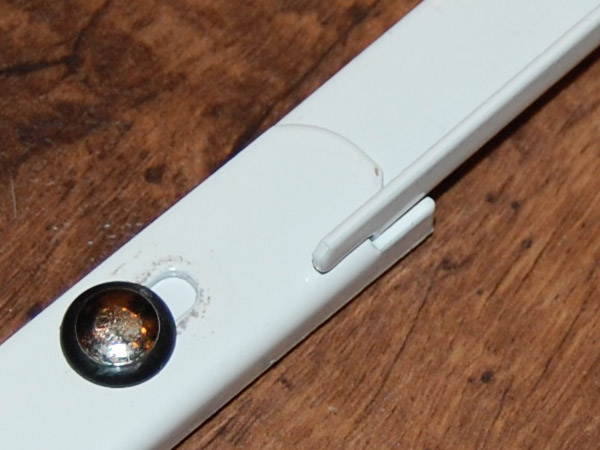
Clamp in working position:
So, proceed to the assembly. To begin with, we will put everything in a heap in order to roughly imagine what we will have in the end:
Not a hurricane, but I'm not a professional Papa Carlo: ")
The legs are 31cm tall, if we fold them they won't fit without an overlap into the available 60cm (width of the table top), then we will mount them so that when opening it turns out not under, but to the left and right of it, then the folded legs will be parallel to the plane countertops, so it should be easier to store and transport. Naturally, when folded, they will stick out to the left and to the right, but otherwise they would have to be sawed, which means to get a pair of raw edges.
Next, using a credit card as a template (and I didn’t have a ruler on hand), we set the loops on the worktop neatly and mark the attachment points with screws. In contrast to the screwdriver line, and for compatibility and a drill, I found it - we drill holes for the screws with a thin drill.
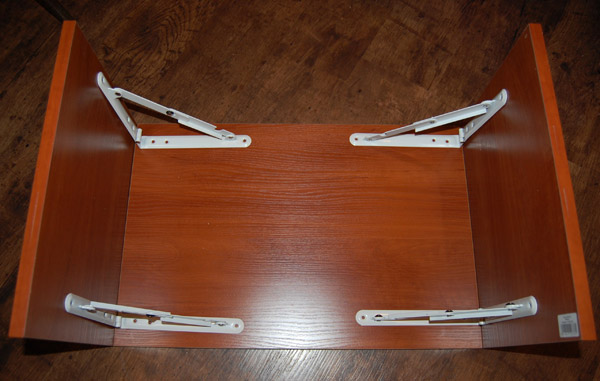
Screw the mount to the table top, attach the legs and mark the attachment points on them. We repeat the drilling and screwing procedure.
It turns out like this:

Dokruchivaem second "leg":

Turn over! The table is ready!

And it can be folded :)

There were no complaints about the fact that he didn’t fit into the hospital bed, so the mission can be considered completed successfully :)
I wish all the "creative Uzbeks" and not to be ill!
There was a problem to urgently find a table for the laptop, so that you can use it in bed. On Sunday around 18-00. Time for everything about everything for about two hours. You can, of course, more, but it is very desirable to meet the deadline. We take a taxi and start to fly around the stores, the parallel call-up of potential owners did not succeed, the stores are empty :(
The head is visited by thoughts to try to collect the necessary device "from scrap materials." Unfortunately, there is nothing at hand, which means we are going to the construction hypermarket, where not so long ago, blanks for shelves made of laminated chipboard with processed edges and of various sizes were noticed. A plan like this:
- take three shelves. more - tabletop, smaller - legs
- several door hinges, because the table is preferably folding
- a couple of bars that will limit the rotation of the legs in the "unfolded state" without letting them turn out.
Shelves are found, loops too, on the spot we are trying to estimate what's what ... The future design does not inspire confidence. And then, miracle, next to the shelves are found wonderful wall mounting for these shelves! With retainer!
It is decided that we use them!
')
So, the kit is purchased and delivered home. Here on it that assembly also is required about 15 minutes.
Shelf 60x40, two shelves 40x31, three dozen 4x16 screws and four wonderful fixings. The total cost is ~ $ 20, of which a little more than half went to the mounts.
That same "wonderful" mount. Further I will call them "loops", it is painfully similar, and what they are called in fact I do not know: ")
Actually a retainer that does not allow the legs to fold during operation. Now the “loop” is half-open and has not yet been fixed:
Clamp in working position:
So, proceed to the assembly. To begin with, we will put everything in a heap in order to roughly imagine what we will have in the end:
Not a hurricane, but I'm not a professional Papa Carlo: ")
The legs are 31cm tall, if we fold them they won't fit without an overlap into the available 60cm (width of the table top), then we will mount them so that when opening it turns out not under, but to the left and right of it, then the folded legs will be parallel to the plane countertops, so it should be easier to store and transport. Naturally, when folded, they will stick out to the left and to the right, but otherwise they would have to be sawed, which means to get a pair of raw edges.
Next, using a credit card as a template (and I didn’t have a ruler on hand), we set the loops on the worktop neatly and mark the attachment points with screws. In contrast to the screwdriver line, and for compatibility and a drill, I found it - we drill holes for the screws with a thin drill.
Screw the mount to the table top, attach the legs and mark the attachment points on them. We repeat the drilling and screwing procedure.
It turns out like this:
Dokruchivaem second "leg":
Turn over! The table is ready!
And it can be folded :)
There were no complaints about the fact that he didn’t fit into the hospital bed, so the mission can be considered completed successfully :)
I wish all the "creative Uzbeks" and not to be ill!
Source: https://habr.com/ru/post/85891/
All Articles