Resurrection D-Link DWL-2100AP
I work in a small Internet service provider in the region, including in the private sector. Wi-Fi with directional antennas and access points on both sides (in WDS and “client” modes) was chosen as the last mile technology. Energy supply in the private sector leaves much to be desired - the tension jumps and quite often disappears completely. Of course, such conditions affect the equipment extremely negatively - the points often fail, and many of them fall out in a cyclic reboot due to failures in the firmware. There are a couple of dozens of such points. The bosses decided that repairing the points would eventually cost more than buying new ones. But it's a pity when so much equipment is dead weight, but it can still serve the motherland.

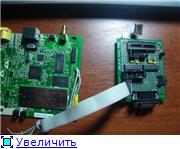
Having developed a point, I found two groups of contact pads on the board. One of them looked like a JTAG connector, the other was not signed, but I assumed that it could be an RS-232 interface. The Internet has confirmed my assumption, besides there was a pinout of conclusions.
')


To connect these pins to the computer, we need a level converter - a MAX232 chip (or any similar, with the index 232). Happy owners of laptops without COM ports can purchase and send out a data cable for old Siemens phones (models from c62 and earlier). Such a cable can be soldered directly to the connector on the access point board without assembling converters. I will not consider this option, since I don’t have a cable, but by going as far as you can find the necessary information yourself.
The converter will also require five capacitors - four capacitors with a capacity of 10 μF and one with a capacity of 1 μF. Here is its diagram (by the way, the typical scheme for using MAX232):

My converter looks much more complicated than it should, since I collected it much earlier and for other purposes. On the breadboard, there are two MAX232 microcircuits and some more “redundant” elements. Also, for convenience, when connecting, I placed the DB-9 "mother" connector on the board:


We solder the wires TX, RX and ground from the converter directly to the access point board.
Open any terminal program (I use PuTTY, but HyperTerminal will do) and set up a serial port connection (COM1 or COM2) with parameters: speed 9600 bps, 8 data bits, 1 stop bit, parity disabled, flow control - disabled. We connect a point and a converter to the configured port. By energizing the converter and the point, you should see that the point loading process is displayed in the terminal program window - memory testing, search and firmware download. If this does not happen - check the converter, also try swapping the wires soldered to TX and RX.

To restore the firmware, we need a TFTP server (tftpd), an FTP server (Small HTTP Server or FileZilla) and a set of working firmware files (apimg1, art, backup, apcfg, apcfg.bak) .
By default, the address of the access point in recovery mode is 192.168.1.20. Configure the ip-address of the computer as 192.168.1.1 with the mask 255.255.255.0 and connect it to the access point. Restart the point with the “Reset” button. Immediately after the lines appeared in the terminal stating that the loader is testing the memory, repeatedly press the ESC key until the loader gives us the following invitation:
Now we can see and change the settings of the bootloader and the access point itself. The full list of commands is displayed if you enter the "?" and press enter. Change settings is made with the command "c". Output current - the command "p". From the help we learn that the bootloader can run the firmware from local memory (tffs) and through TFTP. This is what we need. Enter the “c” command and in turn define the bootloader settings:

We configure TFTPd so that its root directory points directly to the folder with the unzipped firmware files. Enter the command "@" and press Enter. If everything is configured correctly, the bootloader will download and download the art file. After that, we will see the VxWorks operating system shell.
Press Enter to open the invitation. Now we will configure the FTP server. It should also point to the firmware files. In addition, in the settings of the ftp-server, you need to add a user, under which we will upload files, for example - guest with a password of 12345.
To begin, initialize the flash-memory (i.e., re-create the access point file system, while removing the firmware and configuration).
In the terminal, enter the following command:
In case of success, the terminal will issue a result code 0x0. We continue:
Now check if the FTP server is working. Enter the ls command. If the team issued a list of firmware files lying on the ftp server, copy them to the flash-memory of the point:
After each command, the system should return the code 0x0 and the size of the recorded file. Reboot the access point and call the boot loader prompt, as we did at the beginning. Here are the bootloader settings in the initial state:
The next operation is not necessary, but my point refused to load until I did it. Turning off the power point, hold down the Reset button, turn on the power and wait until the point shows in the terminal that the factory settings were reset: "resetting to factory config". Release the reset.
That's all. After a reboot, the point will start in normal mode and after downloading it will be accessible from the outside by the factory IP address: 192.168.0.50.
If the bootloader displays “boardData checksum error”, you should do the following operation before downloading VxWorks. At the bootloader's invitation, enter the “B” command (input of the “board” settings) and go over all items with the Enter key, without entering anything else. This should be done with great care. If you suspect that an error has occurred - do it again without rebooting.
Autopsy
Having developed a point, I found two groups of contact pads on the board. One of them looked like a JTAG connector, the other was not signed, but I assumed that it could be an RS-232 interface. The Internet has confirmed my assumption, besides there was a pinout of conclusions.
')

To connect these pins to the computer, we need a level converter - a MAX232 chip (or any similar, with the index 232). Happy owners of laptops without COM ports can purchase and send out a data cable for old Siemens phones (models from c62 and earlier). Such a cable can be soldered directly to the connector on the access point board without assembling converters. I will not consider this option, since I don’t have a cable, but by going as far as you can find the necessary information yourself.
The converter will also require five capacitors - four capacitors with a capacity of 10 μF and one with a capacity of 1 μF. Here is its diagram (by the way, the typical scheme for using MAX232):
My converter looks much more complicated than it should, since I collected it much earlier and for other purposes. On the breadboard, there are two MAX232 microcircuits and some more “redundant” elements. Also, for convenience, when connecting, I placed the DB-9 "mother" connector on the board:
We solder the wires TX, RX and ground from the converter directly to the access point board.
Loading
Open any terminal program (I use PuTTY, but HyperTerminal will do) and set up a serial port connection (COM1 or COM2) with parameters: speed 9600 bps, 8 data bits, 1 stop bit, parity disabled, flow control - disabled. We connect a point and a converter to the configured port. By energizing the converter and the point, you should see that the point loading process is displayed in the terminal program window - memory testing, search and firmware download. If this does not happen - check the converter, also try swapping the wires soldered to TX and RX.
To restore the firmware, we need a TFTP server (tftpd), an FTP server (Small HTTP Server or FileZilla) and a set of working firmware files (apimg1, art, backup, apcfg, apcfg.bak) .
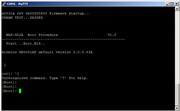
By default, the address of the access point in recovery mode is 192.168.1.20. Configure the ip-address of the computer as 192.168.1.1 with the mask 255.255.255.0 and connect it to the access point. Restart the point with the “Reset” button. Immediately after the lines appeared in the terminal stating that the loader is testing the memory, repeatedly press the ESC key until the loader gives us the following invitation:
[Boot]:Now we can see and change the settings of the bootloader and the access point itself. The full list of commands is displayed if you enter the "?" and press enter. Change settings is made with the command "c". Output current - the command "p". From the help we learn that the bootloader can run the firmware from local memory (tffs) and through TFTP. This is what we need. Enter the “c” command and in turn define the bootloader settings:
boot device : ae1
processor number: 0
host name :
file name : art
inet on ethernet (e) : 192.168.1.20:0xffffff00
inet on backplane (b) :
host inet (h) : 192.168.1.1 (ip TFTP-)
gateway inet (g) :
user (u) :
ftp password (pw) :
flags (f) : 0x80
target name (tn) :
startup script (s) :
other (o): ae
We configure TFTPd so that its root directory points directly to the folder with the unzipped firmware files. Enter the command "@" and press Enter. If everything is configured correctly, the bootloader will download and download the art file. After that, we will see the VxWorks operating system shell.
Firmware
Press Enter to open the invitation. Now we will configure the FTP server. It should also point to the firmware files. In addition, in the settings of the ftp-server, you need to add a user, under which we will upload files, for example - guest with a password of 12345.
To begin, initialize the flash-memory (i.e., re-create the access point file system, while removing the firmware and configuration).
In the terminal, enter the following command:
diskInit "/fl"In case of success, the terminal will issue a result code 0x0. We continue:
hostAdd "pc", "192.168.1.1"
netDevCreate "pc:", "pc", 1
cd "pc:"
iam "guest", "12345"
Now check if the FTP server is working. Enter the ls command. If the team issued a list of firmware files lying on the ftp server, copy them to the flash-memory of the point:
copy "pc:/apimg1", "/fl/apimg1"
copy "pc:/apcfg", "/fl/apcfg"
copy "pc:/apcfg.bak", "/fl/apcfg.bak"
copy "pc:/art", "/fl/art"
copy "pc:/backup", "/fl/backup"
After each command, the system should return the code 0x0 and the size of the recorded file. Reboot the access point and call the boot loader prompt, as we did at the beginning. Here are the bootloader settings in the initial state:
boot device : tffs0
processor number: 0
host name :
file name : /fl/apimg1
inet on ethernet (e) : 192.168.1.20:0xffffff00
inet on backplane (b) :
host inet (h) : .
gateway inet (g) :
user (u) :
ftp password (pw) :
flags (f) : 0x0
target name (tn) :
startup script (s) :
other (o): ae
The next operation is not necessary, but my point refused to load until I did it. Turning off the power point, hold down the Reset button, turn on the power and wait until the point shows in the terminal that the factory settings were reset: "resetting to factory config". Release the reset.
That's all. After a reboot, the point will start in normal mode and after downloading it will be accessible from the outside by the factory IP address: 192.168.0.50.
Notes
If the bootloader displays “boardData checksum error”, you should do the following operation before downloading VxWorks. At the bootloader's invitation, enter the “B” command (input of the “board” settings) and go over all items with the Enter key, without entering anything else. This should be done with great care. If you suspect that an error has occurred - do it again without rebooting.
Source: https://habr.com/ru/post/85134/
All Articles