iPhone development: Integrating In-App Purchases
In-App Purchases is a simple and convenient mechanism for organizing sales of your applications or additional features directly from your application. In-App Purchases are easy to integrate and open a new sales channel for you. Interaction with the App Store is carried out using StoreKit.framework, which comes with the SDK, starting with version 3.0.
In-App Purchases are of three types:
Consumable - consumed type. Purchase of this type can be bought several times. For example, in an Eliminate game, a player buys energy, which is wasted over time and you have to buy it again, or wait three hours until energy is restored.
Non-Consumable - non-consumable type. Purchase is bought only once. It is usually used to unlock new themes, additional levels, etc.
')
Subscription is a subscription to something. For example, you can write an iPhone application for a Web service, in which there is a Premium account that opens up additional features. With Subscription, you can activate your account, say, for a month or a year.
In-App Purchases can be implemented using two models:
The built-in model allows you to unlock features. Typically, the use of this model encourages developers to embed them in the application in advance. With this implementation, StoreKit is only responsible for paying for features. In general, with the help of StoreKit we can find out whether the purchase has passed or not.
The server model is more flexible. Three entities take part in the model: an iPhone application, an Apple server and our server. All new features are stored on our server, so there is no need to update the application when adding new features or products. The model works as follows:
In this post, the built-in model is considered.
I will demonstrate the work of the built-in In-App Purchases model using the AppPurchasesExample test example. This is a small iPhone application with 3 windows. The first (it’s the main) window will be available to the user by default. This window will contain information about the other two windows, which can only be unlocked for money.
Go to the iPhone Developer Program Portal and open the App IDs tab:
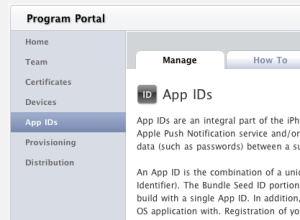
In the upper right corner of the screen, click New App ID. Then we enter information about the application. For my example, I filled out a form like this:

To create a Bundle Identifier, Apple recommends using the Reverse DNS notation, which guarantees the uniqueness of your Identifier and will save you from further problems when publishing an application. It is very important not to use the '*' symbol in the Bundle Identifier. If you enter 'com.wordpress.indiedevelop. *', Then In-App Purchases will not work.
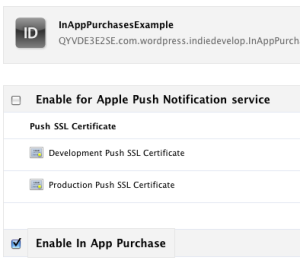
Next you need to enable In App Purchases for the App ID. In the App IDs list, opposite the desired Bundle Identifier in the Action column, click Configure. The Configure App ID form will appear, on which you must enable the checkbox 'Enable In App Purchase'.
If the profile was installed correctly, then Organizer will open in xCode and you will see something like the following:

In order to test our in-app purchase app, you need to create it in iTunes Connect. To do this:
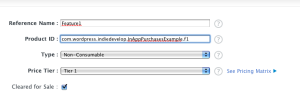
For the test application, I created two In-App products with Product Id 'com.wordpress.indiedevelop.InAppPurchasesExample.f1' and 'com.wordpress.indiedevelop.InAppPurchasesExample.f2'. Both features with type Non-Consumables.
To test In-App Purchases, you must create at least one test user. This is done simply:
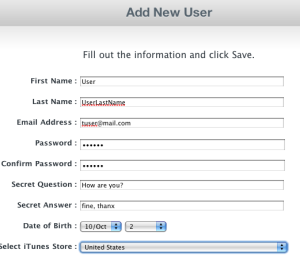
User email does not have to be real. For my example, I created one test user:
An important point. If you have not completed a contract with Apple, then in-app purchase will not work for you. In order to complete the contract, you must specify Contact Info, Bank Info and Tax Info.
For my test case, I created a project framework and User Interface:
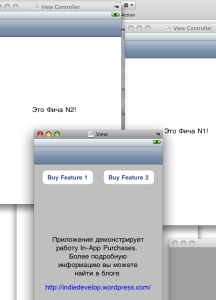
To work with the App Store, I recommend using MKStoreKit , developed in 2009 by developer Kumar (Mugunth Kumar). This set of classes will greatly facilitate the work with StoreKit. In addition to MKStoreKit, StoreKit.framework must be added to the project.
In my example, I use the slightly modernized first MKStoreKit. For convenience, I added the following delegate to the MKStoreManager class:
A message is sent to the delegate by productAPurchased when feature 1 is purchased, productBPurchased — when feature 2 is purchased, and failed — when the user either canceled the purchase or the purchase failed.
Class- Singleton MKStoreManager is primary in MKStoreKit. This is what his announcement looks like:
Consider using the class in my test case.
First, in the MKStoreManager.m file, I registered the Product ID of my features:
You also need to check whether the program features were purchased. The main example class is inherited from UIViewController, so it is advisable to embed the verification code in the viewDidLoad method:
Inside MKStoreKit, information about whether the product is purchased is saved through NSUserDefaults, so when the application is deleted, the information is reset. However, the user will not buy features twice, because StoreKit will open access to the feature for free.
Next you need to implement the 'Buy' methods. They are tied to the TouchUpInside event of the appropriate buttons:
Next, I implemented the delegate MKStoreKitDelegate methods:
New features are implemented as separate UIViews under the control of a UIViewController. I implemented the transition to new features with the help of UINavigationController:
Also, when manipulating the store, you can add a check for its availability. This is done like this:
As you can see everything is quite simple. It remains to be copied and tested :)
To test In-App Purchases you need to compile, install and run the application. When testing, remember the following:
As a result, I got an application that can unlock two additional windows. This application can be used as an example to create your in-app purchase projects.
Source code: InAppPurchasesExample.zip
Screenshots:

I really hope that this post has helped you. If you have Questions, please ask. I will answer them with pleasure.
- Jacob
general information
In-App Purchases are of three types:
- Consumables
- Non-consumeries
- Subscriptions
Consumable - consumed type. Purchase of this type can be bought several times. For example, in an Eliminate game, a player buys energy, which is wasted over time and you have to buy it again, or wait three hours until energy is restored.
Non-Consumable - non-consumable type. Purchase is bought only once. It is usually used to unlock new themes, additional levels, etc.
')
Subscription is a subscription to something. For example, you can write an iPhone application for a Web service, in which there is a Premium account that opens up additional features. With Subscription, you can activate your account, say, for a month or a year.
In-App Purchases can be implemented using two models:
- Built-in model
- Server model
The built-in model allows you to unlock features. Typically, the use of this model encourages developers to embed them in the application in advance. With this implementation, StoreKit is only responsible for paying for features. In general, with the help of StoreKit we can find out whether the purchase has passed or not.
The server model is more flexible. Three entities take part in the model: an iPhone application, an Apple server and our server. All new features are stored on our server, so there is no need to update the application when adding new features or products. The model works as follows:
- The iPhone application requests a list of products from its server.
- The iPhone application displays new products to the user,
- User buys (or does not buy :))
- The iPhone application requests a purchase from the Apple server through StoreKit,
- StoreKit returns the answer.
- iPhone application sends the answer to your server
- The answer is checked again (it is sure to check that the answer came from Apple),
- After that, the iPhone application downloads a new product from its server.
In this post, the built-in model is considered.
Implementation
I will demonstrate the work of the built-in In-App Purchases model using the AppPurchasesExample test example. This is a small iPhone application with 3 windows. The first (it’s the main) window will be available to the user by default. This window will contain information about the other two windows, which can only be unlocked for money.
Step 1. Create App ID
Go to the iPhone Developer Program Portal and open the App IDs tab:

In the upper right corner of the screen, click New App ID. Then we enter information about the application. For my example, I filled out a form like this:

To create a Bundle Identifier, Apple recommends using the Reverse DNS notation, which guarantees the uniqueness of your Identifier and will save you from further problems when publishing an application. It is very important not to use the '*' symbol in the Bundle Identifier. If you enter 'com.wordpress.indiedevelop. *', Then In-App Purchases will not work.
Next you need to enable In App Purchases for the App ID. In the App IDs list, opposite the desired Bundle Identifier in the Action column, click Configure. The Configure App ID form will appear, on which you must enable the checkbox 'Enable In App Purchase'.

Step 2. Creating a Development Profile
- In the left column, click on 'Provisioning' and go to the 'Development' tab.
- Click 'New Profile' and fill in all the necessary information. The Profile Name field can be any (I recorded 'InAppPurchasesExample Dev').
- In the list that appears, the profile created has a pending status. You need to refresh the page, or go to another tab and back, then the profile will be available for download.
- Profile can be downloaded and installed in xCode. To install, simply click on the profile by double-clicking, or drag the profile to the xCode icon.
If the profile was installed correctly, then Organizer will open in xCode and you will see something like the following:

Step 3. Create an application in iTunes Connect
In order to test our in-app purchase app, you need to create it in iTunes Connect. To do this:
- You need to go to iTunes Connect and click on 'Manage Your Applications-> Add New Application'.
- To the question "Does your product contain encryption?" answer in the negative.
- Fill out the form where you need to specify the application name, description, version number, category, etc. Everything is quite trivial. Difficulties can cause unless the field 'SKU Number'. This field must be unique, I entered 'IAPEX' in it (short for In-App Purchases Example).
- On the form 'Upload' you must set the flag 'Upload application binary later'. All other parameters and forms for the test example have no meaning.
Step 4. Create In-App Purchases in iTunes Connect
- In iTunes Connect, click on 'Manage Your In App Purchases-> Create New' and select the desired application.
- Choose a Bundle ID and fill in the Purchase information (type, name, price, etc.). You also need to enter a 'Product ID', which can be arbitrary, but I advise you to use Reverse DNS. It is best to form the Product ID from the Bund ID of your application and the name of the feature. For my example, it looks like this:

For the test application, I created two In-App products with Product Id 'com.wordpress.indiedevelop.InAppPurchasesExample.f1' and 'com.wordpress.indiedevelop.InAppPurchasesExample.f2'. Both features with type Non-Consumables.
Step 5. Creating a test user
To test In-App Purchases, you must create at least one test user. This is done simply:
- In iTunes Connect, you must go to the 'Manage Users-> In App Purchase Test User'
- Click 'Add New User'
- Enter user information
User email does not have to be real. For my example, I created one test user:

An important point. If you have not completed a contract with Apple, then in-app purchase will not work for you. In order to complete the contract, you must specify Contact Info, Bank Info and Tax Info.
Step 6. Programming
For my test case, I created a project framework and User Interface:

To work with the App Store, I recommend using MKStoreKit , developed in 2009 by developer Kumar (Mugunth Kumar). This set of classes will greatly facilitate the work with StoreKit. In addition to MKStoreKit, StoreKit.framework must be added to the project.
In my example, I use the slightly modernized first MKStoreKit. For convenience, I added the following delegate to the MKStoreManager class:
@protocol MKStoreKitDelegate @optional
- ( void )productAPurchased;
- ( void )productBPurchased;
- ( void )failed;
@end

* This source code was highlighted with Source Code Highlighter .
A message is sent to the delegate by productAPurchased when feature 1 is purchased, productBPurchased — when feature 2 is purchased, and failed — when the user either canceled the purchase or the purchase failed.
Class- Singleton MKStoreManager is primary in MKStoreKit. This is what his announcement looks like:
@ interface MKStoreManager : NSObject<SKProductsRequestDelegate> {
...
}

//
@property (nonatomic, retain) id<MKStoreKitDelegate> delegate ;
// ,
@property (nonatomic, retain) NSMutableArray *purchasableObjects;

// Singleton
+ (MKStoreManager*)sharedManager;

//
- ( void ) buyFeatureA;
- ( void ) buyFeatureB;

//
+ (BOOL) featureAPurchased;
+ (BOOL) featureBPurchased;
...
@end

* This source code was highlighted with Source Code Highlighter .
Consider using the class in my test case.
First, in the MKStoreManager.m file, I registered the Product ID of my features:
static NSString *featureAId = @"com.wordpress.indiedevelop.InAppPurchasesExample.f1" ;
static NSString *featureBId = @"com.wordpress.indiedevelop.InAppPurchasesExample.f2" ;

* This source code was highlighted with Source Code Highlighter .
You also need to check whether the program features were purchased. The main example class is inherited from UIViewController, so it is advisable to embed the verification code in the viewDidLoad method:
- ( void )viewDidLoad {
[super viewDidLoad];

[MKStoreManager sharedManager]. delegate = self; // MKStoreManager

if ([MKStoreManager featureAPurchased]) // 1
{
feature1Button.hidden = YES; // ' 1'
seeFeature1Button.hidden = NO; // ' 1'
}

if ([MKStoreManager featureBPurchased]) // 2
{
feature2Button.hidden = YES; // ' 2'
seeFeature2Button.hidden = NO; // ' 2'
}
}

* This source code was highlighted with Source Code Highlighter .
Inside MKStoreKit, information about whether the product is purchased is saved through NSUserDefaults, so when the application is deleted, the information is reset. However, the user will not buy features twice, because StoreKit will open access to the feature for free.
Next you need to implement the 'Buy' methods. They are tied to the TouchUpInside event of the appropriate buttons:
-(IBAction)feature1ButtonPressed
{
[self showLockView]; // ,
[[MKStoreManager sharedManager] buyFeatureA]; // ' 1'
}

-(IBAction)feature2ButtonPressed
{
[self showLockView]; // ,
[[MKStoreManager sharedManager] buyFeatureB]; // ' 2'
}

* This source code was highlighted with Source Code Highlighter .
Next, I implemented the delegate MKStoreKitDelegate methods:
// 1
- ( void )productAPurchased
{
[self hideLockView]; //
feature1Button.hidden = YES; // ''
seeFeature1Button.hidden = NO; // ''
}

// 2
- ( void )productBPurchased
{
[self hideLockView]; //
feature2Button.hidden = YES; // ''
seeFeature2Button.hidden = NO; // ''
}

// ,
- ( void )failed
{
[self hideLockView]; //
}

* This source code was highlighted with Source Code Highlighter .
New features are implemented as separate UIViews under the control of a UIViewController. I implemented the transition to new features with the help of UINavigationController:
// 1
-(IBAction)seeFeature1
{
[self.navigationController pushViewController:feature1ViewController animated:YES];
}

// 2
-(IBAction)seeFeature2
{
[self.navigationController pushViewController:feature2ViewController animated:YES];
}

* This source code was highlighted with Source Code Highlighter .
Also, when manipulating the store, you can add a check for its availability. This is done like this:
if ([SKPaymentQueue canMakePayments])
{
... //
}
else
{
... // , Purchases
}

* This source code was highlighted with Source Code Highlighter .
As you can see everything is quite simple. It remains to be copied and tested :)
Step 7. Testing
To test In-App Purchases you need to compile, install and run the application. When testing, remember the following:
- Testing Purchases can only be on the device.
- Before testing, you need to exit iTunes on your iPhone. This is done via 'Settings-> Store-> Sign Out'.
- When testing, messages with an offer to buy a feature will appear [Environment: sandbox] - this is a sign of the test mode.
- Test can only test accounts (see Step 5)
InAppPurchasesExample Test Case
As a result, I got an application that can unlock two additional windows. This application can be used as an example to create your in-app purchase projects.
Source code: InAppPurchasesExample.zip
Screenshots:

I really hope that this post has helped you. If you have Questions, please ask. I will answer them with pleasure.
- Jacob
Source: https://habr.com/ru/post/84359/
All Articles