Preparing a PC for the summer heating period (part 2)
Part 1

In the first part of this material, we talked about the fact that most computers assembled and sold in winter in the summer heat may become unstable due to overheating due to assembly errors, poor ventilated system unit location and the need for preventive maintenance (in other words, replace the thermal grease dust wipe). Earlier, we talked about how you can identify a potential problem, fix the assembler's flaws and improve the case ventilation and CPU cooling. However, the video card is a private house in matters of overheating and noise pollution, and in this part we will talk about it. This topic is doubly relevant, since with the release of NVIDIA GeForce GTX 480, just under the summer, the GeForce GTX 295 (most likely, double-decker, as enthusiasts and avid gamers bought them) will fall on the secondary market, and on these cards, as far as I know It is known, unlike GeForce 9800GX2, the alternative air cooling was not released.
So, if additional blowing of a 120 mm video card with a fan in the side wall of the case doesn’t help enough, and the turbine screams as cut, then there is only one way out - alternative cooling systems specially designed for video cards, such as Thermaltake ISGC-V320 . Its two effective fans work not quieter than the default cooling system. Pay for this pleasure will have ~ 2500-3000 rubles.
')
Thermaltake ISGC-V320
However, there is one small “but” - the installation of a cooling system from a third-party manufacturer is associated with a certain number of pitfalls, and if you are not confident in your abilities, then it is better to turn to someone more experienced.
Such a curious incident happened to my good friend, well-known in narrow circles of Boomburum 'th :) He had to suffer a lot with Arctic Cooling Accelero XTREME GTX280, which he planned to use on NVIDIA GeForce GTX285 in a freshly assembled computer, so as not to injure his wife's sleep at night and baby. In principle, there were no contraindications for this: the architecturally old GT200 chip made according to the 65 nm technical process is no different from the GT200 stepping B3 made according to 55 nm standards - both contain 240 stream processors, 80 texture units and 32 rasterization blocks, while the new chip consumes 183 watts versus 236 watts of the old one. The size of the heat-spreading lid of both chips is the same, and although the base of the Accelero XTREME GTX280 cooler is smaller than the chip's lid, this should not have a significant impact on heat dissipation. However, there is a frame around the chip on the GTX285, but there is no frame on the GTX280, and the layout on the boards is different. Most likely, this led to the bending of the board and the misalignment of the cooler and caused poor contact of the radiator sole with the chip cover. As a result, the chip warms up to 100 degrees in the load, which, of course, is not normal. In addition, Boomburum suffered from the fastening of small radiators for memory, which were included in the set - the thermoplastic from time to time, apparently, had time to dry up, and the additional bought Thermaltake BGA Memory Heatsink radiators also held on to an honest word. For its video card - just right Arctic Cooling Accelero XTREME GTX Pro, but at the moment it is still not available anywhere else. We are waiting for the end of a fascinating story :).
As I mentioned above, dual-deck flagship NVIDIA air alternative is not available. If on the GeForce NVIDIA 9800GX2, third-party cooling masters still managed to release a monstrous air system, then for GeForce GTX295 there is only one way out - installing a water block. And, in my opinion, this is the right decision, especially when you consider that with the release of NVIDIA Fermi, the GTX295 waterblocks will be sold at half price (you won’t adapt it anymore), and then there is a chance to take a ready-made kit with a waterblock. The water cooling system will provide complete silence, low temperatures and noticeable acceleration.

Installation of alternative air cooling on NVIDIA GeForce 9800GX2
Installing a waterblock on a video card is also very difficult. For example, many video cards were killed unknowingly by hapless users who did not know that it was necessary to lay thermal pads between the fulcaper (water block, closing the chip, memory, and power elements) and memory, rather than trying to force them to meet, forcing the screws to a crunch PCB and inoperability boards. We don’t call for waterblocks to install the waterblockers, but purely for interest, below it’s shown and shown how to install the waterblock on the double-deck GeForce GTX295. Alexander Cherkasov aka Killerchik helps me in this.
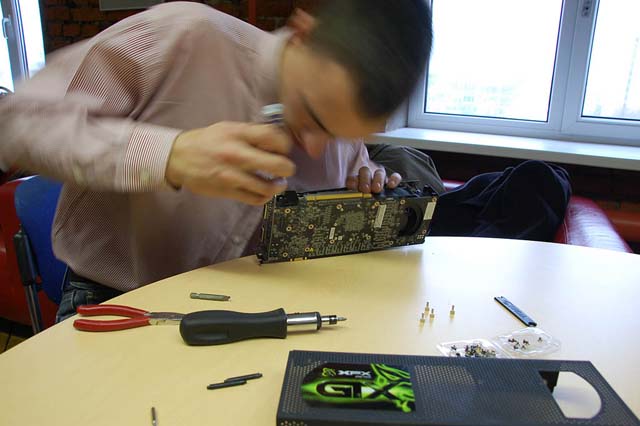
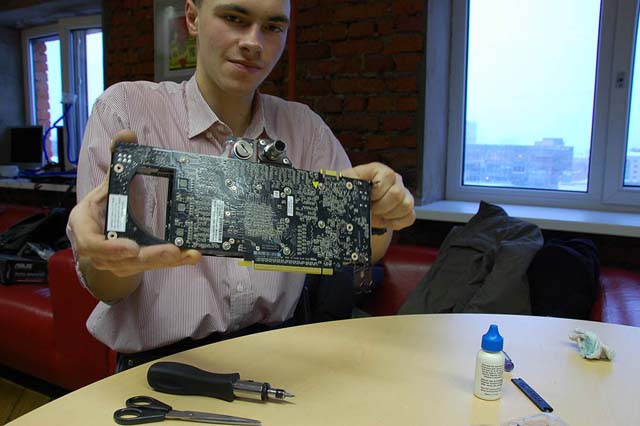
The heroine of this part of the article is the GeForse GTX 295 video card from the XFX company. It emits heat, about as a bright big chandelier. And since overclockers from the OCClub team are driving cards to the maximum. And then the last stage of the “Cup of Nations” arrived in time for its 3D Mark 2001SE stage, we decided to install a Koolance water block on this video card.

XFX GeForce GTX 295 - this is it, Crysis's best friend!
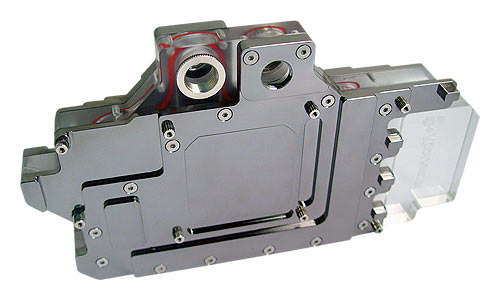
Waterblock Koolance for GeForce GTX 295
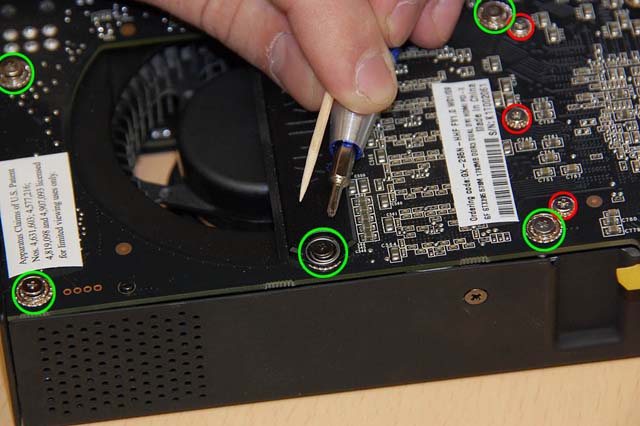
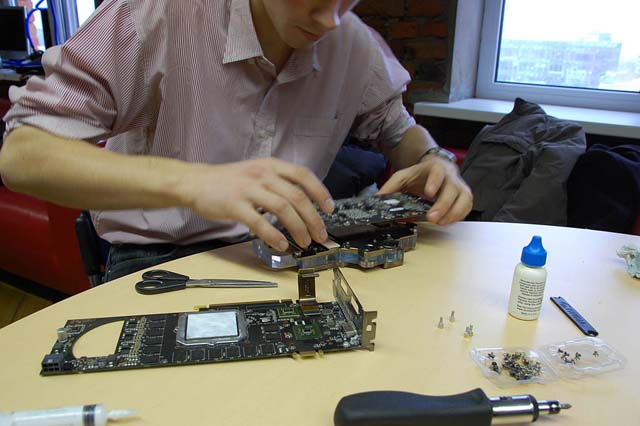
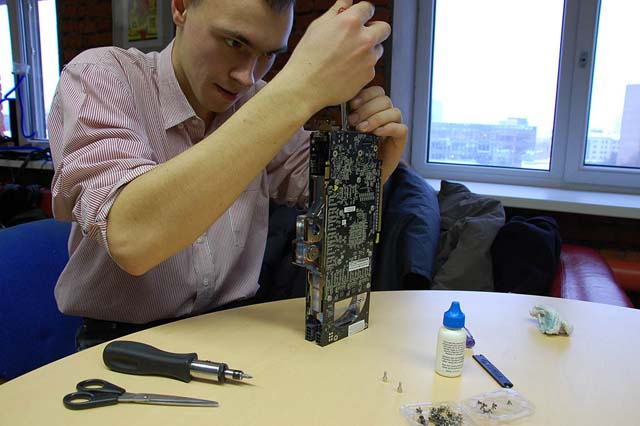
Let's start by disassembling the card. To begin, remove the board, which is not covered with a plastic casing. Screws - small, with thin slots, and then you need an hour screwdriver.
Those screws that are circled in green, you need to unscrew, but those that I circled in red (they are easy to distinguish - they are smaller in diameter), do not touch - they hold the frame around the GPU.
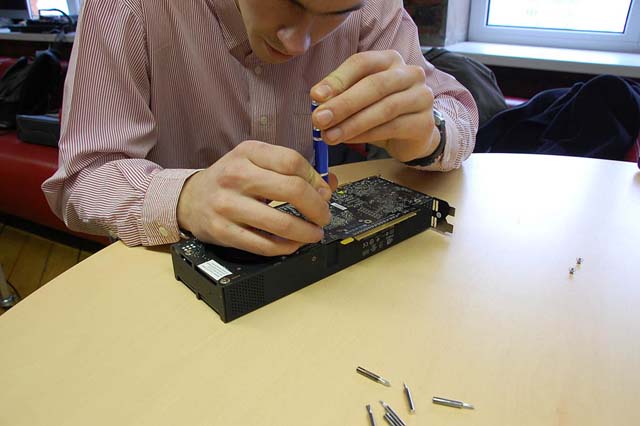
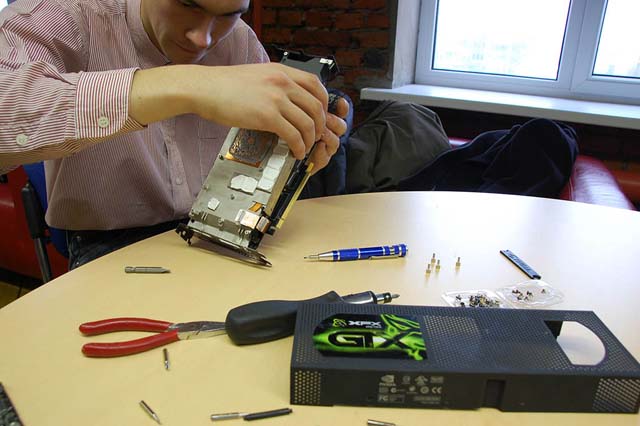
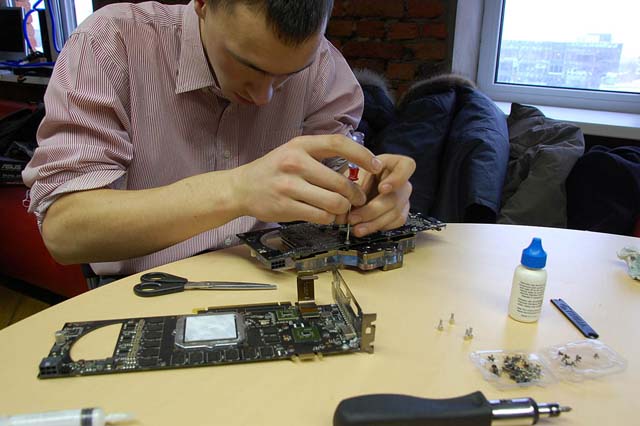
Thus, we unscrew all the screws, but for now we are not trying to remove the board. Next, remove the plastic cover.

Everything is simple - unscrew all the screws that hold the casing.

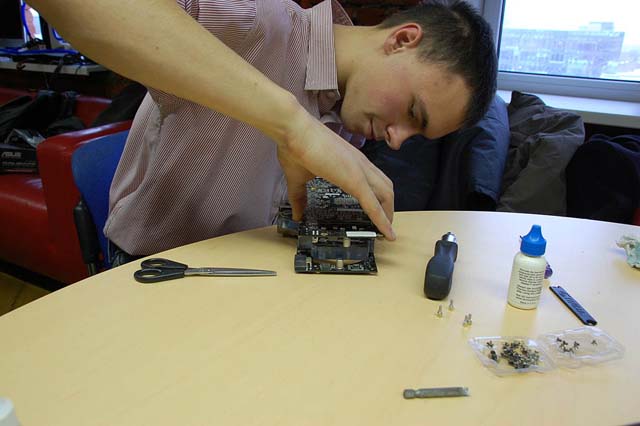
After that, gently we delay one side of the casing and remove it.

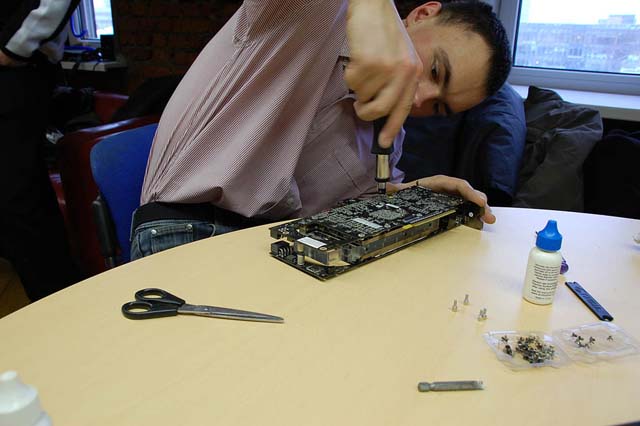
Now we turn the card over (don't be afraid, the chips and thermal paste are inside the sandwich, and the paste should not stain the table) and unscrew the second board.

Having unscrewed the screws on the board, we proceed to dismantling the DVI connectors, unscrewing the pins to which the cable from the monitor is screwed - only four of them.
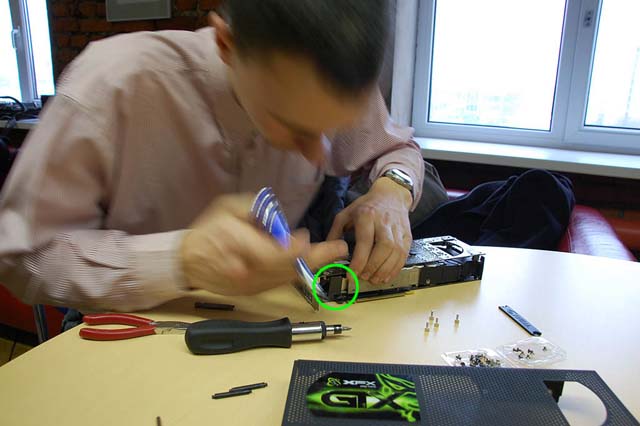
Further, in no case try to remove the fee! Carefully wipe your hands off the thermal paste and take a flat watch screwdriver. With it we will dismantle the bridge connecting the two parts of the board. You need to be careful with him! Any damage to the bridge or dirt or thermal paste on the connectors can lead to a complete failure of the entire device. In the photo, the SLI-bridge is circled in green.
On the other side of the card, which is facing me in the photo, most gently pry the two bridge connectors (one of them is located a centimeter further into the card relative to the first one) and pull them out of the connectors. From which card you will remove the bridge does not matter.

After the bridge was removed, we take a wide flat screwdriver and little by little otkovyrivaem (otherwise you can not say) the second board from the cooling system. To do this, you will have to slightly bend the iron plug of the video card on which the DVI connectors are located.

This is how the board should look like, if you did everything correctly ... However, let's not talk about it :).
Similarly, we remove the lower GeForce GTX 295 board.

Both GeForce GTX 295 cards are almost identical.

Now carefully remove the factory thermal grease from the card (well, we couldn’t get it dirty) and from the elements — a paper napkin is perfect for this — and wipe the elements with a special compound for cleaning from thermal paste.

ArctiClean is an indispensable assistant to those who tinker with computers.

Purely! Do not touch! On the cleaned and degreased surface thermal paste will fall much better.
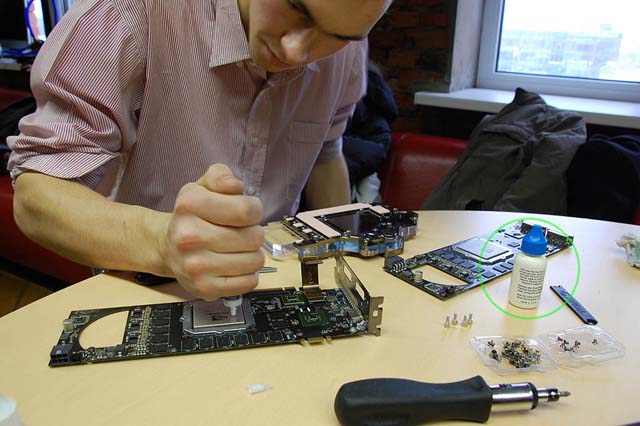
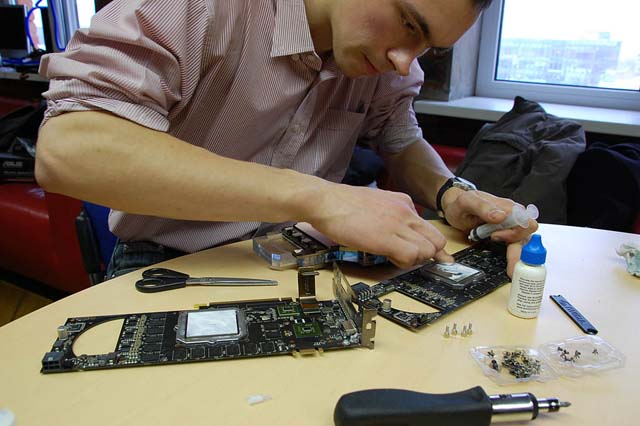
It is time to apply the thermal paste on the chip and stick the thermal pads on the water block itself, and then put the three parts of the video monster together.
Included with the water block are cogs with rubber pads - with them we fasten the first board to the water block.

It will be quite difficult to reattach the bridges (remember - they really do not like thermal paste) - you can do this with your middle finger :).
After connecting the bridges fasten the second board.
Perhaps the last - cogs connectors.

Screw fittings in the water block.
That's it!
Thank you for mastering our material in two parts, a successful acceleration and a relaxing summer!
In the first part of this material, we talked about the fact that most computers assembled and sold in winter in the summer heat may become unstable due to overheating due to assembly errors, poor ventilated system unit location and the need for preventive maintenance (in other words, replace the thermal grease dust wipe). Earlier, we talked about how you can identify a potential problem, fix the assembler's flaws and improve the case ventilation and CPU cooling. However, the video card is a private house in matters of overheating and noise pollution, and in this part we will talk about it. This topic is doubly relevant, since with the release of NVIDIA GeForce GTX 480, just under the summer, the GeForce GTX 295 (most likely, double-decker, as enthusiasts and avid gamers bought them) will fall on the secondary market, and on these cards, as far as I know It is known, unlike GeForce 9800GX2, the alternative air cooling was not released.
Uneasy alternative
So, if additional blowing of a 120 mm video card with a fan in the side wall of the case doesn’t help enough, and the turbine screams as cut, then there is only one way out - alternative cooling systems specially designed for video cards, such as Thermaltake ISGC-V320 . Its two effective fans work not quieter than the default cooling system. Pay for this pleasure will have ~ 2500-3000 rubles.
')
Thermaltake ISGC-V320
However, there is one small “but” - the installation of a cooling system from a third-party manufacturer is associated with a certain number of pitfalls, and if you are not confident in your abilities, then it is better to turn to someone more experienced.
Such a curious incident happened to my good friend, well-known in narrow circles of Boomburum 'th :) He had to suffer a lot with Arctic Cooling Accelero XTREME GTX280, which he planned to use on NVIDIA GeForce GTX285 in a freshly assembled computer, so as not to injure his wife's sleep at night and baby. In principle, there were no contraindications for this: the architecturally old GT200 chip made according to the 65 nm technical process is no different from the GT200 stepping B3 made according to 55 nm standards - both contain 240 stream processors, 80 texture units and 32 rasterization blocks, while the new chip consumes 183 watts versus 236 watts of the old one. The size of the heat-spreading lid of both chips is the same, and although the base of the Accelero XTREME GTX280 cooler is smaller than the chip's lid, this should not have a significant impact on heat dissipation. However, there is a frame around the chip on the GTX285, but there is no frame on the GTX280, and the layout on the boards is different. Most likely, this led to the bending of the board and the misalignment of the cooler and caused poor contact of the radiator sole with the chip cover. As a result, the chip warms up to 100 degrees in the load, which, of course, is not normal. In addition, Boomburum suffered from the fastening of small radiators for memory, which were included in the set - the thermoplastic from time to time, apparently, had time to dry up, and the additional bought Thermaltake BGA Memory Heatsink radiators also held on to an honest word. For its video card - just right Arctic Cooling Accelero XTREME GTX Pro, but at the moment it is still not available anywhere else. We are waiting for the end of a fascinating story :).
As I mentioned above, dual-deck flagship NVIDIA air alternative is not available. If on the GeForce NVIDIA 9800GX2, third-party cooling masters still managed to release a monstrous air system, then for GeForce GTX295 there is only one way out - installing a water block. And, in my opinion, this is the right decision, especially when you consider that with the release of NVIDIA Fermi, the GTX295 waterblocks will be sold at half price (you won’t adapt it anymore), and then there is a chance to take a ready-made kit with a waterblock. The water cooling system will provide complete silence, low temperatures and noticeable acceleration.
Installation of alternative air cooling on NVIDIA GeForce 9800GX2
Installing a waterblock on a video card is also very difficult. For example, many video cards were killed unknowingly by hapless users who did not know that it was necessary to lay thermal pads between the fulcaper (water block, closing the chip, memory, and power elements) and memory, rather than trying to force them to meet, forcing the screws to a crunch PCB and inoperability boards. We don’t call for waterblocks to install the waterblockers, but purely for interest, below it’s shown and shown how to install the waterblock on the double-deck GeForce GTX295. Alexander Cherkasov aka Killerchik helps me in this.
Installation of a waterblock on a GeForce GTX295
The heroine of this part of the article is the GeForse GTX 295 video card from the XFX company. It emits heat, about as a bright big chandelier. And since overclockers from the OCClub team are driving cards to the maximum. And then the last stage of the “Cup of Nations” arrived in time for its 3D Mark 2001SE stage, we decided to install a Koolance water block on this video card.
XFX GeForce GTX 295 - this is it, Crysis's best friend!
Waterblock Koolance for GeForce GTX 295
Let's start by disassembling the card. To begin, remove the board, which is not covered with a plastic casing. Screws - small, with thin slots, and then you need an hour screwdriver.
Those screws that are circled in green, you need to unscrew, but those that I circled in red (they are easy to distinguish - they are smaller in diameter), do not touch - they hold the frame around the GPU.
Thus, we unscrew all the screws, but for now we are not trying to remove the board. Next, remove the plastic cover.
Everything is simple - unscrew all the screws that hold the casing.
After that, gently we delay one side of the casing and remove it.
Now we turn the card over (don't be afraid, the chips and thermal paste are inside the sandwich, and the paste should not stain the table) and unscrew the second board.
Having unscrewed the screws on the board, we proceed to dismantling the DVI connectors, unscrewing the pins to which the cable from the monitor is screwed - only four of them.
Further, in no case try to remove the fee! Carefully wipe your hands off the thermal paste and take a flat watch screwdriver. With it we will dismantle the bridge connecting the two parts of the board. You need to be careful with him! Any damage to the bridge or dirt or thermal paste on the connectors can lead to a complete failure of the entire device. In the photo, the SLI-bridge is circled in green.
On the other side of the card, which is facing me in the photo, most gently pry the two bridge connectors (one of them is located a centimeter further into the card relative to the first one) and pull them out of the connectors. From which card you will remove the bridge does not matter.
After the bridge was removed, we take a wide flat screwdriver and little by little otkovyrivaem (otherwise you can not say) the second board from the cooling system. To do this, you will have to slightly bend the iron plug of the video card on which the DVI connectors are located.
This is how the board should look like, if you did everything correctly ... However, let's not talk about it :).
Similarly, we remove the lower GeForce GTX 295 board.
Both GeForce GTX 295 cards are almost identical.
Now carefully remove the factory thermal grease from the card (well, we couldn’t get it dirty) and from the elements — a paper napkin is perfect for this — and wipe the elements with a special compound for cleaning from thermal paste.
ArctiClean is an indispensable assistant to those who tinker with computers.
Purely! Do not touch! On the cleaned and degreased surface thermal paste will fall much better.
It is time to apply the thermal paste on the chip and stick the thermal pads on the water block itself, and then put the three parts of the video monster together.
Included with the water block are cogs with rubber pads - with them we fasten the first board to the water block.
It will be quite difficult to reattach the bridges (remember - they really do not like thermal paste) - you can do this with your middle finger :).
After connecting the bridges fasten the second board.
Perhaps the last - cogs connectors.
Screw fittings in the water block.
That's it!
Thank you for mastering our material in two parts, a successful acceleration and a relaxing summer!
Source: https://habr.com/ru/post/84281/
All Articles