Preparing a PC for the summer heating period (part 1)
Although it is still outside the window there is a lot of snow and cold frost, but soon, very soon, March will come, and with it the graphics chip NVIDIA Fermi (we will call it by code name, since the manufacturer is confused about the readings - either GT300, GT400 ...) , kidneys and purses of avid gamers will swell, who, not embarrassed by the price of novelties of about 1,000 American presidents, will run an upgrade, which means that the zealous amateur of virtual entertainment will soon be able to take the previous “green” fleet at a very similar price - NVIDIA GeForce 295 , best friend Crys is warhead. If it is slightly tweaked, then at first it will be possible to look good, even against the background of happy owners of an expensive svezhak.
Attention! Under the cut 36 photos.
But here behind the cool March and the traditional April Fool's day, May 9 comes a short but furious northern summer, and service centers collect a rich crop of corpses with heat stroke of the brain. It was in the summer that unlucky users rush to the Savelovsky radio market with complaints about the howling of video card turbines (of course, the heat and turnovers are set at 100%), the whistle of chokes, soldered sockets and chips, and numerous glitches and hangs.
No, this is not the time for summer vacations (although not without it), but the result of “successful” winter purchases: video cards with passive cooling or, even worse, OC Edition with dead core voltage, prefab computers in the cheapest cases with one small fan front and CPU with default low-profile cooler, which, at the request of an informed user, were still overclocked, while the process rolled the horse dose of voltage. And even in cool winter conditions for temperature monitoring, these fluctuated somewhere in the acceptable range of 50-55 degrees for the probe and 70-75 degrees for the vidyuhi, but taking into account the dusty case and raising the thermometer in the division room by 8-10, you can easily bring your sistemnik to the boiling point.
Moral - you need to cook a cart in the winter, while there is still something to cook. Below we will talk about a couple of not the most difficult steps on the way to a silent and heat-resistant computer.
Forewarned is forearmed
As I already wrote in my previous material “Blow into the case” , it’s better to sacrifice the spectacular appearance of the case, but get enough places to install additional fans and space to ensure free intake and air flow inside the case. And if now, in sparing climatic conditions, the temperatures are close to the limit, it's time to revise the case fans and think about increasing their number.
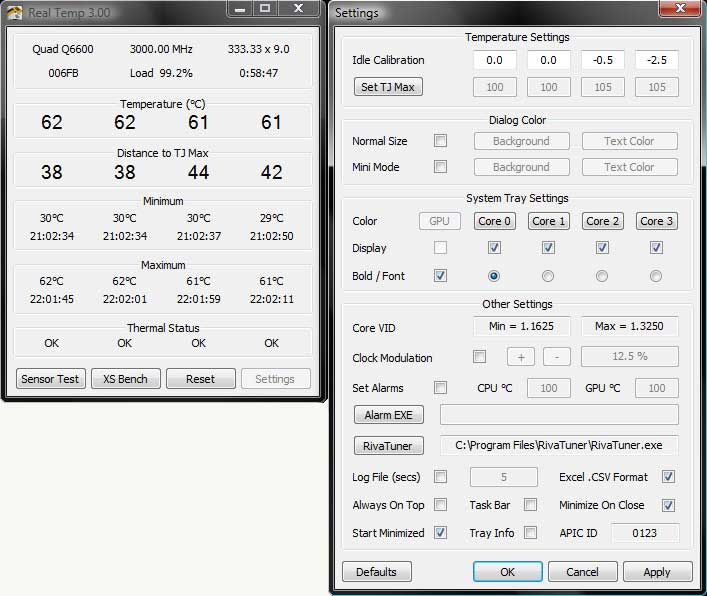
You should not think that if during the demonstration in the store the temperatures were normal, then the situation will not change when the case is standing in the computer desk, practically resting on the back of the wall. So the first thing to do is monitor the temperatures. Experienced overclockers like to use Real Temp for this purpose. This softphone monitors the sensor readings of all processor cores and remembers the maximum values reached.
')
Now, in the conditions of your situation and placement of the PC case, you need to warm up the processor properly. The following set of test utilities is suitable for this:
1. Cinebench R10 or new version 11.5 - test rendering in multithreaded mode. Allows you to evaluate the efficiency of loading processor threads, and, indirectly, it checks the stability of its operation.
http://www.maxon.net/en/downloads/downloads/cinebench/cinebench-115.html
2. LinX 0.6.4 is a graphical shell for the recognized test performance of Linpack multiprocessor servers. Maximally loads all cores and virtual threads of the processor by computing systems of linear equations, which naturally requires high stability.
http://occlub.ru/forum/showthread.php?t=652

3. Prime95 (Blend preset) is a client of a distributed computing system for searching for primes, and in combination it is a very tough test of system stability, which can reveal stability problems where other utilities worked perfectly fine.
http://www.mersenne.org/freesoft/

It is enough to run each test within 20 minutes . But even if the system remained stable, this is not a reason to relax. We look at the results recorded by Real Temp (temperature monitoring, of course, must be included during the tests) for each core. Even if the temperatures are within the allowable range, this is not a reason to calm down. In the summer, the air temperature in the room often rises from 20–22 degrees to 28–31 degrees, which means that the maximum temperature recorded by Real Temp should be added 8–10 degrees , and at the same time it can go beyond the permissible range. And this is not good at all, since the long-term operation of the processor at high temperatures is not recommended for it and may lead to its degradation, that is, a gradual deterioration of the properties of the crystal and loss of stability even in normal mode.
Real Temp can also reveal overheating of one of the cores against the background of an acceptable temperature for all the others, which may indicate poorly applied thermal paste (for example, not over the entire contact surface of the heat distribution cover and the cooler base) or distorted radiator foot during installation. This is also bad due to the uneven load on the processor socket.
With video cards it's a bit easier. To warm up and check the stability of video cards, they have not yet invented more evil things than the “hairy bagel” - FurMark . It is not recommended to drive it for more than an hour , as there have been cases that on low-quality video cards because of this test, the chip soldering went away. Temperature indicators are best taken with the proven Riva Tuner utility. As in the case of the processor, it is necessary to add 10 degrees to the maximum fixed temperature of the GPU when working in the conditions of your room and table and make sure that it will not be very bad in the summer. You can immediately lower the temperature by fixing all the same Riva Tunner turbine rpm by 100% . But, of course, a terrible howl is attached to this.
Emergency measures
So, the problem has been identified, and the first thing to do is to carry out simple actions that do not require serious cash infusions: put and tie the wires with plastic ties so that they do not stick in the path of the air flow, remove the cooler and check the application of thermal paste (it is better to replace it with a more efficient one) and the correctness of the clamp.
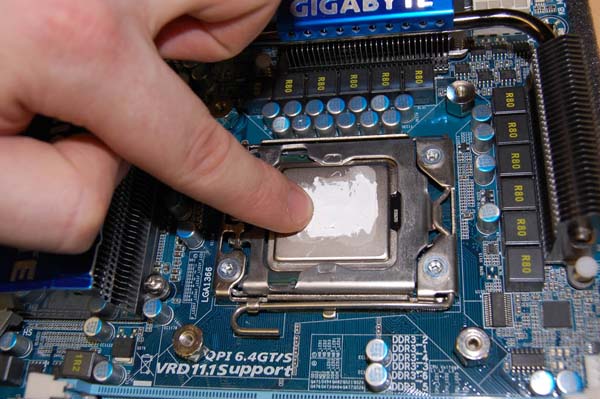
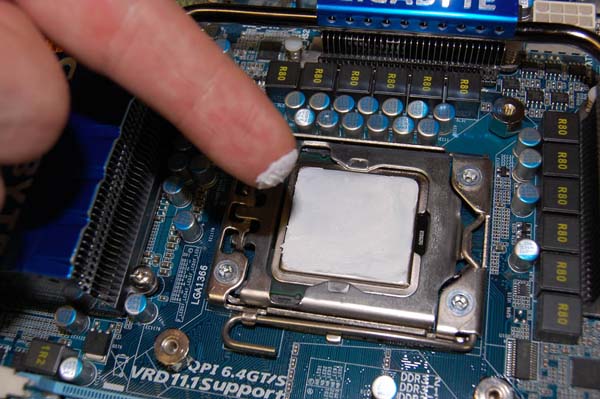
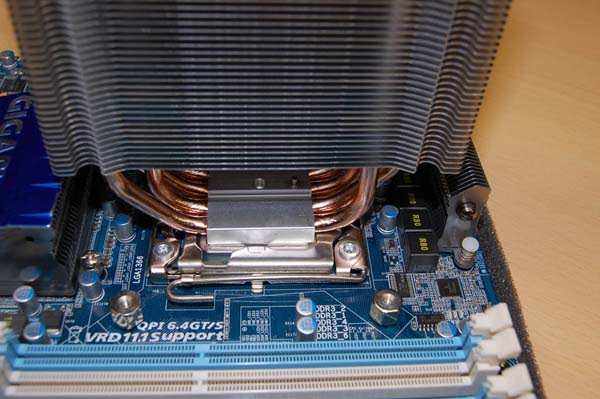
Thermopaste is best applied with a finger, in a thin layer, without smearing excessively over the entire surface of the heat-spreading lid. Then you can tightly attach the bottom of the cooler a couple of times and make sure that there remains a uniform imprint on the entire contact surface. After that, holding the radiator with your hand, you need to snap the fasteners in pairs diagonally from each other - in no case, not one clockwise, as some like :), but the whole effort will be on one side, and not only the cooler can be distorted , but also will not stand BGA-socket soldering.
This may give you some improvement in temperature, but it may not be enough for your needs. For example, I recently watched a config for one acquaintance, and the Intel Core i7 920 stepping D0 processor was extremely unsuccessful - for 4 GHz operation it required 1.37 volts, which is a lot and, of course, led to high temperatures. There is another claim to the default cooler - it drives the air down, perpendicular to the plane of the motherboard, accelerating the heat removed from the processor, that is, to the already hot elements of the processor power circuits, which can negatively affect both the stability of their work and for durability.
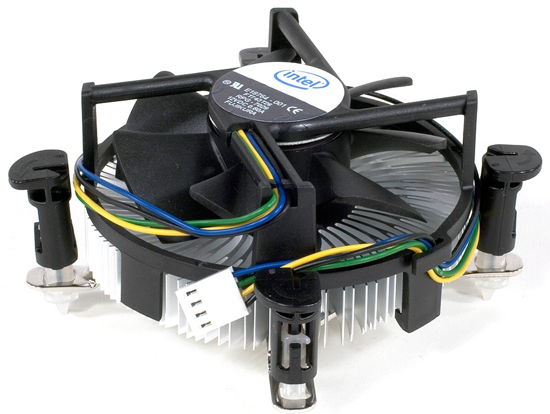
Regular cooler for Intel processors
Well, in this case, you will have to make a difficult choice: to give up a fair amount of performance on particularly hot days, or sit with an open case, listen to the howls of fans, or accept the need to replace standard cooling with a tower super-cooler with an effective and relatively quiet 120mm fan.
We put the tower
By the way, it did happen: for the upcoming 6-core Intel Gultown CPU, the manufacturer started using a tower-type model as the default cooler - another proof that, despite the decrease in technical process and the increase in energy efficiency of transistors, the heat release is steadily increasing :).
Just be careful when choosing - tower coolers are quite high. Here we had an amusing incident at the OCClub : a man took an inexpensive case of a popular brand for having such a cool massive carrying handle, but the case turned out to be surprisingly narrow, and the tower cooler bought for it simply didn’t fit protruding heat pipes did not close the side wall. So we recommend measuring the distance from the processor to the wall before buying :).
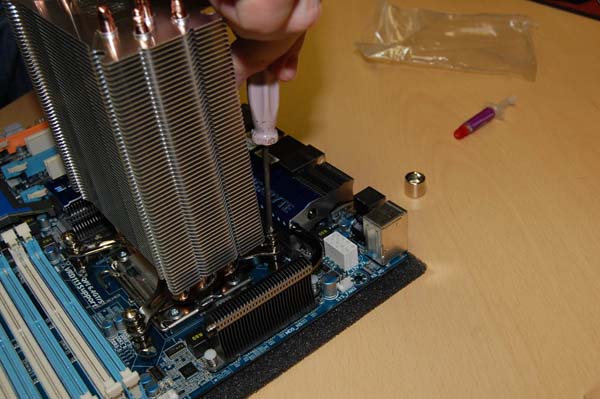
Tower coolers are usually more advanced than the default cooling: they are screwed to the motherboard with four bolts (you must also carefully tighten, gradually tightening the bolts crosswise, then one or the other, to prevent skewing), while there is also a central regulator, which ensures uniform pressure on the cooler sole to the heat-spreading lid, and this does not cause the PCB to flex the motherboard, as in the case of standard cooling. The main thing is not to overdo it - do not tighten the regulator to the crunch :).
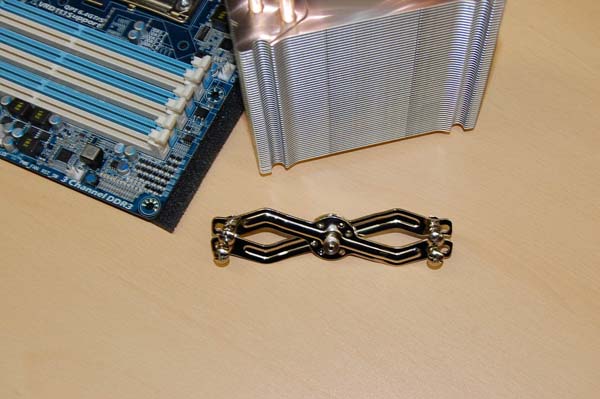
Mount tower cooler

The screws provide adjustment of the position of the cooler's sole, and the central regulator - uniform pressure
Headset cooler
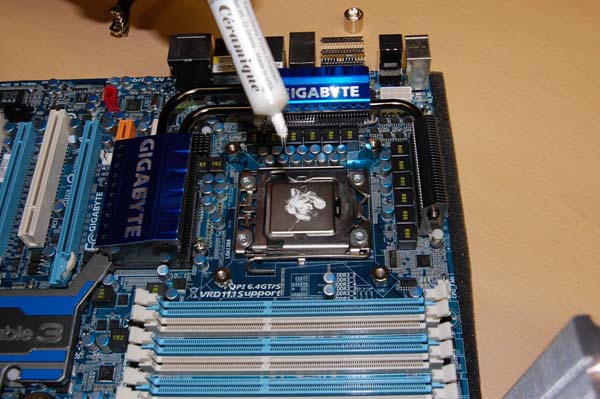
It is better to go broke on expensive thermal paste - “favorite” KPT-8 can be of very different quality ...
Finger - the best tool for applying thermal paste! Smear carefully, evenly over the entire lid, remove excess.
We press the cooler, slightly turning around the vertical axis to the left to the right, so that the thermal paste adheres to the sole
Using a screwdriver, gradually take turns tightening the cross one or the other screw, then finally press the cooler to the processor with the central regulator
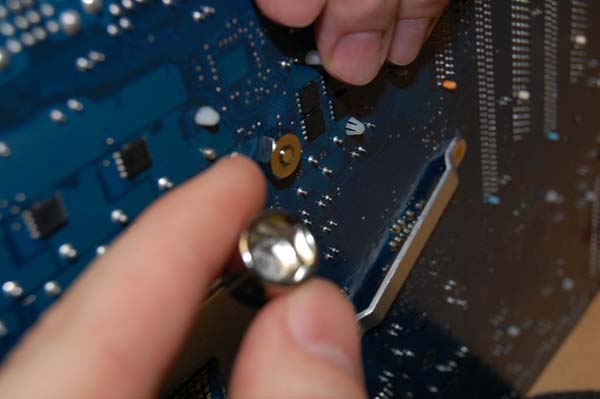
So the cooler mount is installed on the back of the motherboard

By means of such wire fasteners any 120 mm fans can be attached to modern tower coolers.

The fan is pressed against the radiator fins.

Hellish confrontation fans :). It is better to rearrange the 120-ku from the rear basket to the CPU cooler itself (the main thing is that they inject air in one direction). The power supply fan will also try to take away its part of the air flow. It can be seen that the case was not designed to install a tower cooler.

This duct, in theory, is designed to provide fresh air for a regular CPU cooler.

It is better to remove this useless pipe and put in its place an 80 mm blower fan - this will allow you to better cool both the processor and the north bridge, and the power supply elements. With a tower cooler, this grille generally becomes useless. Air vents to the right (they will be above the video cards) are also almost useless, they need good active airflow.

The back wall of the case. A 120 mm or 80 mm fan can be installed in the basket (although there is little point in the second). It is seen. That with the installation of the tower cooler, the cooling efficiency of the power supply will suffer. Also, the completely deaf area around the video card is alarming - hot air can only go out through a tiny lattice on the slots plug.

Circus! Heat pipes protrude from a too narrow case - this is what frivolous attitude to this part of the computer means.

The wall can not be closed. The unlucky buyer was sent for a lower cooler, that is, a tower with 120 mm fans would be unavailable, which raises concerns for the stability of the computer in the summer.

The biggest problem of this case is that the installation of components in it is possible only in such a way, which leads to the division of the space of the case into two practically autonomous parts. The entire flow from the front fan goes under the video card and there does not know where to put it. Upstairs, the air flows with difficulty, the ventilation grille over the processor cooler with the “tower” is practically useless, and therefore the cooling efficiency drops sharply. So two 120-ki for cooling the processor - a severe need, and the video card would be good to provide alternative cooling, otherwise noise and overheating can not be avoided.
Fan placement
But even installing a tower cooler on the CPU and turning on the turbine of a video card by 100% may not give the expected effect and change the temperature by only a few degrees, because injecting cold air into the case and ejecting hot air from it can be very inefficient. In this case, we are waiting for a revision of the installed case fans and places for them.
Even in the oldest ATX-cases, which thrifty users love to leave when upgrading the system, there are small ventilation slots and a basket for an 80 mm cooler in the front bottom (but without the cooler itself). Honestly, with the current level of heating of modern hard drives and the number of heat sources in the case, this is ridiculously small, but better than nothing. If possible, you must intrude there with the tools and install a 120 mm fan.
The second mandatory program number is an additional 120 mm cooler on the rear panel of the case - they should not be neglected, as it will help disperse the warm air accumulated between the rear part of the case and the wall.
Well, in the case of sufficiently powerful video cards, it is very important to inject cold air from the side directly onto the video card and, preferably, onto the chipset. For example, additional blowing of video cards from above, even with an open test bench, allows overclockers to increase stability at extreme frequencies.
And this may not be enough. Here, for example, the test results of one of the most beautiful gaming enclosures of the NZXT brand LEXA S , already familiar from the previous article, hung with four pre-installed effective fans (1x120 mm from the front, 1x120 mm with the backlight on the side, 1x120 mm fan on the back panel and 140 mm fan on the top cover with the possibility of installing another 120/140 mm). The system consisting of a CPU Intel Core i7 920 (at a standard frequency and default cooler), a NVIDIA GeForce 8800GTS 320 MB video card, an MSI Eclipse SLI motherboard and one Seagate Barracuda 7200.11 hard drive warmed to the following temperatures (air temperature is 25 degrees Celsius):
- processor - 44 degrees in idle / 74 degrees in load
- video card - 46 degrees in idle / 76 degrees in the load
- hard disk - 33 degrees in idle / 37 degrees in load
- chipset - 70 degrees in idle / 79 degrees in the load.
That is, one can say that the temperatures are already close to critical, although the air temperature in the room is not the highest. The case would clearly not have been prevented by another 120 mm fan in front, which would ensure the flow of cold air over the video card directly to the number and processor. In defense of the hull, it can be said that it has a pre-installed dual-channel reobas (channel separately for blower and blower fans), and cooling performance would be better if you set the impeller speed to maximum 1200 rpm, sacrificing noise characteristics. The chipset's temperature reached such “indecent” marks just because of the default cooler, which took the hot air directly into the radiator of the north bridge, which was connected with heat pipes to the south bridge and a very hot NVIDIA nForce 200 bridge chip.

NZXT LEXA S

Very good lateral blowing of video cards

The correct location of the power supply (bottom) and effective removal of hot air from the near-socket space.
So, I consider the 120 mm fan to be blown as mandatory for installation (in the case of the old case, for greater efficiency, you can carefully lengthen the ventilation slots or drill holes in the form of an aesthetic pattern), an additional 120 mm fan at the back and a fan on the side panel that blows air to the area of video cards and chipset.
For these purposes, it is better to use efficient, relatively quiet fans, such as those installed in the housing mentioned above (1200 rpm, 23db / 42CFM, double rolling bearing).
With the side panel, you can proceed as follows. If there is no space for a fan, then, whether there is a plexiglass window or just a blank steel with a small ventilation grill, you can wipe at the installation of a 200 mm cooler that will cool both the video card and the chipset. To do this, you can refer the body wall to laser cutting, after removing all the measurements and drawing a cut pattern in Corel Draw. Everything about everything with fans and cutting will take 2,000-2,500 rubles, which is not so much compared to the very likely losses and inconveniences.

Quiet 120mm fans

200 mm fan is best suited for side blowing. To install it, just poshmanit a little in Corel Draw and get to the laser cutting.
Another place where it may be necessary to install an additional 120 mm fan is, oddly enough, the second side of the heatsink of a processor-type tower cooler. The fact is that by default there is always only one fan in the kit, forcing air between the radiator fins. Adding a blower fan that removes hot air from the intercostal space will increase the efficiency of the cooler. But the main thing here is not to overdo it :), otherwise you can get a locomotive from three fans in a row, including a 120 mm cooler on the rear panel. In this case, it is better to simply rearrange the 120-ku from the case to the CPU cooler radiator.
Of course, even the most quiet and efficient fans, although they can make the overall noise of the system more comfortable, for example, positively affecting the speed of a video card's turbine, will definitely contribute to the common chorus of impellers. And the only way to deal with this is the active management of cooler speeds.
Control, still control!
No matter how trite it sounds, but you have to pay for everything. Saving on the purchase of the case and a good cooler, in the summer you run for an additional fan and radiator tower; Having heaped a bunch of blades all over the body, after a while you run behind the control panel for them.
And so that you do not have to run twice, you need to immediately part with the illusions and accept the fact that:
1. Five channels for the modern reobas are the minimum health. We consider: the fans in the front, an additional fan in the back, blowing in from the side, two 120-ki on the processor cooler (you can, of course, entrust the automatic control of the motherboard or proprietary software, but the accuracy and speed of the reaction will be noticeably lower) and one channel to the PSU fan or additional chipset airflow, or cooling of the NWO radiator. Even a little.
2. Modern good fans can eat up to 10 watts, so the panel should be capable of delivering up to 10 watts per channel.
3. It is necessary to have accurate temperature and speed control, temperature control and notification of the achievement of critical values, storage profiles in the memory.
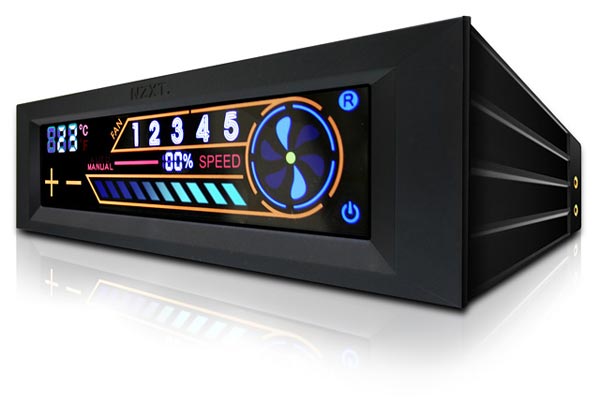
The aforementioned NZXT has, for example, a good touch panel with such characteristics - NZXT SENTRY 2. I didn’t deal with similar products from other brands, so I won’t say anything, and this device leaves the most pleasant impressions: a bright touch-screen LED screen, a black matte frame - just for fashionable all-black cases. Included is a fair amount of Molexes to connect fans and thermocouples to remove temperatures. Thermocouples are simply glued to the hot melt glue closer to the bottom of the radiator, and we get fairly high measurement accuracy. Nevertheless, it is better to make a margin of 2-3 degrees from the critical temperature, because directly on the chip it is somewhat higher.
NZXT SENTRY 2

Included are quite comfortable temperature sensors. Also, NZXT SENTRY 2 has a large number of Molexes for connecting any fans.

Approximately the same sensor is glued to the radiator of the node whose temperature is to be controlled :).
In this panel, the required 5 channels are implemented, so that you can independently dilute all parts of the cooling system and experiment carefully with each fan. Most likely, 100% of the revolutions for part of the fans will be redundant, and the noise can be significantly reduced even while playing a voracious 3D toy. You can also choose the profile settings for the torrent rocking mode at night, and the automation will not allow the computer to overheat if the air temperature outside the window suddenly creeps up.
But one more very noisy tenant of the system unit remains - a video card. It is impossible to connect its turbine to external control panels! Not to mention that it is simply not intended for this. Adjusting the turbine speed should be done by means of the driver or the same Riva Tunner - it is better to entrust control over temperatures to the automation of the video card itself.
The fact that you can do to reduce the temperature and noise of the video card, as well as the pitfalls that are associated with it - in the next part.
Donny
Source: https://habr.com/ru/post/84206/
All Articles