SpyderCube - a cube that will change your life

Everyone who once held in their hands at least a little professional camera heard about the balance of white (color). And those who are involved in photography seriously and even more so! ..
For certain, you sometimes saw yellowish or reddish photos. It just depends on the white balance. And so that the image looks the same as the object of your shooting, you need to precisely adjust it. For this, the next device was created. (big pictures under the cut)
So, this is a cube, or rather, a target for controlling white balance.
')
White balance (also called white balance for short) is one of the parameters of the color image transfer method, which determines whether the image color of the object corresponds to the color of the subject.
It is usually used as a variable characteristic of a photographic process, photographic material, color printing and copying systems, television systems, and devices for reproducing graphic information (for example, monitors).
The box of this cube looks like this:

And here is her insides:

Here are the contents of this box:
• Datacolor SpyderCube ™
• Protective pouch (soft pouch)
• Quick start guide (including in Russian)
• Warranty Card (1 year warranty)
SpyderCube is made from Cycoloy hybrid material, an ABS plastic and polycarbonate alloy that does not fade, is extremely durable, impact and fire resistant.
In appearance - very high quality and pleasant. I did not try to set fire, does not react to blows and does not deform.
Its colors are additionally pigmented for durability and applied using precisely calculated formulas to ensure optimal color values, including 18% gray, which sets new standards for spectral neutrality giving accurate color correction for any light source.

Well, enough, perhaps, the technical characteristics, I will tell better how he looks and how to use it to get the best result.
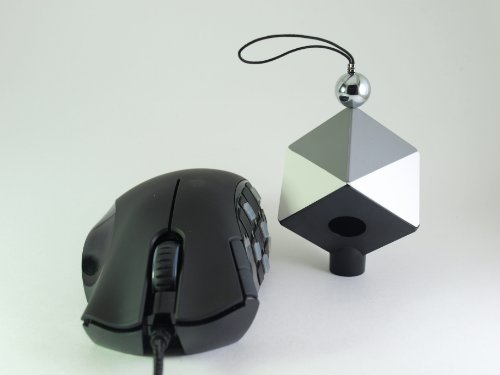
So, this is a cube, with sides of 3 colors: gray (18%), black, white. There is a light trap in it, that is, it almost always has an almost completely black color. At the top of the cube - a shiny metal ball for processing glare + string to hang it somewhere. Below - a screw hole for mounting on a tripod.

In fact, you will use only 3 sides of the cube: two with a gray and white coating and one with a black and light trap.
It is very convenient to mount on a tripod.

Spydercube is useful to virtually any photographer who is at least somehow engaged in the processing of photos and wants his photos to look close to perfect. When processing images, you will need to use either Adobe Photoshop with the plug-in Adobe Camera Raw, or a special program for processing Raw images - Adobe Lightroom.
An additional plus is that even if you do not have a professional device, you can take a picture of the image in Jpeg and then edit it as you need.
And now briefly, how to use a cube. Its use consists of 3 simple actions.
1) You adjust the lighting, set the composition and so on. and, when you are ready to make a high-quality photo, place the SpyderCube in the frame so that you can see 3 sides at the same time: two sides of white + gray, one black with a light trap. And you make one frame with a cube (you can even without the subject of the shooting, only the lighting and the place), and the rest is as you need. Moreover, you can change the composition, but if you change the lighting - it is better to take another photo with the device.
By the way, the advice: when you take a photo, or rather, you adjust the lighting, make sure that the ball has as little glare as possible, if, of course, the glare is not specifically designed for a photo.
2) After uploading a photo in Lightroom or in Photoshop, you take the information off the cube, that is, it looks like gray, white and completely black. And your photo will change. But what to do with the rest, on which there is no cube. Read p.3.
3) You save the preset and apply it to the rest of the photos. In this way, they will all acquire exactly the color that was in the objects you photographed.

The device, if you can call it that, is irreplaceable if:
- You are not a professional and do not know how to properly configure the camera or lighting
- If you are taking pictures on the street and only the sun can be a source of light, and it shines yellow. Or you are taking pictures in the room, but the source is the incandescent lamp, which also shines yellow
- No time to adjust the lighting and camera
- The photo must be taken indoors with blue (red) wallpaper. There will be a glare.
- Dark room, flash photos do not always work out.
In general, to continue this list can be infinite, in any case, the cube is indispensable if you want to achieve the real color of the photographic objects in your photos.
Now, for gourmets, I will tell you in more detail and more clearly how to use Datacolor SpyderCube.
1) You take a photo. For example, I took a photo with apples in sunny light in the kitchen. As you can see, the photo has some shade of yellow. Suppose that I have no other lighting in the kitchen and I do not know how to set up a camera. That turned out, you see in the photo below.

2) We put next to the basket our cube as mentioned earlier. We photograph. Again, we have a yellow color scheme, but soon we will fix it.
3) Upload a photo to a computer. I took a photo in Raw format (in my case, in .OGF), but you can also use .Jpeg, you can do a good job of it too. Benefits Raw will not paint. Who knows, he knows. I will use Adobe Lightroom, because It seems to me more convenient than a plug-in for Photoshop (in the video below you can see both options).
Open the photo with a cube in the photo processing program.

4) We proceed to direct editing. Remove the "pipette" gray. We get it from the most lighted side (!). We change the exposure and brightness so that the gray color remains 18%. We change the levels of black so that the light trap is clearly visible relative to the black surface. All parameters are shown in the photo circles. And, as we see, the photograph has acquired the usual shades, that is, those that we just photographed.
5) Save the settings (or just remember). Open the photo with the same lighting, but without the cube and apply our settings to it.

6) Voila. Got a photo with real colors in just a couple of seconds.

Usage video
Of course, you can adjust the color in the camera, set the lighting, but it is long and, if there is an opportunity in our age of technology to process the photo later, and without much effort, then why not do it.
The video shows the whole process of processing (in English + Russian subtitles)
I will add only one thing from myself, the SpyderCube has become irreplaceable for me lately, because making a subject survey for reviews, it is rarely possible to fine-tune the balance (I only have incandescent bulbs). With him to make good photos is not difficult.
The only thing that can perhaps be confusing is its price, because it is about 2 thousand. BUT, professional photographers it is not difficult, because I personally will not spare any money for a good photo. But to make such a cube yourself is rather difficult, because firstly it’s necessary to make gray 18%, secondly a light trap, and it will look handicraft. In general, I believe that this, albeit an overpriced, but quite reasonable price for a professional device. After all, the rest of the photo gadgets are about the same, if you look at the price / quality ratio (for example, lenses, filters, flashes, tripods, etc.).
Also, I want to add that it will be quite difficult if you want to take a photo from above, because it is difficult to put a cube on the edge, so that you can see 3 sides - it is possible, but with sharpness possible.
Let us, finally, sum up.
Pluses:
- Gray 18% color
- Absolutely black trap
- Ball for glare
- Convenient mount for tripod + rope
- Easy to use
- Stylish design + good performance (quality)
- Storage Bag
- Impact resistant material
- Miniature size
Minusiki:
- You can only put on the mount to the tripod
- Unused 3 sides
- High price
Thus, we see a lot of advantages, and only a couple of drawbacks.
I give a rating - 4.
Removed 1 point due to the price. Otherwise, Datacolor SpyderCube is perfect.
By the way, advice: if you want to save money, then the SpyderCube is sold in sets that include several more items (color charts, targets). But the set is worth buying if you are really professional.
Official site - Datacolor
Size comparison with a mouse naga .
Take great photos!
For new reviews you can follow on Twitter .
Source: https://habr.com/ru/post/84186/
All Articles