Filter Forge: heart shaped frame (lesson)
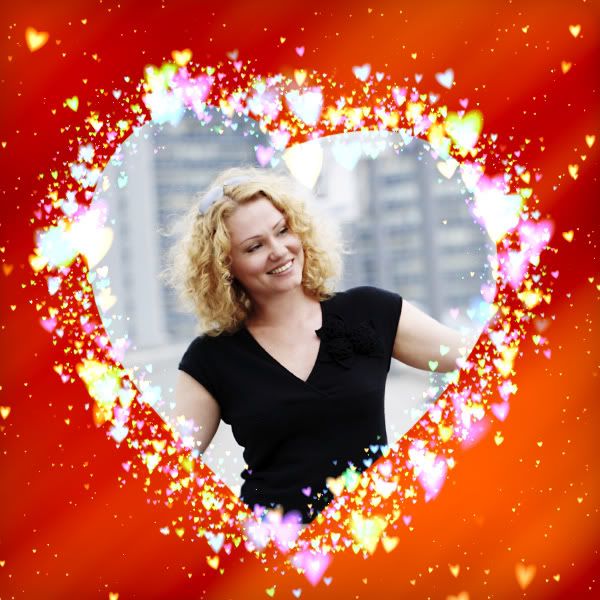
In this lesson we will learn how to make a fun frame - all in beautiful glowing hearts. You do not have to painstakingly draw with pens for this, we will use a wonderful, powerful tool called Filter Forge.
In the first part of the lesson I will explain in detail how to apply a ready-made filter that you can download and use for your own pleasure. The second part will be devoted to the description of the process of creating a filter. Thus, if you are not interested in how to make filters, you can safely skip the second part.
So, let's do this frame:
')
We will need:
Open the original image in Photoshop. Convert the Background to a Layer and call it “Photo”.

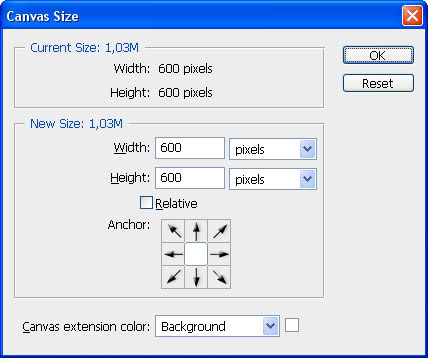
Since I plan to make a frame in the shape of a heart, in my opinion, the square will look better. For this lesson I decided to make an image of 600x600 px. To do this, in the menu Image> Canvas Size ... set the desired value:
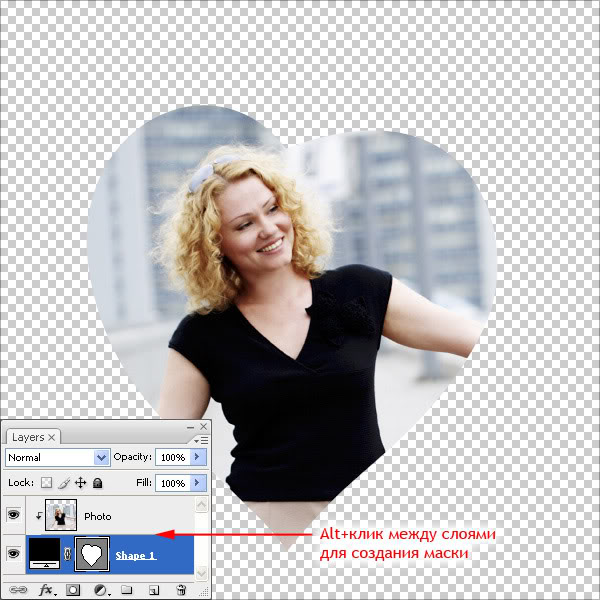
Now you need to set the shape of the frame. Using the Custom Shape Tool: custom shape: draw a vector object in the shape of a heart. Place this layer with shape under the “Photo” layer. Then Alt + click between these layers (Create Clipping Mask).
Now we understand what part of the photo will be visible in the frame. If desired, we can edit the shape of the frame and move the layer “Photo”.
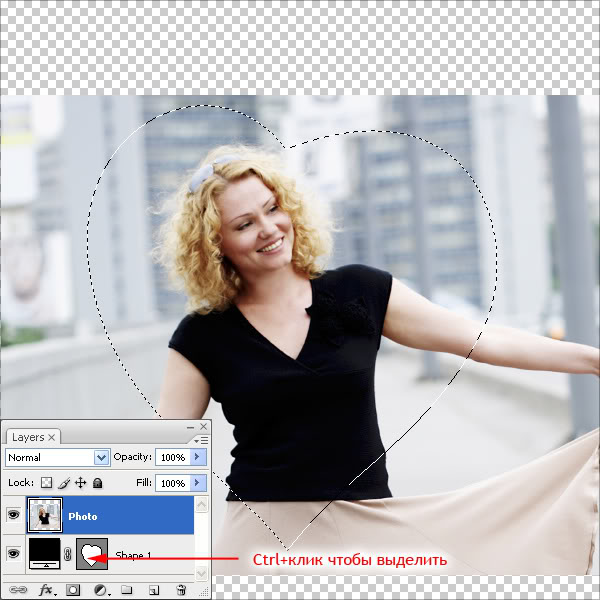
Now that we have decided on the shape of the frame. Duplicate the “Photo” layer and make an Alt + click between the “Photo” and “Photo copy” layers (Release clipping mask).
Then select the “Photo copy” layer and Ctrl + click on the vector layer (in my case it is Shape 1).
To create a selection, you can use any method convenient to you, for example, using the Quick Mask function. The main thing is that as a result we should have a selection in the shape of the desired frame. We have this heart.
Finally, make sure again that the “Photo copy” layer is selected. It is this layer that will be processed using Filter Forge.
If you decide not to bother with making your filter in Filter Forge, this will be the final stage of our lesson. Well, if you want to acquire the skills to create your own filters, which opens up almost endless possibilities :), then go to step 3.2.
Run the plugin in the menu Filters> Filter Forge> Filter Forge 2 ... Download the Glowing Hearts Frame filter from here: Glowing Hearts Frame.ffxml and run it.
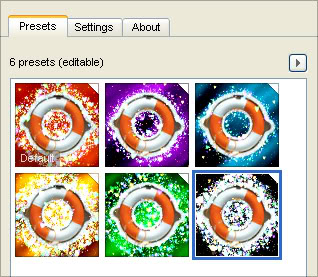
We can use ready-made presets (Presets tab):
Or we can choose the filter settings ourselves (the Settings tab):

After the desired result is achieved, click the “Apply” button. Well, actually, that's all.
Further steps are devoted to the description of the filter manufacturing process in Filter Forge.
Launch the plugin in the menu Filters> Filter Forge> Filter Forge 2 ... Create a new filter: Ctrl + N or click the Filter Editor button in the upper right corner of the program window, select Create a new filter and click the Open Filter Editor button.
Well, immediately give the name to our filter: Ctrl + S (or in the menu File> Save Filter As ...).

From the list on the right side of the screen (the list is opened by clicking the Components button in the upper right corner of the window) drag and drop the Ellipse component (the Patterns group) into the editor's working area. We set the following parameters to it:

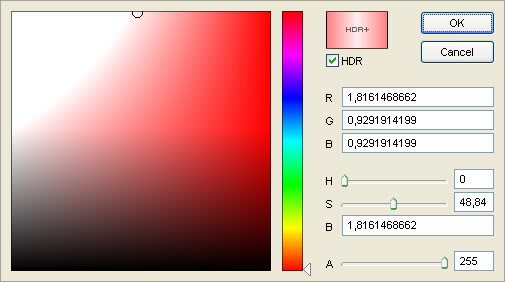
Learn more about color selection: click on the colored rectangle next to the Color parameter. A picker window will open. Put a tick next to the HDR parameter and set the Brightness value (the third parameter in the HSB group) to 3. And then pick the desired color with a picker.

We should have such a thing:

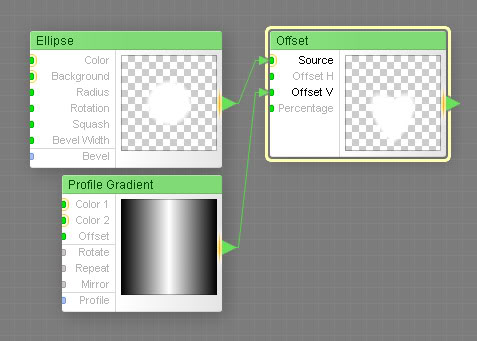
Now we will make a heart out of this circle. For this we need the Profile Gradient component (the Gradients group) and the Offset component (the Processing group).
Component Profile Gradient tick the parameter Mirror, all the rest - without change.

The output of the Ellipse component (green triangle) is connected to the input (small green circle) of the Source component Offset. And in the same way we hook Profile Gradient to the input of Offset V. And we set the Offset component to the parameter Offset H to zero.
Voila! Now we have a picture of the heart :)
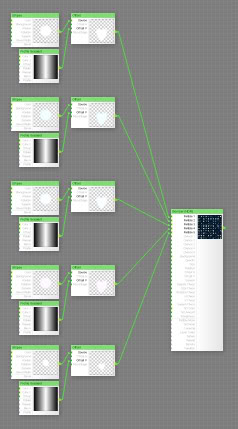
Since we are going to throw particles (particles) of different colors (in our case these are hearts) on the frame, we need to make several more copies of the component group with which we made our heart. Select all 3 components. Copy to the clipboard Ctrl + C, and paste a copy of Ctrl + V (4 times). In total, I got 5 copies of such groups.
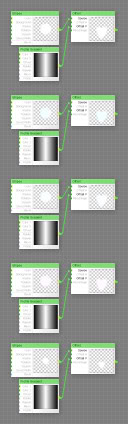
To make our hearts turn out to be multi-colored, we set different Color parameters for each Ellipse component.
[I "> Tip: Don't forget to save your filter from time to time (Ctrl + S). [/ I">
Now we need the Bomber (HDR) component (group of Patterns). Do not confuse with just a bomber. Otherwise, we will not get a beautiful glow, which gives the use of HDR-colors.
Now we connect the resulting hearts (the outputs of the Offset components) to the inputs of Particle 1 ... Particle 5 of the Bomber component (HDR). (Now you understand why we made exactly 5 hearts of different colors?)
Set the Bomber (HDR) component to the following parameters (those that I did not mention, leave unchanged):
Size: 100;
Opacity Chaos: 100;
Size Chaos: 100;
Rotation Chaos: 12;
H Chaos: 100;
V Chaos: 100;
Squash Chaos: 9;
Tint Amount: 20;
Roughness: 50;
Repeat: 10;
Density: 2;
Let us leave our bomber jacket aside for the moment and take a frame. In order for us to use the selection that was previously set in Photoshop, we need the Selection component (the External group).
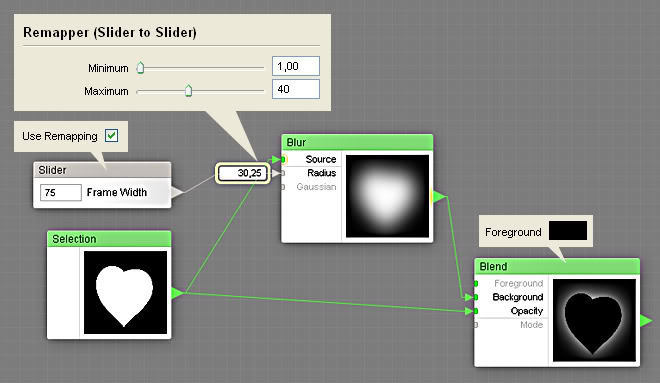
We define the width of the frame using the Blur component (Processing group). Drag it into the working field from the component list. Selection we catch on the Source input of the Blur component.
With the help of blur radius we will control the width of the frame. To do this, connect to the input of the Radius control Slider (group Controls). In the slider properties, enable the Use Remapping option. A rectangle will appear on the line connecting the Slider control and the Blur component - this is the remapper. We poke it with the mouse and set it in the Minimum: 1, Maximum: 40 properties. Having set these values, we have limited the range of possible values for Blur Radius, i.e. width of our frame.
The next step is to take the Blend component (Processing group). We put him in the foreground black. At the Background input, we catch Blur, Opacity - Selection.
The resulting bright zone will determine the zone that we will “bomb” with the previously made luminous hearts. In order for this zone to go a little bit on the image inside the frame, you need to expand it.
Dragging the Threshold component from the list (the Adjustment group). We cling to his input Source
our blend. Component Threshold set the following parameters: Threshold: 19, Smooth: 0.
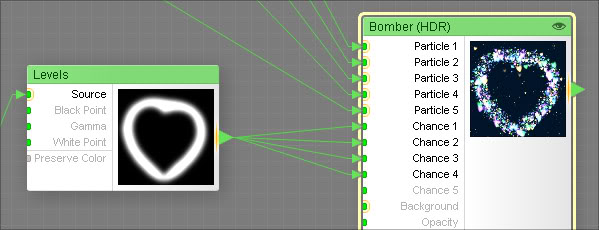
Then we make our frames soft edges with another Blur component (Radius: 7) and make it more contrast using the Levels component (Adjustments group) with the White Point: 62 parameter.

What we got at the output of the Levels component, we cling to the Bomber (HDR), which was discussed in Section 6, to the inputs of Chance 1, Chance 2, Chance 3, Chance 4. Thus, we set the area of the largest cluster of particles (glowing hearts). On the background we will scatter the particlelets are not so tight. For this we left the entrance to Chance 5.
Now we will create a mask for partchikl, which will be scattered across the background, but will not fall inside our frame. To do this, drag the Invert component from the list (the Adjustments group). We give it to the Source input the output from the Selection component (it is already on the editor's working area).
We connect Invert to the new Blend component (Processing group) at the Foreground input. We set the Opacity value to 6. And we give all this happiness to the input of Chance 5 of our Bomber (HDR) component.
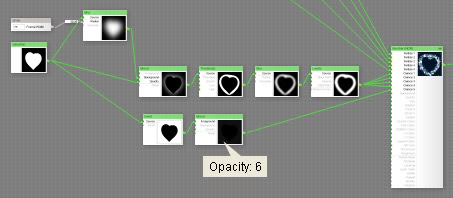
We got this picture:

It now remains to place our image in a frame and enclose a beautiful background.
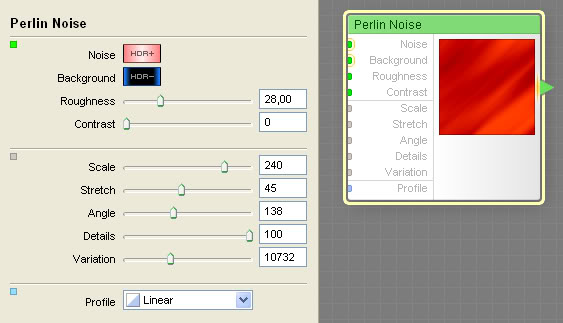
Drag Perlin Noise (Noise group) from the list. We select parameters for him at our discretion. I stopped at these: Roughness: 28; Contrast: 0; Scale: 240; Stretch: 45; Angle: 138;

Now let's combine the background with our photo, not forgetting the selection. Dragging the Image component (External group) and the Blend component (HDR) from the list. (It is Blend (HDR), and not just Blend! Otherwise, our beautiful background will lose all its beautifulness). We also look for the Invert components on the working field (we have inverted the selection with them). And we connect all this as follows:

The output of the Blend component (HDR) is connected to the “Background” input of the Bomber component (HDR).
Click the "Save Filter" button.
Click the "Apply" button. Voila! We have such an unearthly beauty:

Finally, I decided to improve the filter a bit by adding different backgrounds, vignetting and several controls to it. I decided not to describe these steps, but you can familiarize yourself with the details. To do this, just download the filter from here: Glowing Hearts Frame.ffxml and run it.
Well, in the end, I added a few presets:

In the first part of the lesson I will explain in detail how to apply a ready-made filter that you can download and use for your own pleasure. The second part will be devoted to the description of the process of creating a filter. Thus, if you are not interested in how to make filters, you can safely skip the second part.
So, let's do this frame:
')
We will need:
- photo or picture that we want to process in a similar way. This tutorial used a photo from istockphoto.com
- Adobe Photoshop
- FilterForge 2.0 Beta plugin (If you don’t have this program, download it here: www.filterforge.com/download/beta2/index.html and install it on your computer)
Step 1 - Image Preparation
Open the original image in Photoshop. Convert the Background to a Layer and call it “Photo”.
Since I plan to make a frame in the shape of a heart, in my opinion, the square will look better. For this lesson I decided to make an image of 600x600 px. To do this, in the menu Image> Canvas Size ... set the desired value:
Step 2 - Create a Selection
Now you need to set the shape of the frame. Using the Custom Shape Tool: custom shape: draw a vector object in the shape of a heart. Place this layer with shape under the “Photo” layer. Then Alt + click between these layers (Create Clipping Mask).
Now we understand what part of the photo will be visible in the frame. If desired, we can edit the shape of the frame and move the layer “Photo”.
Now that we have decided on the shape of the frame. Duplicate the “Photo” layer and make an Alt + click between the “Photo” and “Photo copy” layers (Release clipping mask).
Then select the “Photo copy” layer and Ctrl + click on the vector layer (in my case it is Shape 1).
To create a selection, you can use any method convenient to you, for example, using the Quick Mask function. The main thing is that as a result we should have a selection in the shape of the desired frame. We have this heart.
Finally, make sure again that the “Photo copy” layer is selected. It is this layer that will be processed using Filter Forge.
Step 3.1 - Filter Forge
If you decide not to bother with making your filter in Filter Forge, this will be the final stage of our lesson. Well, if you want to acquire the skills to create your own filters, which opens up almost endless possibilities :), then go to step 3.2.
Run the plugin in the menu Filters> Filter Forge> Filter Forge 2 ... Download the Glowing Hearts Frame filter from here: Glowing Hearts Frame.ffxml and run it.
We can use ready-made presets (Presets tab):
Or we can choose the filter settings ourselves (the Settings tab):
After the desired result is achieved, click the “Apply” button. Well, actually, that's all.
Further steps are devoted to the description of the filter manufacturing process in Filter Forge.
Step 3.2 - Creating a Filter in Filter Forge 2.0
Launch the plugin in the menu Filters> Filter Forge> Filter Forge 2 ... Create a new filter: Ctrl + N or click the Filter Editor button in the upper right corner of the program window, select Create a new filter and click the Open Filter Editor button.
Well, immediately give the name to our filter: Ctrl + S (or in the menu File> Save Filter As ...).
Step 4 - create glowing hearts
From the list on the right side of the screen (the list is opened by clicking the Components button in the upper right corner of the window) drag and drop the Ellipse component (the Patterns group) into the editor's working area. We set the following parameters to it:
Learn more about color selection: click on the colored rectangle next to the Color parameter. A picker window will open. Put a tick next to the HDR parameter and set the Brightness value (the third parameter in the HSB group) to 3. And then pick the desired color with a picker.
We should have such a thing:
Now we will make a heart out of this circle. For this we need the Profile Gradient component (the Gradients group) and the Offset component (the Processing group).
Component Profile Gradient tick the parameter Mirror, all the rest - without change.
The output of the Ellipse component (green triangle) is connected to the input (small green circle) of the Source component Offset. And in the same way we hook Profile Gradient to the input of Offset V. And we set the Offset component to the parameter Offset H to zero.
Voila! Now we have a picture of the heart :)
Step 5 - Clone and Repaint the Heart
Since we are going to throw particles (particles) of different colors (in our case these are hearts) on the frame, we need to make several more copies of the component group with which we made our heart. Select all 3 components. Copy to the clipboard Ctrl + C, and paste a copy of Ctrl + V (4 times). In total, I got 5 copies of such groups.
To make our hearts turn out to be multi-colored, we set different Color parameters for each Ellipse component.
[I "> Tip: Don't forget to save your filter from time to time (Ctrl + S). [/ I">
Step 6 - Bomber Component (HDR)
Now we need the Bomber (HDR) component (group of Patterns). Do not confuse with just a bomber. Otherwise, we will not get a beautiful glow, which gives the use of HDR-colors.
Now we connect the resulting hearts (the outputs of the Offset components) to the inputs of Particle 1 ... Particle 5 of the Bomber component (HDR). (Now you understand why we made exactly 5 hearts of different colors?)
Set the Bomber (HDR) component to the following parameters (those that I did not mention, leave unchanged):
Size: 100;
Opacity Chaos: 100;
Size Chaos: 100;
Rotation Chaos: 12;
H Chaos: 100;
V Chaos: 100;
Squash Chaos: 9;
Tint Amount: 20;
Roughness: 50;
Repeat: 10;
Density: 2;
Step 7 - use selection
Let us leave our bomber jacket aside for the moment and take a frame. In order for us to use the selection that was previously set in Photoshop, we need the Selection component (the External group).
Step 8 - Set Frame Width
We define the width of the frame using the Blur component (Processing group). Drag it into the working field from the component list. Selection we catch on the Source input of the Blur component.
With the help of blur radius we will control the width of the frame. To do this, connect to the input of the Radius control Slider (group Controls). In the slider properties, enable the Use Remapping option. A rectangle will appear on the line connecting the Slider control and the Blur component - this is the remapper. We poke it with the mouse and set it in the Minimum: 1, Maximum: 40 properties. Having set these values, we have limited the range of possible values for Blur Radius, i.e. width of our frame.
The next step is to take the Blend component (Processing group). We put him in the foreground black. At the Background input, we catch Blur, Opacity - Selection.
The resulting bright zone will determine the zone that we will “bomb” with the previously made luminous hearts. In order for this zone to go a little bit on the image inside the frame, you need to expand it.
Dragging the Threshold component from the list (the Adjustment group). We cling to his input Source
our blend. Component Threshold set the following parameters: Threshold: 19, Smooth: 0.
Then we make our frames soft edges with another Blur component (Radius: 7) and make it more contrast using the Levels component (Adjustments group) with the White Point: 62 parameter.
Step 9 - Determine the Heart Cluster Zones
What we got at the output of the Levels component, we cling to the Bomber (HDR), which was discussed in Section 6, to the inputs of Chance 1, Chance 2, Chance 3, Chance 4. Thus, we set the area of the largest cluster of particles (glowing hearts). On the background we will scatter the particlelets are not so tight. For this we left the entrance to Chance 5.
Now we will create a mask for partchikl, which will be scattered across the background, but will not fall inside our frame. To do this, drag the Invert component from the list (the Adjustments group). We give it to the Source input the output from the Selection component (it is already on the editor's working area).
We connect Invert to the new Blend component (Processing group) at the Foreground input. We set the Opacity value to 6. And we give all this happiness to the input of Chance 5 of our Bomber (HDR) component.
We got this picture:
Step 10 - make the background
It now remains to place our image in a frame and enclose a beautiful background.
Drag Perlin Noise (Noise group) from the list. We select parameters for him at our discretion. I stopped at these: Roughness: 28; Contrast: 0; Scale: 240; Stretch: 45; Angle: 138;
Step 11 - combine the background with the original image
Now let's combine the background with our photo, not forgetting the selection. Dragging the Image component (External group) and the Blend component (HDR) from the list. (It is Blend (HDR), and not just Blend! Otherwise, our beautiful background will lose all its beautifulness). We also look for the Invert components on the working field (we have inverted the selection with them). And we connect all this as follows:
The output of the Blend component (HDR) is connected to the “Background” input of the Bomber component (HDR).
Click the "Save Filter" button.
Step 12 - Result
Click the "Apply" button. Voila! We have such an unearthly beauty:
Finally, I decided to improve the filter a bit by adding different backgrounds, vignetting and several controls to it. I decided not to describe these steps, but you can familiarize yourself with the details. To do this, just download the filter from here: Glowing Hearts Frame.ffxml and run it.
Well, in the end, I added a few presets:
Source: https://habr.com/ru/post/83923/
All Articles