Making a simple web application on the Spring Framework MVC
In this article, I want to tell new Java developers how to write a simple web application using the popular framework Spring Framework.
When developing the application, we will use the Ant utility to automate actions and learn how to write a simple test using the JUnit library. All the code will be written in the Eclipse IDE .
The article is based on the first part of the “Introduction to Spring MVC” guide. You only need to have a general idea of Spring to read the article with benefit.
')
So welcome :)
You can use several options to configure an application in Spring. The most popular way - making configuration in the xml-files . It is also the most traditional way used in the framework since the first release. With the introduction of annotations in the Java 5 language, it became possible to customize the framework using them (since version 2.5). In this article we will use traditional XML-style.
Required Tools
- Java SDK 1.5,
- Apache Tomcat 6,
- Ant 1.7,
- Junit 4.x,
- Eclipse 3.
Important note: when copying the code, replace the quotes of the Christmas tree with ordinary ones. This will save your code from errors :)
1. Creating a project structure
Install the Spring IDE plugin on the installed Eclipse. Create a Springapp Spring-project, add a war folder.

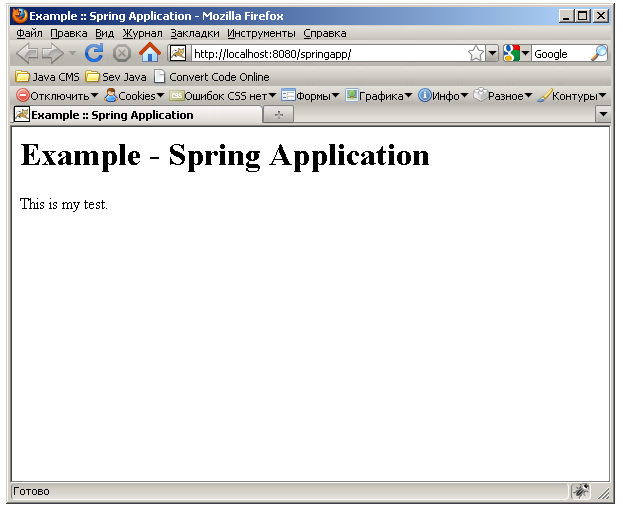
2. Create index.jsp
springapp / war / index.jsp
<html>
<head>
<title> Example :: Spring Application </ title>
</ head>
<body>
<h1> Example - Spring Application </ h1>
<p> This is my test. </ p>
</ body>
</ html>
In the war folder, create the WEB-INF , and place the web.xml in it.
springapp / war / WEB-INF / web.xml
<? xml version = '1.0' encoding = 'UTF-8' ?>
< web-app version = '2.4'
xmlns = 'java.sun.com / xml / ns / j2ee'
xmlns: xsi = 'www.w3.org / 2001 / XMLSchema-instance'
xsi: schemaLocation = 'http: //java.sun.com/xml/ns/j2ee
java.sun.com/xml/ns/j2ee/web-app_2_4.xsd ' >
< welcome-file-list >
< welcome-file >
index.jsp
< / welcome-file >
< / welcome-file-list >
< / web-app >
3. Deploy the application to Tomcat
To deploy the application on the server, we use the ant-script (to start working with Ant, it’s enough to read a note about it in Wikipedia ). The script will contain targets for compiling, building and transferring the application.
springapp / build.xml
<? xml version = '1.0' ?>
< project name = 'springapp' basedir = '.' default = 'usage' >
< property file = 'build.properties' / >
< property name = 'src.dir' value = 'src' / >
< property name = 'web.dir' value = 'war' / >
< property name = 'build.dir' value = '$ {web.dir} / WEB-INF / classes' / >
< property name = 'name' value = 'springapp' / >
< path id = 'master-classpath' >
< fileset dir = '$ {web.dir} / WEB-INF / lib' >
< include name = '*. jar' / >
< / fileset >
< ! - We need the servlet API classes: - >
< ! - * for Tomcat 5/6 use servlet-api.jar - >
< ! - * for other app servers - check the docs - >
< fileset dir = '$ {appserver.lib}' >
< include name = 'servlet * .jar' / >
< / fileset >
< pathelement path = '$ {build.dir}' / >
< / path >
< target name = 'usage' >
< echo message = '' / >
< echo message = '$ {name} build file' / >
< echo message = '-----------------------------------' / >
< echo message = '' / >
< echo message = 'Available targets are:' / >
< echo message = '' / >
< echo message = 'build - > Build the application' / >
< echo message = 'deploy - > Deploy application as directory' / >
< echo message = 'deploywar - > Deploy application as a WAR file' / >
< echo message = '' / >
< / target >
< target name = 'build' description = 'Compile main source tree java files' >
< mkdir dir = '$ {build.dir}' / >
< javac destdir = '$ {build.dir}' source = '1.5' target = '1.5' debug = 'true'
deprecation = 'false' optimize = 'false' failonerror = 'true' >
< src path = '$ {src.dir}' / >
< classpath refid = 'master-classpath' / >
< / javac >
< / target >
< target name = 'deploy' depends = 'build' description = 'Deploy application' >
< copy todir = '$ {deploy.path} / $ {name}' preservelastmodified = 'true' >
< fileset dir = '$ {web.dir}' >
< include name = '** / *. *' / >
< / fileset >
< / copy >
< / target >
< target name = 'deploywar' depends = 'build'
description = 'Deploy application as a WAR file' >
< war destfile = '$ {name} .war' webxml = '$ {web.dir} /WEB-INF/web.xml' >
< fileset dir = '$ {web.dir}' >
< include name = '** / *. *' / >
< / fileset >
< / war >
< copy todir = '$ {deploy.path}' preservelastmodified = 'true' >
< fileset dir = '.' >
< include name = '*. war' / >
< / fileset >
< / copy >
< / target >
< / project >
springapp / build.properties
# Ant properties for building the springapp
appserver.home = C: / Program Files / Apache Software Foundation / Tomcat 6.0 /
# for Tomcat 5 use $ appserver.home} / server / lib
# for Tomcat 6 use $ appserver.home} / lib
appserver.lib = $ {appserver.home} / lib
deploy.path = $ {appserver.home} / webapps
tomcat.manager.url = http: // localhost: 8080 / manager
tomcat.manager.username = tomcat
tomcat.manager.password = s3cret
Set the appserver.home variable correctly . For me, it points to C: / Program Files / Apache Software Foundation / Tomcat 6.0 /.
To create a Tomcat user in the appserver.home / conf / tomcat-users.xml file, write:
<? xml version = '1.0' encoding = 'utf-8' ?>
< tomcat-users >
< role rolename = " manager " / >
< user username = " tomcat " password = " s3cret " roles = " manager " / >
< / tomcat-users >
Run the build script: Context menu of the build.xml> Run As> Ant Build> Select targets build, deploy in the Targets tab.
4. Check application performance
Launch Tomcat and open localhost: 8080 / springapp / in your browser.
5. Download Spring Framework
Download the framework , if you have not done so already, and unpack it.
This completes the environment setting. Next, we proceed to configuring the application itself on Spring MVC.
6. Change web.xml in the WEB-INF folder
We define a dispatcher servlet DispatcherServlet (also called Front Controller ). Its purpose is to dispatch incoming requests. Let's make mapping for this servlet. We decided to send all requests with urls like ' .htm ' to the servlet-dispatcher.
springapp / war / WEB-INF / web.xml
<? xml version = " 1.0 " encoding = " UTF-8 " ?>
< web-app version = " 2.4 " xmlns = " java.sun.com/xml/ns/j2ee "
xmlns: xsi = " www.w3.org/2001/XMLSchema-instance "
xsi: schemaLocation = " java.sun.com/xml/ns/j2ee
java.sun.com/xml/ns/j2ee/web-app_2_4.xsd " >
< servlet >
< servlet-name > springapp < / servlet-name >
< servlet-class > org.springframework.web.servlet.DispatcherServlet < / servlet-class >
< load-on-startup > 1 < / load-on-startup >
< / servlet >
< servlet-mapping >
< servlet-name > springapp < / servlet-name >
< url-pattern > * .htm < / url-pattern >
< / servlet-mapping >
< welcome-file-list >
< welcome-file >
index.jsp
< / welcome-file >
< / welcome-file-list >
< / web-app >
Create a file springapp-servlet.xml . This file contains the descriptions of the beans (java files) that DispatcherServlet will use. In other words, the file defines the servlet context (WebApplicationContext). Under the standard naming convention for Spring Web MVC, the springapp servlet will have a bean description file named springapp-servlet.xml .
Add a bean entry description of '/hello.htm' with class springapp.web.HelloController . This entry defines the Controller that the application will use to serve the request with the url ' /hello.htm '. For mapping a URL to an object that it will process, the Spring Web MVC framework uses a class that implements the HandlerMapping interface. The default mapping class is BeanNameUrlHandlerMapping .
Unlike DispatcherServlet, HelloController is responsible for handling a request for a specific page. It is also called the ' Page Controller '.
springapp / war / WEB-INF / springapp-servlet.xml
  <? xml version = "1.0" encoding = "UTF-8"?> <br/>
 <beans xmlns = "http://www.springframework.org/schema/beans" <br />
	 xmlns: xsi = "http://www.w3.org/2001/XMLSchema-instance" <br/>
	 xsi: schemaLocation = "http://www.springframework.org/schema/beans <br/>
     http://www.springframework.org/schema/beans/spring-beans-2.5.xsd "> <br/>
	 <! - the application context definition for the springapp DispatcherServlet -> <br/>
	 <bean name = "/ hello.htm" class = "springapp.web.HelloController" /> <br/>
 </ beans>
7. Copy the library in 'WEB-INF / lib'
Create the war / WEB-INF / lib directory and copy the necessary Spring libraries into it:
- spring.jar (from spring-framework-2.5 / dist);
- spring-webmvc.jar (from spring-framework-2.5 / dist / modules);
- commons-logging.jar (from spring-framework-2.5 / lib / jakarta-commons);
- junit-4.4.jar (from spring-framework-2.5 / lib / junit).
Add the necessary libraries to the Eclipse project:
- Project context menu> Build Path> Configure Build Path> Add External JARs> 'war / WEB-INF / lib';
- Project context menu> Build Path> Configure Build Path> Add Library> Server Runtime> Tomcat.
8. Create a controller
Let's create a HelloController Controller in the springapp.web package.
springapp / src / springapp / web / HelloController.java
package springapp.web;
import org.springframework.web.servlet.mvc.Controller;
import org.springframework.web.servlet.ModelAndView;
import javax.servlet.ServletException;
import javax.servlet.http.HttpServletRequest;
import javax.servlet.http.HttpServletResponse;
import org.apache.commons.logging.Log;
import org.apache.commons.logging.LogFactory;
import java.io.IOException;
public class HelloController implements Controller {
protected final Log logger = LogFactory.getLog (getClass ());
public ModelAndView handleRequest (HttpServletRequest request,
HttpServletResponse response) throws ServletException, IOException {
logger.info ( "Returning hello view" );
return new ModelAndView ( "hello.jsp" );
}
}
This is a very simplified implementation of the Controller. We will expand it further, and will also use ready-made implementations of controllers from the framework.
In the MVC model, the Controller processes the request and returns Model-And-View (ModelAndView) - in our case the ' hello.jsp ' page. The model that the controller returns is actually resolved via the ViewResolver . Since we did not explicitly specify ViewResolver, the default resolver will be used, which simply sends a request to the address of the resource specified in the Model-and-View. In the future we will change it.
We also specified a logger with which we can check the work performed by the application. When using Tomcat, we can view the application log in the catalina.out file, which can be found at $ {Tomcat.home} / log .
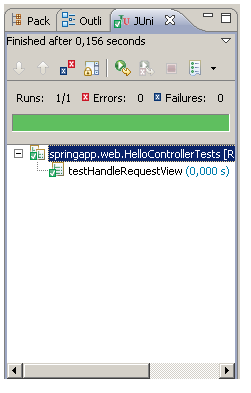
9. Write a test for the controller
Testing is one of the most important stages in the development of complex software systems. This is also a fundamental practice with Agile software development . Many people believe that the best time to write tests is through development, not after. So, despite the simplicity of the controller we developed, we will write a test for it.
Create a HelloControllerTests test that extends the TestCase class from the Junit library: New> Other> JUnit> JUnit Test Case.
This is a unit test. It checks whether the view name returned via handleRequest () matches the type we expect: ' hello.jsp '.

springapp / src / springapp / web / HelloControllerTests.java
package springapp.web;
import org.springframework.web.servlet.ModelAndView;
import springapp.web.HelloController;
import static org.junit.Assert. *;
import org.junit.Test;
public class HelloControllerTests {
@Test
public void testHandleRequestView () throws Exception {
HelloController controller = new HelloController ();
ModelAndView modelAndView = controller.handleRequest ( null , null );
assertEquals ( "hello.jsp" , modelAndView.getViewName ());
}
}
To run the test, use the menu: Run> Run As> JUnit Test.
The result of the test:
Another Agile development practice is continuous integration (Continuous Integration). It is a good idea to run tests with each build (build), in order to be confident in the correct behavior of your code (ideally, tests run automatically with each build).
10. Create View
It is time to create a View . In our case, this will be the JSP page hello.jsp .
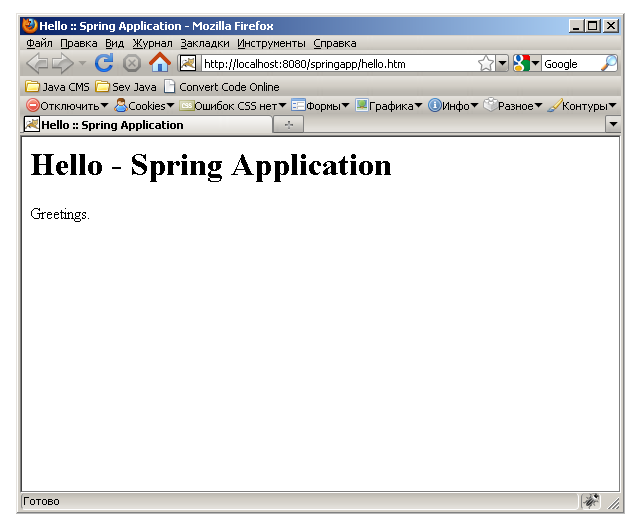
springapp / war / hello.jsp
<html>
<head>
<title> Hello :: Spring Application </ title>
</ head>
<body>
<h1> Hello - Spring Application </ h1>
<p> Greetings. </ p>
</ body>
</ html>
11. Compile and deploy the application on the server.
For the build.xml file, add the springapp \ war \ WEB-INF \ lib \ junit-4.4.jar library to Classpath , and accomplish the Build and Deploy targets (Context menu of the build.xml> Run As> Ant Build ...> tabs Targets, Classpath ).
12. Let's try to start the application.
In the browser, type http: // localhost: 8080 / springapp / hello.htm .
13. Summary
Let's skim through what has been done.
- The application start page is index.jsp. It serves to ensure the installation of the environment. We will change it later.
- The dispatcher servlet (DispatcherServlet or Front controller) with the corresponding description file springapp-servlet.xml.
- The controller (Page controller) HelloController with basic functionality - simply returns Model-And-View. At the moment, the model is empty. Full implementation of the Model will be made in the future.
- A unit test for the HelloControllerTests controller that checks if the name of the view matches the expected one.
- Application view - hello.jsp.
Below is the structure of the project, which should be after the implementation of all instructions.

The finished Eclipse project can be downloaded here .
Thanks for attention. I wish you success!
Source: https://habr.com/ru/post/83860/
All Articles