Creating circular panoramas (flash)
How to make a panoramic photo with a three-dimensional view

To turn the head - by pulling with the mouse, or with the cursors ← →, approach / removal - with the mouse wheel.
In this article I will talk about how to take panoramic photos, as well as
how to make circular 3D panoramas out of them: what programs are needed for this, and how to use them. In short, I will try to show the whole process step by step. At the end of the article I will do a little work on the bugs, and tell you how to avoid them in the future.
In general, making a panoramic photo (including a circular panorama) is not at all difficult.
With minimal skill, everything will take about 10 minutes.
I will list all that we need:
')
As an example, I propose to use the work on the panorama, the original images of which were taken in the winter of this (2010) year on the territory of the plant NPO "Plastic", which is on Berezhkovskaya embankment in Moscow.
You have already seen a picture of this panorama at the top of the page.
11 photos were taken with a Canon 350D camera, with a whale lens, focal length of 18 mm. Snapshots
made without a tripod, with hands. The frame is “vertical”. If the pictures were taken in the "horizontal" mode, it would take 6-7 frames instead of 11, but then less landscape would fall into the frame (in height).
The photos were taken with a small "overlap", i.e. each new frame contained 5-10% of the previous frame.
You can download the archive with source jpg-files at http://lesha.name/panorama/howto.rar , the file weighs 25 megabytes.
1. Run the program Microsoft Image Composite Editor
... and click File → New.

In the window that opens, select the files from the unpacked howto.rar archive
(all at once), and click "Open". For a while (a couple of minutes) the computer puffs,
trying to figure out where the head is, and where the tail is, and “gluing together” photographs with edges based on the principle of finding the same objects in adjacent frames. Those. with the help of the same 10% layering of personnel, which we took as an “overlap”.
As a result, we will have something similar to this:
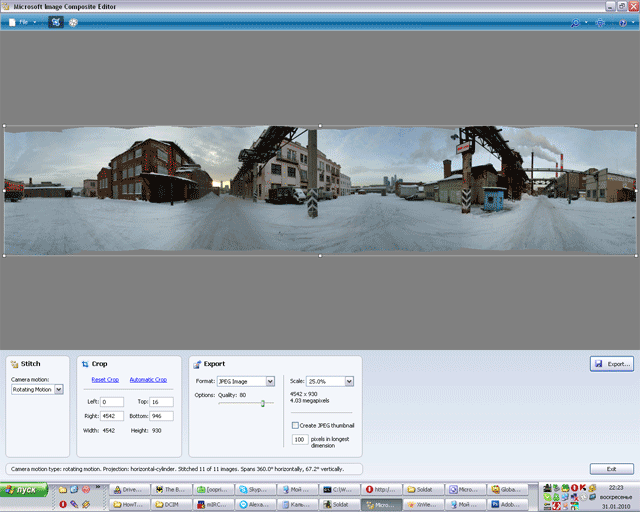
Now we need to cut the irregularities resulting from gluing:
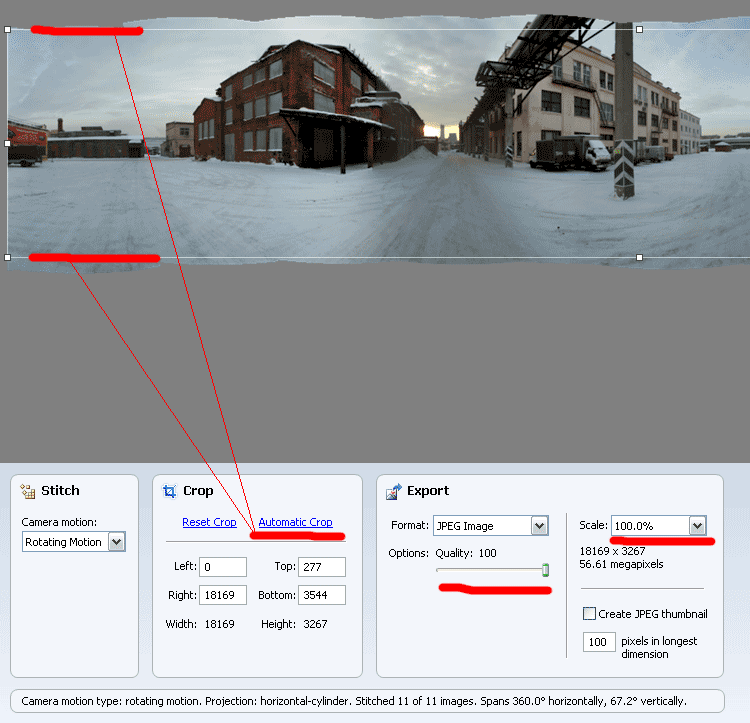
To do this, we press the Automatic Crop button (underlined in red) - and the program will cut off the excess itself.
At the same time, we set the maximum quality for the output image - move the Quality slider all the way to the right, up to 100%.
Also leave the original size of the panorama - in the Scale menu, set 100%.
We leave the maximum quality settings here because we will always have time to lower the quality - and we will do this at the final stage of creating a panorama, but not now.
Now we need to save the panorama as a JPG file.

Everything is done in two clicks - click on "Export",
and then on “Save”. Let's call the file, for example, panorama_result.jpg
By the way, the file will be large, at 28 megabytes. However, we deliberately did this: the fewer steps in optimizing the image, the higher the quality of the final image.
We will have the output file like this (only 10 times larger):
Add our file panorama_result.jpg to the program
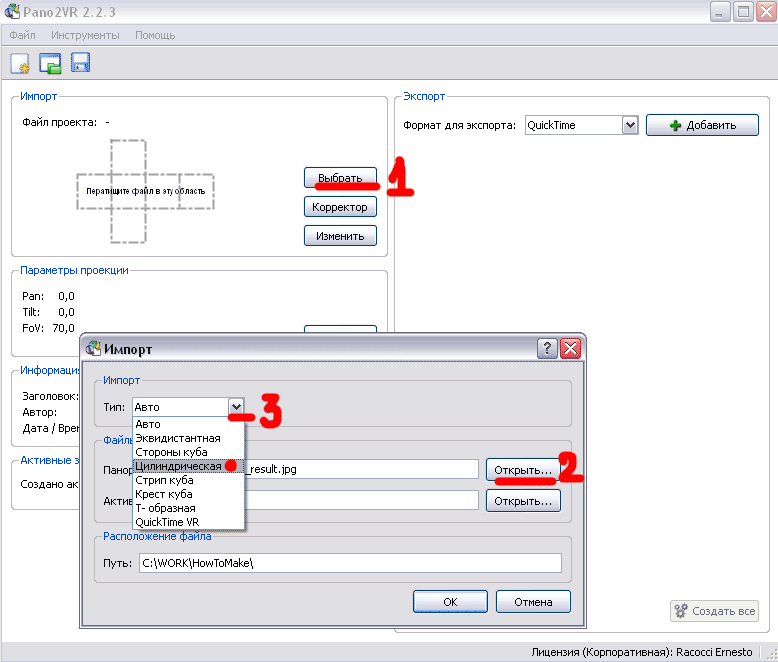
Press “Select” (number 1), then “Open” (number 2, and look for our panorama_result.jpg file in the window), then just in case, we will indicate what we are going to make a cylindrical panorama (number 3). OK.
Now click on the drop down menu “Format for export”, and select “Flash” there.
Then click on the "Add" button.
Before us pops up such a window, which we now consider in detail:
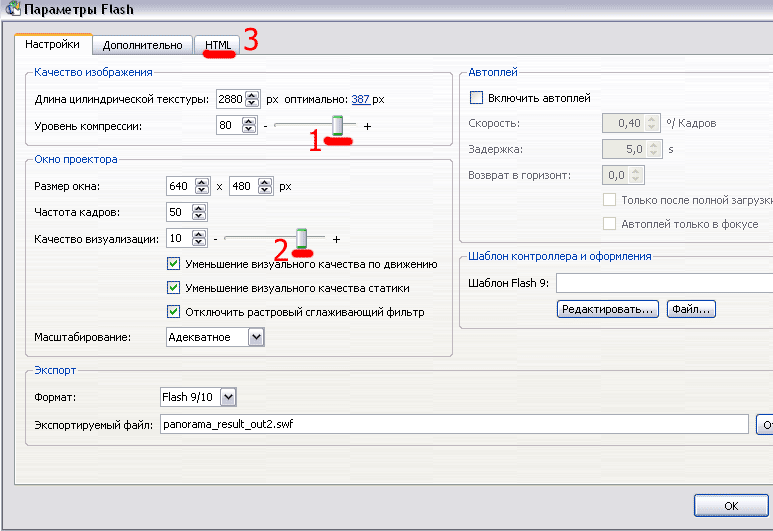
To begin with, we set the compression level to 80, the rendering quality to 10, and the length of the cylindrical texture to maximum, i.e. at 2880.
Playing with these settings, you will be able to receive output panoramas of different quality / size.
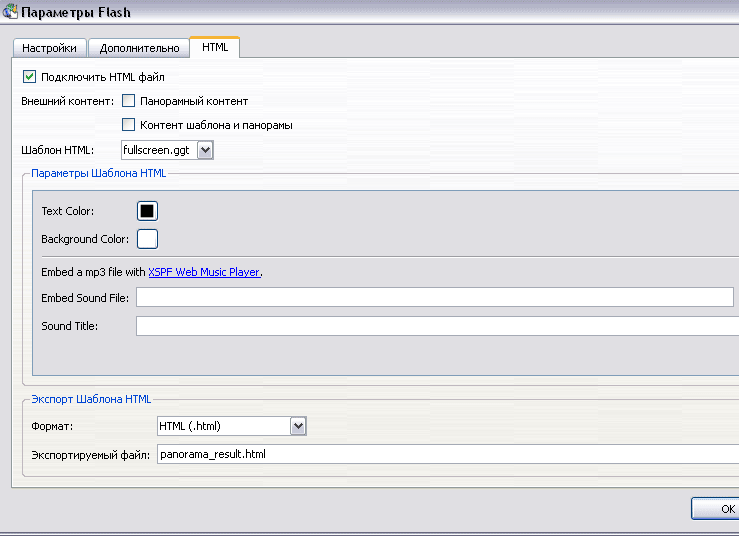
Then go to the HTML tab, and put a tick in the "Connect HTML-file." We do this so that the flash drive can be immediately put on your homepage. The file will be called panorama_result.html
Actually, everything. Press the “ OK ” button , the computer will ask “Export file?”, After your affirmative answer it will think a little, and show a page in the browser - which will display something like this:
http://lesha.name/panorama/npo.htm
If you want to change any settings of the resulting panorama - you can change the settings in the “Projection Parameters” block, or click on the wrench image and change the quality / size of the photo.
An observant reader from North America called the Sharp-Sighted Eye will notice that there are at least two minor flaws in the panorama.
First, to the left of the sun, on the brick extension, there is an uneven junction line of two frames: because of which, the left side of the building is brighter, and the right side is darker, muddy. And the sky above the building is different - part of it with clouds, and part - without. It turned out most likely because of the autofocus, and the presence in the frame of the sun. To avoid this, next time I will take a picture in such a way that the sun falls into the “overlap” of two frames - then in the end the parts of the image to the right and to the left of it will be as close as possible to the exposure (i.e. the amount of light), and there will not be a sharp drop in the dark / light frame. Also, most likely, it was necessary to take photos on a permanent manual focus.
The second defect is to the left of the yellow plate advertising the repair of bumpers. If you make an approximation-increase in the image using the mouse wheel, it will be seen that the cabs of the cars "docked" is not very correct. It happened, most likely, also because of the automatic focus, plus, perhaps, I moved a little between the frames. A tripod and manual focus should help fix the situation - a simple telescopic tripod costs 500-600 rubles, and can be easily removed even in a small shoulder bag.
Behind this all.
If you have any comments, suggestions, amendments to this article - write.
UPD.
Good free programs:
1. Hugin hugin.sourceforge.net
2. Panosalado panosalado.com
3.?
To turn the head - by pulling with the mouse, or with the cursors ← →, approach / removal - with the mouse wheel.
In this article I will talk about how to take panoramic photos, as well as
how to make circular 3D panoramas out of them: what programs are needed for this, and how to use them. In short, I will try to show the whole process step by step. At the end of the article I will do a little work on the bugs, and tell you how to avoid them in the future.
In general, making a panoramic photo (including a circular panorama) is not at all difficult.
With minimal skill, everything will take about 10 minutes.
I will list all that we need:
- Camera.
I hope that for most readers it’s still digital, not film, because we will process photos on the computer. - Computer.
Any computer will work, if only it was released no more than 10 years ago, and it was running the Windows operating system.
You can create circular panoramic photos on older computers and on computers with other operating systems - but this article does not capture them. - Programs.
- Adobe Flash Player 10 - most likely, Flash is already installed on your computer, and you don’t need to download / install it.
- Microsoft Research Image Composite Editor (Microsoft ICE) - 3 MB, a program that sticks together disparate photos into a single panel.
- Pano2VR 2.2.3 - a program that makes a circular (3D) panorama (3D) using a flash. Do not forget to feed the program a key code, so that the inscription “Trial Version Expired” would not appear on your panoramas. Alternatively, the code can be purchased from the developers. There are other similar programs for creating circular panoramas that you can easily find through Yandex / Google.
- Instructions. (optional)
You are reading it now.
')
Let's get started
As an example, I propose to use the work on the panorama, the original images of which were taken in the winter of this (2010) year on the territory of the plant NPO "Plastic", which is on Berezhkovskaya embankment in Moscow.
You have already seen a picture of this panorama at the top of the page.
11 photos were taken with a Canon 350D camera, with a whale lens, focal length of 18 mm. Snapshots
made without a tripod, with hands. The frame is “vertical”. If the pictures were taken in the "horizontal" mode, it would take 6-7 frames instead of 11, but then less landscape would fall into the frame (in height).
The photos were taken with a small "overlap", i.e. each new frame contained 5-10% of the previous frame.
You can download the archive with source jpg-files at http://lesha.name/panorama/howto.rar , the file weighs 25 megabytes.
1. Run the program Microsoft Image Composite Editor
... and click File → New.
In the window that opens, select the files from the unpacked howto.rar archive
(all at once), and click "Open". For a while (a couple of minutes) the computer puffs,
trying to figure out where the head is, and where the tail is, and “gluing together” photographs with edges based on the principle of finding the same objects in adjacent frames. Those. with the help of the same 10% layering of personnel, which we took as an “overlap”.
As a result, we will have something similar to this:
Now we need to cut the irregularities resulting from gluing:
To do this, we press the Automatic Crop button (underlined in red) - and the program will cut off the excess itself.
At the same time, we set the maximum quality for the output image - move the Quality slider all the way to the right, up to 100%.
Also leave the original size of the panorama - in the Scale menu, set 100%.
We leave the maximum quality settings here because we will always have time to lower the quality - and we will do this at the final stage of creating a panorama, but not now.
Now we need to save the panorama as a JPG file.
Everything is done in two clicks - click on "Export",
and then on “Save”. Let's call the file, for example, panorama_result.jpg
By the way, the file will be large, at 28 megabytes. However, we deliberately did this: the fewer steps in optimizing the image, the higher the quality of the final image.
We will have the output file like this (only 10 times larger):
2 Run the program Pano2VR
Add our file panorama_result.jpg to the program
Press “Select” (number 1), then “Open” (number 2, and look for our panorama_result.jpg file in the window), then just in case, we will indicate what we are going to make a cylindrical panorama (number 3). OK.
Now click on the drop down menu “Format for export”, and select “Flash” there.
Then click on the "Add" button.
Before us pops up such a window, which we now consider in detail:
To begin with, we set the compression level to 80, the rendering quality to 10, and the length of the cylindrical texture to maximum, i.e. at 2880.
Playing with these settings, you will be able to receive output panoramas of different quality / size.
Then go to the HTML tab, and put a tick in the "Connect HTML-file." We do this so that the flash drive can be immediately put on your homepage. The file will be called panorama_result.html
Actually, everything. Press the “ OK ” button , the computer will ask “Export file?”, After your affirmative answer it will think a little, and show a page in the browser - which will display something like this:
http://lesha.name/panorama/npo.htm
If you want to change any settings of the resulting panorama - you can change the settings in the “Projection Parameters” block, or click on the wrench image and change the quality / size of the photo.
3. Work on the bugs.
An observant reader from North America called the Sharp-Sighted Eye will notice that there are at least two minor flaws in the panorama.
First, to the left of the sun, on the brick extension, there is an uneven junction line of two frames: because of which, the left side of the building is brighter, and the right side is darker, muddy. And the sky above the building is different - part of it with clouds, and part - without. It turned out most likely because of the autofocus, and the presence in the frame of the sun. To avoid this, next time I will take a picture in such a way that the sun falls into the “overlap” of two frames - then in the end the parts of the image to the right and to the left of it will be as close as possible to the exposure (i.e. the amount of light), and there will not be a sharp drop in the dark / light frame. Also, most likely, it was necessary to take photos on a permanent manual focus.
The second defect is to the left of the yellow plate advertising the repair of bumpers. If you make an approximation-increase in the image using the mouse wheel, it will be seen that the cabs of the cars "docked" is not very correct. It happened, most likely, also because of the automatic focus, plus, perhaps, I moved a little between the frames. A tripod and manual focus should help fix the situation - a simple telescopic tripod costs 500-600 rubles, and can be easily removed even in a small shoulder bag.
Behind this all.
If you have any comments, suggestions, amendments to this article - write.
UPD.
Good free programs:
1. Hugin hugin.sourceforge.net
2. Panosalado panosalado.com
3.?
Source: https://habr.com/ru/post/83434/
All Articles