Wooden toys-2 or Pitonim on your smartphone
After I posted the post “ Wooden toys or How I wrote mobile games from the phone ” a couple of days ago for the authorship of the Artemzr habrauser now , my ICQ and mail experienced a mini habra effect: those who wanted to get to the main habr in this way turned out to be not so little .
Among them wasOmKol Moscow student OmKol habrauzer, which this post inspired to share his experience: how to write a Python program on a smartphone using only smartphone tools, without a PC.
This guide only applies to Symbian 8.1 smartphones and below, although some of the programs listed below are also present on Symbian 9.x.
')
So what I used:
I will not describe the process of programming in Python - there are people who will make it better than me.
I will tell you how to get a full-fledged application using the above programs. So:
install the Python interpreter itself, Python Script Shell and Python Modules Pack, and then Two Towers itself.
After installing the menu, you will see the icons Tower 1 and Tower 2 with the same program - useful if you are writing a program in parallel are going to write a module for it or just a text file.
When you start one of the two towers, the entire screen turns white, only the cursor flashes lonely - you can write a program. But let's explore the functionality in more detail - when you click on the left soft key, a menu appears. It can perform basic operations with a file (create, open, save), perform a program search, compile, run, install the program so that an icon appears in the menu - the functionality is generally decent for a mobile programming environment.
When creating a program, you can use a ready-made template in which basic modules are imported, functions such as encoding text into utf-8 and its decoding are described, which is useful for displaying text in Russian on the screen, functions for displaying an information message and an error message, exception handling and error output to the screen - well, some work has been done for you.
The program is saved in \ System \ Apps \ Python \ my \, which is quite convenient if you are not satisfied with the debugger in Two Towers and you want to debug in the Python Script Shell. When the program is ready, it would be nice to install it for subsequent packaging - the menu item “Tools> Install”. You will be prompted to enter the program name and its UID in the format 0x12abcdef. It is important to choose a unique UID that does not match the UID of other applications; moreover, if you select an invalid UID, the program will generate an installation error - there is nothing wrong with that, you just have to choose another UID.

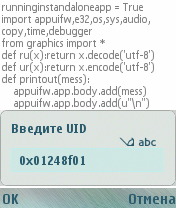
Program window Enter the UID to install the program.
Now it would be nice to create an icon for the program. To do this, we will open the Image Designer. We need to create 4 images - two with a resolution of 42x29 and two with a resolution of 44x44. One image is the actual icon in PNG format with 24 bits, and the other mask is a black and white or monochrome image (PNG format with 8 bits), the pixel brightness in which determines the transparency of the pixel in the image itself. White pixel - no transparency, black pixel - full transparency. The 42x29 icon will be displayed in the menu, and the 44x44 icon in the running application.

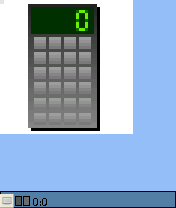
Image Designer such a fancy Here such an icon took me ten minutes
The resulting images must be saved in the \ python \ mbmtool \ img \ folder in the order: 42x29 image, 42x29 mask, 44x44 image, 44x44 mask. Then open MBMTool, select the 24bit / 8bit or 16bit / 8bit inversion, then proceed to the package by selecting the appropriate “Packing” menu item. The result is an mbm file saved in the path \ python \ mbmtool \ mbm \. Go to the tab mbm and select "Create an icon". Then we select the mbm file to create the icon, specify its UID, or select the app file of our program from \ System \ Apps \ Program_Name \, from which the UID is taken. After we enter the name of the program and the name of the aif-file, which must match the name of the aif-file from the program located on the path \ System \ Apps \ Program_name \. The icon will be created and saved in the \ python \ mbmtool \ aif \ folder. This aif-file then replace the old aif-file along the path \ System \ Apps \ Program_Name \.
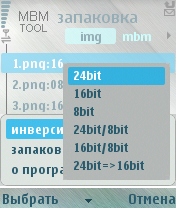

Menu program MBMTool Went packing - with progress bar


Create a file manager icon in MbmTool
Now let's proceed to the final stage of all this disgrace - the creation of the installation package. For this we use SISBOOM. There are two options for packaging the program - either straight from \ system \ apps, or confusing and creating your project with the structure of all the files that will be in the project. In the second case, you will need to create a project folder and three subfolders in it - “C” (packing files installed in the main memory), “E” (packing files for a memory card) and “!” (The application manager will ask where the files from this install folders). After selecting a folder in both cases, you will be prompted to edit the project.info file — this file contains information about the installation package, such as the project UID, its name, version, project type, you can also write a description of the project that will appear during the package installation. When you click on the right soft and select “Save and Pack”, the project will start packing. This process can take a long time - it all depends on the size of your program. After packing the sis-package will appear in the project folder or in the root of the disk.


Menu SISBOOM That packed the program
That's it - a full-fledged Python program with an icon in the menu and an installation package is ready!
PS The author of the post is a habrauser OmKol , please love and don't regret karma :)
Among them was
This guide only applies to Symbian 8.1 smartphones and below, although some of the programs listed below are also present on Symbian 9.x.
')
So what I used:
- The actual interpreter of Python and Python Script Shell - a necessary thing for debugging the code - is here sourceforge.net/projects/pys60/files
- Python Modules Pack is an unofficial set of third-party modules that extends the capabilities of Python.
- Two Towers - a programming environment written in Python, has a fairly powerful functionality.
- Image Designer is a powerful graphics editor with dozens of filters and a huge number of functions, also written in Python. An optional application, but because we want to write a full-fledged program with graphics, is not it?
- MBMTool - if you want your program to have an icon, then this program will definitely come in handy. Written in Python.
- SISBOOM is a program that allows you to package your program in an installation package in sis format. And yes, also written in Python.
- The above programs can be downloaded here narod.ru/disk/17555215000/PyS60v2DevSoft.zip.html
- Any file manager with access to the system folders of the file system.
I will not describe the process of programming in Python - there are people who will make it better than me.
I will tell you how to get a full-fledged application using the above programs. So:
install the Python interpreter itself, Python Script Shell and Python Modules Pack, and then Two Towers itself.
After installing the menu, you will see the icons Tower 1 and Tower 2 with the same program - useful if you are writing a program in parallel are going to write a module for it or just a text file.
When you start one of the two towers, the entire screen turns white, only the cursor flashes lonely - you can write a program. But let's explore the functionality in more detail - when you click on the left soft key, a menu appears. It can perform basic operations with a file (create, open, save), perform a program search, compile, run, install the program so that an icon appears in the menu - the functionality is generally decent for a mobile programming environment.
When creating a program, you can use a ready-made template in which basic modules are imported, functions such as encoding text into utf-8 and its decoding are described, which is useful for displaying text in Russian on the screen, functions for displaying an information message and an error message, exception handling and error output to the screen - well, some work has been done for you.
The program is saved in \ System \ Apps \ Python \ my \, which is quite convenient if you are not satisfied with the debugger in Two Towers and you want to debug in the Python Script Shell. When the program is ready, it would be nice to install it for subsequent packaging - the menu item “Tools> Install”. You will be prompted to enter the program name and its UID in the format 0x12abcdef. It is important to choose a unique UID that does not match the UID of other applications; moreover, if you select an invalid UID, the program will generate an installation error - there is nothing wrong with that, you just have to choose another UID.
Program window Enter the UID to install the program.
Now it would be nice to create an icon for the program. To do this, we will open the Image Designer. We need to create 4 images - two with a resolution of 42x29 and two with a resolution of 44x44. One image is the actual icon in PNG format with 24 bits, and the other mask is a black and white or monochrome image (PNG format with 8 bits), the pixel brightness in which determines the transparency of the pixel in the image itself. White pixel - no transparency, black pixel - full transparency. The 42x29 icon will be displayed in the menu, and the 44x44 icon in the running application.
Image Designer such a fancy Here such an icon took me ten minutes
The resulting images must be saved in the \ python \ mbmtool \ img \ folder in the order: 42x29 image, 42x29 mask, 44x44 image, 44x44 mask. Then open MBMTool, select the 24bit / 8bit or 16bit / 8bit inversion, then proceed to the package by selecting the appropriate “Packing” menu item. The result is an mbm file saved in the path \ python \ mbmtool \ mbm \. Go to the tab mbm and select "Create an icon". Then we select the mbm file to create the icon, specify its UID, or select the app file of our program from \ System \ Apps \ Program_Name \, from which the UID is taken. After we enter the name of the program and the name of the aif-file, which must match the name of the aif-file from the program located on the path \ System \ Apps \ Program_name \. The icon will be created and saved in the \ python \ mbmtool \ aif \ folder. This aif-file then replace the old aif-file along the path \ System \ Apps \ Program_Name \.
Menu program MBMTool Went packing - with progress bar
Create a file manager icon in MbmTool
Now let's proceed to the final stage of all this disgrace - the creation of the installation package. For this we use SISBOOM. There are two options for packaging the program - either straight from \ system \ apps, or confusing and creating your project with the structure of all the files that will be in the project. In the second case, you will need to create a project folder and three subfolders in it - “C” (packing files installed in the main memory), “E” (packing files for a memory card) and “!” (The application manager will ask where the files from this install folders). After selecting a folder in both cases, you will be prompted to edit the project.info file — this file contains information about the installation package, such as the project UID, its name, version, project type, you can also write a description of the project that will appear during the package installation. When you click on the right soft and select “Save and Pack”, the project will start packing. This process can take a long time - it all depends on the size of your program. After packing the sis-package will appear in the project folder or in the root of the disk.
Menu SISBOOM That packed the program
That's it - a full-fledged Python program with an icon in the menu and an installation package is ready!
PS The author of the post is a habrauser OmKol , please love and don't regret karma :)
Source: https://habr.com/ru/post/83167/
All Articles