Clock on 30 LEDs
There is such a proverb - how to start something to do on the Arduino, so usually the clock turns out. We will not move away from this rule and make a clock. I note that working with microcontrollers (MK)) is my hobby. I liked the low level of entry for dating and learning MK. In addition, as an education programmer, I was attracted by the possibility of mastering new technologies by creating systems based on the MC.
Design
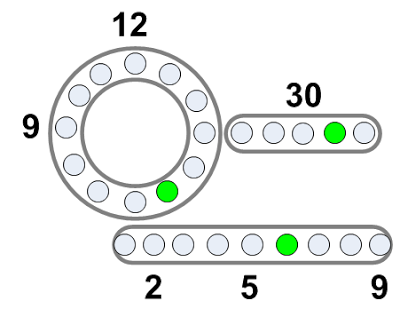
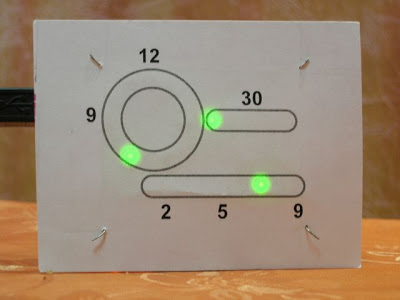
The design decision was inspired by the clock from the Tokyo Lights site. The display in this view was liked by the fact that despite the limited availability of time illumination by 30 diodes, there is a recognizable hour circle and you can understand how long it takes at a glance (after preliminary training). Now on the clock 5 hours 46 minutes .
Description
The clock uses an internal timer. Testing of such a solution showed accuracy no worse than ± 1min in three days. A longer period has not been tested. To connect 30 LEDs, a circuit is needed that would reduce the number of control signals. It can be decoders, registers. However, there is a rather tricky scheme for connecting LEDs, which adds magic to this watch.
The technology is called Charlieplexing . To connect the 30 LEDs we need (X = N * (N-1)) - only 6 ports. True display will be dynamic, i.e. the diode will glow only a small quantum of time. Due to the inertia of perception of the eye, it will seem to us that the diode glows constantly.
Charlieplexing technology
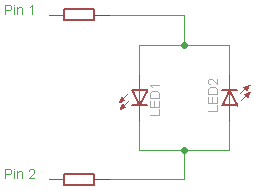
According to the description in the Wiki . If you apply “1” Pin 1 and “0” to Pin 2, the LED of Led 1 will be on. The LED of LED 2 will not light up in this case. If you change the polarity, it will burn Led 2.
')
The following diagram clarifies how ports are saved. With three ports you can control six LEDs

To disconnect the port from the circuit, the third state of the port is used - it is turned on "at the input". For arduino there is a special package for the implementation of the principle of charlielexing.
Implementation
For the implementation we need:
Purchased from: Robocraft and Chip and Dip . Approximate cost - 1500 rubles .
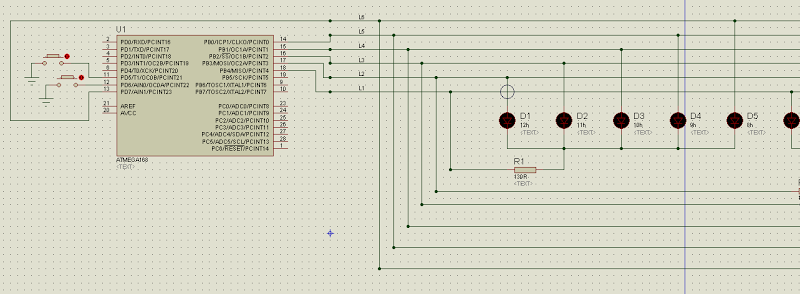
Proteus circuit
Development and modeling was carried out in the Proteus package. Simulation is not too successful, because dynamic display is hard to grasp. Probably need to use additional virtual tools.
General form

Large
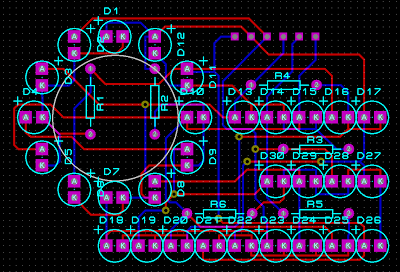
Layout
For wiring had to have items manually.
Long decided on such a large amount of soldering. I will say the process is not simple and requires skill and patience. Probably I will hardly do such work again. I will try something more convenient than the type of laser-iron technology . There truth is etching and drilling required.
LED view
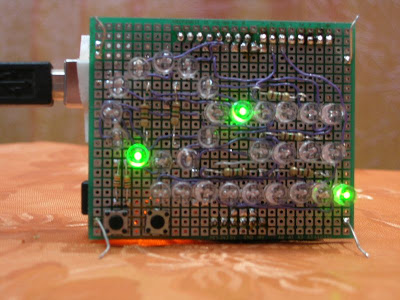
Buttons set the hours and minutes. In the finished product they may have to be transferred.
Installation

Prototype in design
Perspectives
Project
Project files in Proteus and Arduino program here
Design
The design decision was inspired by the clock from the Tokyo Lights site. The display in this view was liked by the fact that despite the limited availability of time illumination by 30 diodes, there is a recognizable hour circle and you can understand how long it takes at a glance (after preliminary training). Now on the clock 5 hours 46 minutes .
Description
The clock uses an internal timer. Testing of such a solution showed accuracy no worse than ± 1min in three days. A longer period has not been tested. To connect 30 LEDs, a circuit is needed that would reduce the number of control signals. It can be decoders, registers. However, there is a rather tricky scheme for connecting LEDs, which adds magic to this watch.
The technology is called Charlieplexing . To connect the 30 LEDs we need (X = N * (N-1)) - only 6 ports. True display will be dynamic, i.e. the diode will glow only a small quantum of time. Due to the inertia of perception of the eye, it will seem to us that the diode glows constantly.
Charlieplexing technology
According to the description in the Wiki . If you apply “1” Pin 1 and “0” to Pin 2, the LED of Led 1 will be on. The LED of LED 2 will not light up in this case. If you change the polarity, it will burn Led 2.
')
The following diagram clarifies how ports are saved. With three ports you can control six LEDs
To disconnect the port from the circuit, the third state of the port is used - it is turned on "at the input". For arduino there is a special package for the implementation of the principle of charlielexing.
Implementation
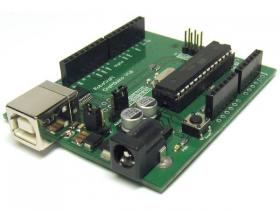
For the implementation we need:- Arduino-compatible board
- Proto-board and adapters to the Arduino
- 30 LEDs (12 + 5 + 9 hours and minutes 4 on alarm clocks)
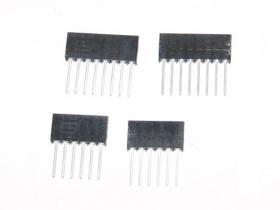
- 6 limiting resistors
- 2 buttons
Purchased from: Robocraft and Chip and Dip . Approximate cost - 1500 rubles .
Proteus circuit
Development and modeling was carried out in the Proteus package. Simulation is not too successful, because dynamic display is hard to grasp. Probably need to use additional virtual tools.
General form
Large
Layout
For wiring had to have items manually.
Long decided on such a large amount of soldering. I will say the process is not simple and requires skill and patience. Probably I will hardly do such work again. I will try something more convenient than the type of laser-iron technology . There truth is etching and drilling required.
LED view
Buttons set the hours and minutes. In the finished product they may have to be transferred.
Installation
Prototype in design
Perspectives
- Design the final design of the clock in a wide wooden frame.
- Connect a real time clock with a lithium battery.
- Rewrite the program using automata programming techniques.
- Implement alarm clocks
- Extend settings management with buttons
Project
Project files in Proteus and Arduino program hereSource: https://habr.com/ru/post/82877/
All Articles