Box Backup - hot backup.
Backup issues will never lose their relevance. This is something without which it is not possible to present any information structure. Today we will talk about on-line backup.
How do they do it “usually”?
When they talk about creating backups of the existing information structure, scripts from cron, incremental archives, a powerful server with a huge disk array, a streamer and other external media recorders immediately come to mind. Without all this, it is quite difficult to imagine a full-fledged backup system, although many still work somehow without backups at all. I will not describe and prove the need to have “strong rear”, because it is known to all.
The above software and hardware components are designed to provide the ability to recover files if they are lost for one reason or another. As a rule, the need for incremental backup is due to the huge amounts of information that is constantly changing and needs to be backed up.
')
You take as a basis one of the redundancy schemes, ADD the EXCESSABILITY you need in your opinion and put the obtained solution into operation. Not the worst option would be the scheme below:
• Once a month, a full backup of absolutely all files that need it is done.
• Daily copying of the data changed for the current day.
• All weekly data is copied weekly.
• Once every two weeks, all files modified during this period are copied, or archives are combined in two weeks.
• The pattern is repeated again until a new month arrives.
You can store two weekly copies or one at a time, depending on your preferences or the standards adopted by your company. The procedure for restoring files is the reverse of the procedure for their entry into the archive.
• Restore the last monthly copy.
• Restore two weekly copy.
• Restore weekly copy.
• Restore copies by day in the reverse order.
Schemes similar to those described are used in many companies. Using this scheme, you can be sure that all files will be restored at the time of the creation of the last "daily" copy. With sufficiently large amounts of data (which is certainly not uncommon), you are forced to use external storage media and have the necessary amount of hard disk space to create at least one full copy. (The condition is not mandatory, but greatly simplifies life.)
This and similar to this scheme work in many companies for a very long time. However, they have a number of significant drawbacks. Among which:
• Known issues when backing up "external" users. You cannot force laptop users to leave their computers on at the office every day.
• Backup security issues.
• A relatively large amount of time to recover, as a single lost files, and large arrays.
• The inconvenience of working with archives - the search time in the backup database can be very long.
• Need for help from a system administrator to work with archives.
Far from all the existing problems are listed, these are only those that I had to face. Perhaps the solution you use is devoid of these shortcomings. Perhaps your backup software package is purchased and meets all your requirements. Perhaps you are satisfied with the existing order of affairs. But I still try to convince you to pay attention to another principle of creating backups.
Online Backup Box Backup.
The system refers to the online backup. Why does it have such a name?
Unlike the scheme described above, hot backup is done ... constantly. It is like replacing a failed server power supply without shutting it down. (I think you have come across such computers or at least heard about them.) Creating a backup copy of the user's files occurs interactively as they change. The scheme of work is simple:
• At initial start-up, the system scans the directories indicated to it and transfers them to the archive. Then monitors what is happening in the file system.
• As it detects changed files, it transfers them to the archive.
In other words, the most recent versions of files are always (!) In the backup. In case of loss of data on the original system, you can safely and quickly restore them in full. Is it tempting isn't it?
Box Backup can work in a rather impressive list of OS:
• OpenBSD;
• Linux;
• NetBSD;
• FreeBSD;
• Darwin / Mac OS X 10.5;
• Cygwin (Windows) (client only);
• Native Windows (client only);
• Solaris.
Some quite logical questions that arise when you first get acquainted with this system of hot backup. I will try to answer the most obvious ones.
• If the user deleted files, what will happen to the backup?
• Permanent copying of files implies huge network traffic and a large server load backups. How to solve this problem?
• How is copying secured?
• And if there are a lot of files, how much resources will the program need for the program to verify changes?
Removal procedure.
Files that have been deleted from the system actually do not disappear anywhere. (I am not talking, of course, about the client computer.) In the backup, they are only marked as deleted. A user (yes, a user, not a system administrator, but more on that later) can at any time ask the system to return a file deleted by mistake. The archived data from the archive will disappear only when the allowable amount allocated for the reservation approaches the mark beyond which there is no choice - either to clear the marked files or to copy new ones.
Demanding of resources.
A large network load, as one would expect, can actually be observed only when creating an initial backup, when the system needs to transfer a large amount of data at a time. However, the process priority (by default) of the Box Backup client is quite low and is calculated so as not to interfere with the overall operation of the computer. It works in the background and does not bring discomfort from the “thoughtfulness” of the system as a whole. Subsequently, the system will need to transfer only new or modified files, and this is not so much traffic.
Backup security.
Ensuring security is not a lot of attention.
• Client authorization on the server backups.
• Data transfer security.
• Data encryption.
• Protection of the data structure.
• Secure data storage.
SSL is used to authenticate the client on the server side of the Box Backup system. Every computer whose data needs to be backed up creates an SSL certificate that is signed on the server.
TLS encryption is used to ensure a secure transmission medium. Any operations between the client and the server occur over an encrypted channel. This allows the backup system to be used even in an insecure environment without the fear that data can be intercepted.
The security of files in backups is provided by encryption. Each Box Backup client creates a unique key during configuration. With this key, all transmitted files are encrypted. And only having the key you can get access to the archive to view or restore files.
Moreover, the backup server files are stored under unique numbers, not names. Without knowing where a file is located, it is not possible to guess what it is. However, even knowing that the file in front of you, you can not achieve anything. After all, they are encrypted, and for access you need a key. No passwords are required.
Installing the server part of Box Backup.
I will consider installing Box Backup on the example of the gentoo system. Installation on other systems will differ in only a few details, which I will mention later.
So, first install the server side of the system. The ebuild Box Backup is in the standard ports tree, so we only need to use the standard installation procedure for packages on the gentoo system.
#emerge -av boxbackup
Please note that by default you will be asked to install an older version of the system - 0.09. I would recommend to follow the tree of ports to the desired branch and install a newer version, as many corrections were made to it.
#cd / usr / portage / app-backup / boxbackup
#emerge -av boxbackup-0.10.ebuild
Of course, you can make corrections to your /etc/portage/package.keywords, but I don’t see any reason to do it for the sake of one package (the system does not require other packages for its work).
After the package build is complete, you can proceed with the configuration. Here it is important to note one thing. If your system does not have a raid controller for backup, but just several disks are used - Box Backup offers to create several directories that provide redundancy in case of disk errors.
If the raid is installed, then you can safely refuse to use this structure.
To use Box Backup's “raid”, execute the following command:
# raidfile-config / etc / boxbackup 2048 /raid/0.0 /raid/0.1 /ind/0.2
Or we will refuse its use by a command of other type:
# raidfile-config / etc / boxbackup 2048 /raid/0.0
The list of parameters in this command:
• / etc / boxbackup - directory where configuration files will be created. (If you are installing the system not in gentoo linux, then by default use the / etc / box directory);
• 2048 - block size of files;
• /raid/0.0 and the rest are directories where backups will be stored directly. These directories must be created by you. They will not be created automatically.
After the configuration file is ready, create a user from whom Box Backup will work.
#useradd _bbstored
And create the main system configuration file:
# bbstored-config / etc / boxbackup hostname _bbstored
Where:
• / etc / boxbackup - directory of configuration files;
• hostname - computer name;
• _bbstored is the name of the user from whom the system is working.
If you built the package yourself on another system, use the / etc / box directory for configuration files.
Executing this command will create the Box Backup / etc / boxbackup/bbstored.conf main configuration file, which will contain the basic parameters.
Assigning _bbstored directory permissions to our user
#chown -R _bbstored / etc / boxbackup / bbstored
#chmod -R go-rwx / etc / boxbackup / bbstored
This completes the configuration of the server part of the Box Backup system. All that remains is to create an SSL certificate for our system and add customer accounts. We will do this after installing the client part on the machine that will be backed up.
Installing the client part of the Box Backup system in Linux.
Since we are talking about gentoo linux and in the previous output of the command
#emerge -av boxbackup-0.10.ebuild
you probably noticed the -client-only flag, then we’ll use it. Run the following command on the system that needs to be reserved:
#cd / usr / portage / app-backup / boxbackup
# USE = 'client-only' emerge boxbackup-0.10.ebuild
this will install a client system on our system.
After the client is installed, we will configure it to work with our server. Here two options are possible:
• lazy - in this mode, the backup daemon bbackupd constantly monitors file changes and as soon as the modified file is closed, it transfers it to the backup.
• snapshot - the operation of this mode is understandable by its name. Once at the time you set, the bbackupctl sync command is run, after receiving which the bbackupd daemon starts scanning all the directories specified in the configuration file. In case of discrepancy of the last modified date - the file is transferred to the backup server.
Which mode to choose depends directly on the number of files that need to be backed up, the workload of the computer and network traffic. I think the dependencies are quite obvious. I can only say that if you install Box Backup on a laptop that often works outside the local network where the backup server is located, you should probably prefer the snapshot mode.
Of course, no one bothers you to install Box Backup Server so that it is accessible from the outside. But in this case, you should consider the amount of traffic that will be created by computers during backup.
Run the command, which will create the main configuration file, system key and SSL certificate for authorization on a remote server.
# bbackupd-config / etc / boxbackup lazy account_name hostname / var / bbackupd / home
Where:
• / etc / boxbackup - storage location for configuration files;
• lazy - reservation method;
• 99 - the name of the account on the server backups (usually, I just use the last digits of the ip address of the computer);
• hostname - network name of the backup server (Do not accidentally specify the name of your computer in this parameter!);
• / var / bbackupd - a place where the temporary files of the Box Backup system will be stored (make sure there is enough free space);
• / home - path for backup (folders are easily configured in the configuration file and we'll talk about it soon).
Now we just need to specify the folders, the backup copies of which we want to make and the rules for them. The main configuration file of the Box Backup client is located in the / etc / boxbackup directory and is called bbackupd.conf.
The parameters set in this file contain the necessary and very transparent explanations, so I will focus only on the description of the paths for backup.
The structure of the description is as follows:
BackupLocations
{
home-directory
{
Path = / home
ExcludeDir = / home / ftp
ExcludeFilesRegex = *. (Avi | AVI) $
}
etc
{
Path = / etc
}
}
home-directory and etc in this case are conditional directory descriptions for the Box Backup system. It is under these names that they will be displayed when you request a backup.
Path - actually the path to the directories and files that need to be backed up. When specifying the paths you should take into account that the backup will be performed recursively, that is, with all subfolders.
ExcludeDir is, as it is easy to guess, the option of excluding some subfolder from the backup.
ExcludeFilesRegex - a mask indicating file extensions that should be ignored and not transferred to backup.
The remaining options are not less clear and do not need a separate description.
The lazy and snapshot modes in configuration files differ only in parameters:
AutomaticBackup = no
UpdateStoreInterval = 0
MinimumFileAge = 0
MaxUploadWait = 0
(in the case of snapshot mode). To change the mode of operation, it is enough to change the values of these variables for other parameters, which can always be viewed on the neighboring system. Do not rerun the configuration command, as it will replace your encryption key and SSL certificates. In this case, the signature procedure will have to be repeated. (Of course, you can first copy the key and the SSL certificate, but ... isn't it easier to change the value of several variables?)
Now that we have configured the client and server parts of the Box Backup system, it's time to figure out SSL certificates for authorization.
SSL certificates for server side.
To create a basic certificate structure, run the command:
# bbstored-certs ca init
If you get any errors when executing this command, please make sure first of all that you have the OpenSSL package installed.
After the formation of the certificate, we will sign it:
# bbstored-certs ca sign-server hostname-csr.pem
This completes the preparation of certificates for the Box Backup server part.
SSL certificates for the client part.
We already have a client SSL certificate, we only need to sign it on the server, and at the same time copy the certificate from the server to the client. To do this, you need to transfer (scp, samba, ftp or some other way) to the server the file /etc/boxbackup/bbackupd/account_name-csr.pem
It is best to place the client certificate on the server in the / etc / boxbackup / bbackupd / folder
After that, execute the command on the server:
# bbstored-certs / ca sign /etc/boxbackup/bbackupd/account_name-csr.pem
By answering Yes, we will sign the certificate and see the instruction that we need to copy two files to the client:
/ca/clients/account_name-cert.pem
/ca/roots/serverCA.pem
On the client side, we put these files in / etc / boxbackup / bbackupd.
Now it remains only to create an account for our client to reserve.
Creating an account in the backup system.
To create an account, use the command:
#bbstoreaccounts create account_name 0 10000M 15000M
Where:
• account_name - the name of the account in numeric form (for example, as I said, the last digit in the client's ip address).
• 10000M - soft limit on the size of the backup. In this case, I allocated 10 gigabytes per user (you can also specify 10G).
• 15000M - hard limit on the size of the backup.
After that, you can safely start the services of the Box Backup client and server system. Backup system is ready!
Other operations with accounts.
In addition to creating accounts, of course, you can delete them, change the size of the allowed backup space, view information on the occupied space, as well as check backups for errors.
Team:
#bbstoreaccounts info account_name
will show fairly detailed information about the current state of affairs in the specified account. It will look like this.
Account ID: 00000003
Last object ID: 390831
Blocks used: 59659618 (116522.69Mb)
Blocks used by old files: 110818 (216.44Mb)
Blocks used by deleted files: 1670369 (3262.44Mb)
Blocks used by directories: 73637 (143.82Mb)
Block soft limit: 61440000 (120000.00Mb)
Block hard limit: 64000000 (125000.00Mb)
Client store marker: 1145862657000000
As you can see, everything is quite transparent and clear.
Team:
#bbstoreaccounts setlimit account_name 30000M 35000M
will change the allowable backup for this user.(As I wrote above, the volume can be specified in gigabytes.)
To check the backup, use the command:
#bbstoreaccounts check account_name
and, in case of errors, fix it with:
#bbstoreaccount check account_name fix
And finally, the command:
#bbstoreaccounts delete account_name
will delete the existing account.
Restore files from backup.
After everything we talked about, perhaps it is time to find out how the actual files are restored from the backup. For this, there is a bbackupquery utility.

Figure 1. Help output by the bbackupquery utility.
This utility works like a remote shell. It does not need the bbackupd daemon running and allows you to communicate with the backup server using input commands. The connection to the server is established using the same SSL certificates and still passes through TLS channel encryption.
Figure 1 shows the output of the help command. As you can see, quite a large number of commands are available, among which there is even compare that allows you to compare versions of files on a local hard disk and files available in a backup. Working with bbackupquery is somewhat similar to communicating with an ftp server via a console client, so I will not dwell on it in detail.
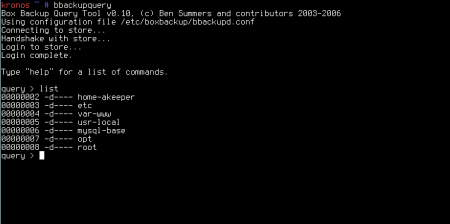
Figure 2. Directory list (by tags from the configuration file).
Boxi graphical shell.
Of course, the world is not without good people and there is a graphical shell for working with backup. A project called boxi . It has a rather spartan interface, but nevertheless it makes it much more convenient to communicate with your backup than the console bbackupquery and allows you to perform all the basic operations for working with a backup. Such as - comparison of versions, removal from the archive, file recovery, review of the directory structure and so on.
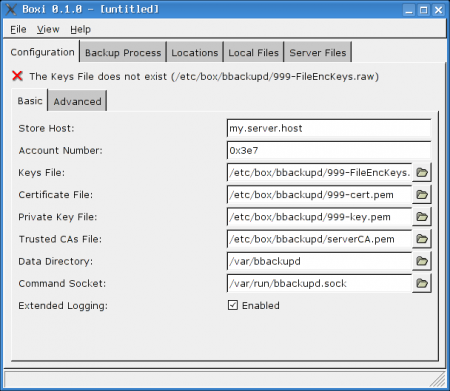
Figure 3. Ascetic boxi.
However, at the moment the use of Boxi is not possible. The reason is that this utility can only work with Box Backup version 0.09, and as I wrote above, version 0.10 has undergone many changes and is recommended for installation. According to the developer of this utility, the next version, ready to work with the 0.10 version, should be expected no earlier than after three months.
But if convenience is more important to you, then it may be worthwhile to install an older version in order to be able to work with the graphical utility.
It should also be noted that to work, Boxi needs all the Box Backup system configuration files. Therefore, when it is used, many people launch the bbackupd process not from the system, but from their user.
Backup windows systems.
So far, I have ignored the use of the system backup windows windows workstations (and servers, of course). I will explain why.
On the site you can find the Windows native client, running at least in the systems of the Windows 2000 and Windows XP family. In the archive you will find all the necessary files that are recommended to be copied to the c: \ Program Files \ Box Backup \ directory. All that
remains is to generate a client certificate, sign it on the server and transfer the signed and server certificates back. And there may be some difficulties. The fact is that the scripts responsible for generating certificates are written in the Perl language and there are no guarantees that it will be in your windows system. It is possible by long suffering to achieve the desired result, but there is a way much faster and more convenient.
On any of your linux systems, first save the / etc / boxbackup / bbackupd directory in a safe place ... generate certificates for the windows system. Why not?After all, it does not matter where the encryption key and certificate will be created. After that, it will only be necessary to sign the newly created certificate and transfer the necessary files to the windows system. And do not forget to return the contents of the folder bbackupd to its rightful place.
Thus, connecting windows of a workstation to backup also becomes a very simple task.
In MS Windows, all the options of the Box Backup configuration files and both modes - lazy, snapshot are available to you. In order to install bbackupd as a system service, just run the command:
bbackupd -i
The Boxi graphical shell also exists under Windows, but for the reasons described above, it is unlikely to be useful for you until you return to Box Backup version 0.09 'but.
It is important.
It is important to remember that all information in the backup is encrypted and cannot be extracted without the FileEncKeys.raw key. Therefore, it is strongly recommended to copy the contents of all the / etc / boxbackup / bbackupd folders to a place protected from unauthorized access, as well as transfer them to external media and put them away. In case of loss of a key, recovery of files from the archive will become impossible.
Also, you should pay attention to the synchronization of time on the client and server machines, since Box Backup uses in its work the date of the last file change.
Good luck to your hot backup!
References:
[1] boxi.sourceforge.net
[2] boxbackup.hostworks.ca/index.php/0.10
akeeper Alexey Korshunov.
First published in the journal "System Administrator".
How do they do it “usually”?
When they talk about creating backups of the existing information structure, scripts from cron, incremental archives, a powerful server with a huge disk array, a streamer and other external media recorders immediately come to mind. Without all this, it is quite difficult to imagine a full-fledged backup system, although many still work somehow without backups at all. I will not describe and prove the need to have “strong rear”, because it is known to all.
The above software and hardware components are designed to provide the ability to recover files if they are lost for one reason or another. As a rule, the need for incremental backup is due to the huge amounts of information that is constantly changing and needs to be backed up.
')
You take as a basis one of the redundancy schemes, ADD the EXCESSABILITY you need in your opinion and put the obtained solution into operation. Not the worst option would be the scheme below:
• Once a month, a full backup of absolutely all files that need it is done.
• Daily copying of the data changed for the current day.
• All weekly data is copied weekly.
• Once every two weeks, all files modified during this period are copied, or archives are combined in two weeks.
• The pattern is repeated again until a new month arrives.
You can store two weekly copies or one at a time, depending on your preferences or the standards adopted by your company. The procedure for restoring files is the reverse of the procedure for their entry into the archive.
• Restore the last monthly copy.
• Restore two weekly copy.
• Restore weekly copy.
• Restore copies by day in the reverse order.
Schemes similar to those described are used in many companies. Using this scheme, you can be sure that all files will be restored at the time of the creation of the last "daily" copy. With sufficiently large amounts of data (which is certainly not uncommon), you are forced to use external storage media and have the necessary amount of hard disk space to create at least one full copy. (The condition is not mandatory, but greatly simplifies life.)
This and similar to this scheme work in many companies for a very long time. However, they have a number of significant drawbacks. Among which:
• Known issues when backing up "external" users. You cannot force laptop users to leave their computers on at the office every day.
• Backup security issues.
• A relatively large amount of time to recover, as a single lost files, and large arrays.
• The inconvenience of working with archives - the search time in the backup database can be very long.
• Need for help from a system administrator to work with archives.
Far from all the existing problems are listed, these are only those that I had to face. Perhaps the solution you use is devoid of these shortcomings. Perhaps your backup software package is purchased and meets all your requirements. Perhaps you are satisfied with the existing order of affairs. But I still try to convince you to pay attention to another principle of creating backups.
Online Backup Box Backup.
The system refers to the online backup. Why does it have such a name?
Unlike the scheme described above, hot backup is done ... constantly. It is like replacing a failed server power supply without shutting it down. (I think you have come across such computers or at least heard about them.) Creating a backup copy of the user's files occurs interactively as they change. The scheme of work is simple:
• At initial start-up, the system scans the directories indicated to it and transfers them to the archive. Then monitors what is happening in the file system.
• As it detects changed files, it transfers them to the archive.
In other words, the most recent versions of files are always (!) In the backup. In case of loss of data on the original system, you can safely and quickly restore them in full. Is it tempting isn't it?
Box Backup can work in a rather impressive list of OS:
• OpenBSD;
• Linux;
• NetBSD;
• FreeBSD;
• Darwin / Mac OS X 10.5;
• Cygwin (Windows) (client only);
• Native Windows (client only);
• Solaris.
Some quite logical questions that arise when you first get acquainted with this system of hot backup. I will try to answer the most obvious ones.
• If the user deleted files, what will happen to the backup?
• Permanent copying of files implies huge network traffic and a large server load backups. How to solve this problem?
• How is copying secured?
• And if there are a lot of files, how much resources will the program need for the program to verify changes?
Removal procedure.
Files that have been deleted from the system actually do not disappear anywhere. (I am not talking, of course, about the client computer.) In the backup, they are only marked as deleted. A user (yes, a user, not a system administrator, but more on that later) can at any time ask the system to return a file deleted by mistake. The archived data from the archive will disappear only when the allowable amount allocated for the reservation approaches the mark beyond which there is no choice - either to clear the marked files or to copy new ones.
Demanding of resources.
A large network load, as one would expect, can actually be observed only when creating an initial backup, when the system needs to transfer a large amount of data at a time. However, the process priority (by default) of the Box Backup client is quite low and is calculated so as not to interfere with the overall operation of the computer. It works in the background and does not bring discomfort from the “thoughtfulness” of the system as a whole. Subsequently, the system will need to transfer only new or modified files, and this is not so much traffic.
Backup security.
Ensuring security is not a lot of attention.
• Client authorization on the server backups.
• Data transfer security.
• Data encryption.
• Protection of the data structure.
• Secure data storage.
SSL is used to authenticate the client on the server side of the Box Backup system. Every computer whose data needs to be backed up creates an SSL certificate that is signed on the server.
TLS encryption is used to ensure a secure transmission medium. Any operations between the client and the server occur over an encrypted channel. This allows the backup system to be used even in an insecure environment without the fear that data can be intercepted.
The security of files in backups is provided by encryption. Each Box Backup client creates a unique key during configuration. With this key, all transmitted files are encrypted. And only having the key you can get access to the archive to view or restore files.
Moreover, the backup server files are stored under unique numbers, not names. Without knowing where a file is located, it is not possible to guess what it is. However, even knowing that the file in front of you, you can not achieve anything. After all, they are encrypted, and for access you need a key. No passwords are required.
Installing the server part of Box Backup.
I will consider installing Box Backup on the example of the gentoo system. Installation on other systems will differ in only a few details, which I will mention later.
So, first install the server side of the system. The ebuild Box Backup is in the standard ports tree, so we only need to use the standard installation procedure for packages on the gentoo system.
#emerge -av boxbackup
Please note that by default you will be asked to install an older version of the system - 0.09. I would recommend to follow the tree of ports to the desired branch and install a newer version, as many corrections were made to it.
#cd / usr / portage / app-backup / boxbackup
#emerge -av boxbackup-0.10.ebuild
Of course, you can make corrections to your /etc/portage/package.keywords, but I don’t see any reason to do it for the sake of one package (the system does not require other packages for its work).
After the package build is complete, you can proceed with the configuration. Here it is important to note one thing. If your system does not have a raid controller for backup, but just several disks are used - Box Backup offers to create several directories that provide redundancy in case of disk errors.
If the raid is installed, then you can safely refuse to use this structure.
To use Box Backup's “raid”, execute the following command:
# raidfile-config / etc / boxbackup 2048 /raid/0.0 /raid/0.1 /ind/0.2
Or we will refuse its use by a command of other type:
# raidfile-config / etc / boxbackup 2048 /raid/0.0
The list of parameters in this command:
• / etc / boxbackup - directory where configuration files will be created. (If you are installing the system not in gentoo linux, then by default use the / etc / box directory);
• 2048 - block size of files;
• /raid/0.0 and the rest are directories where backups will be stored directly. These directories must be created by you. They will not be created automatically.
After the configuration file is ready, create a user from whom Box Backup will work.
#useradd _bbstored
And create the main system configuration file:
# bbstored-config / etc / boxbackup hostname _bbstored
Where:
• / etc / boxbackup - directory of configuration files;
• hostname - computer name;
• _bbstored is the name of the user from whom the system is working.
If you built the package yourself on another system, use the / etc / box directory for configuration files.
Executing this command will create the Box Backup / etc / boxbackup/bbstored.conf main configuration file, which will contain the basic parameters.
Assigning _bbstored directory permissions to our user
#chown -R _bbstored / etc / boxbackup / bbstored
#chmod -R go-rwx / etc / boxbackup / bbstored
This completes the configuration of the server part of the Box Backup system. All that remains is to create an SSL certificate for our system and add customer accounts. We will do this after installing the client part on the machine that will be backed up.
Installing the client part of the Box Backup system in Linux.
Since we are talking about gentoo linux and in the previous output of the command
#emerge -av boxbackup-0.10.ebuild
you probably noticed the -client-only flag, then we’ll use it. Run the following command on the system that needs to be reserved:
#cd / usr / portage / app-backup / boxbackup
# USE = 'client-only' emerge boxbackup-0.10.ebuild
this will install a client system on our system.
After the client is installed, we will configure it to work with our server. Here two options are possible:
• lazy - in this mode, the backup daemon bbackupd constantly monitors file changes and as soon as the modified file is closed, it transfers it to the backup.
• snapshot - the operation of this mode is understandable by its name. Once at the time you set, the bbackupctl sync command is run, after receiving which the bbackupd daemon starts scanning all the directories specified in the configuration file. In case of discrepancy of the last modified date - the file is transferred to the backup server.
Which mode to choose depends directly on the number of files that need to be backed up, the workload of the computer and network traffic. I think the dependencies are quite obvious. I can only say that if you install Box Backup on a laptop that often works outside the local network where the backup server is located, you should probably prefer the snapshot mode.
Of course, no one bothers you to install Box Backup Server so that it is accessible from the outside. But in this case, you should consider the amount of traffic that will be created by computers during backup.
Run the command, which will create the main configuration file, system key and SSL certificate for authorization on a remote server.
# bbackupd-config / etc / boxbackup lazy account_name hostname / var / bbackupd / home
Where:
• / etc / boxbackup - storage location for configuration files;
• lazy - reservation method;
• 99 - the name of the account on the server backups (usually, I just use the last digits of the ip address of the computer);
• hostname - network name of the backup server (Do not accidentally specify the name of your computer in this parameter!);
• / var / bbackupd - a place where the temporary files of the Box Backup system will be stored (make sure there is enough free space);
• / home - path for backup (folders are easily configured in the configuration file and we'll talk about it soon).
Now we just need to specify the folders, the backup copies of which we want to make and the rules for them. The main configuration file of the Box Backup client is located in the / etc / boxbackup directory and is called bbackupd.conf.
The parameters set in this file contain the necessary and very transparent explanations, so I will focus only on the description of the paths for backup.
The structure of the description is as follows:
BackupLocations
{
home-directory
{
Path = / home
ExcludeDir = / home / ftp
ExcludeFilesRegex = *. (Avi | AVI) $
}
etc
{
Path = / etc
}
}
home-directory and etc in this case are conditional directory descriptions for the Box Backup system. It is under these names that they will be displayed when you request a backup.
Path - actually the path to the directories and files that need to be backed up. When specifying the paths you should take into account that the backup will be performed recursively, that is, with all subfolders.
ExcludeDir is, as it is easy to guess, the option of excluding some subfolder from the backup.
ExcludeFilesRegex - a mask indicating file extensions that should be ignored and not transferred to backup.
The remaining options are not less clear and do not need a separate description.
The lazy and snapshot modes in configuration files differ only in parameters:
AutomaticBackup = no
UpdateStoreInterval = 0
MinimumFileAge = 0
MaxUploadWait = 0
(in the case of snapshot mode). To change the mode of operation, it is enough to change the values of these variables for other parameters, which can always be viewed on the neighboring system. Do not rerun the configuration command, as it will replace your encryption key and SSL certificates. In this case, the signature procedure will have to be repeated. (Of course, you can first copy the key and the SSL certificate, but ... isn't it easier to change the value of several variables?)
Now that we have configured the client and server parts of the Box Backup system, it's time to figure out SSL certificates for authorization.
SSL certificates for server side.
To create a basic certificate structure, run the command:
# bbstored-certs ca init
If you get any errors when executing this command, please make sure first of all that you have the OpenSSL package installed.
After the formation of the certificate, we will sign it:
# bbstored-certs ca sign-server hostname-csr.pem
This completes the preparation of certificates for the Box Backup server part.
SSL certificates for the client part.
We already have a client SSL certificate, we only need to sign it on the server, and at the same time copy the certificate from the server to the client. To do this, you need to transfer (scp, samba, ftp or some other way) to the server the file /etc/boxbackup/bbackupd/account_name-csr.pem
It is best to place the client certificate on the server in the / etc / boxbackup / bbackupd / folder
After that, execute the command on the server:
# bbstored-certs / ca sign /etc/boxbackup/bbackupd/account_name-csr.pem
By answering Yes, we will sign the certificate and see the instruction that we need to copy two files to the client:
/ca/clients/account_name-cert.pem
/ca/roots/serverCA.pem
On the client side, we put these files in / etc / boxbackup / bbackupd.
Now it remains only to create an account for our client to reserve.
Creating an account in the backup system.
To create an account, use the command:
#bbstoreaccounts create account_name 0 10000M 15000M
Where:
• account_name - the name of the account in numeric form (for example, as I said, the last digit in the client's ip address).
• 10000M - soft limit on the size of the backup. In this case, I allocated 10 gigabytes per user (you can also specify 10G).
• 15000M - hard limit on the size of the backup.
After that, you can safely start the services of the Box Backup client and server system. Backup system is ready!
Other operations with accounts.
In addition to creating accounts, of course, you can delete them, change the size of the allowed backup space, view information on the occupied space, as well as check backups for errors.
Team:
#bbstoreaccounts info account_name
will show fairly detailed information about the current state of affairs in the specified account. It will look like this.
Account ID: 00000003
Last object ID: 390831
Blocks used: 59659618 (116522.69Mb)
Blocks used by old files: 110818 (216.44Mb)
Blocks used by deleted files: 1670369 (3262.44Mb)
Blocks used by directories: 73637 (143.82Mb)
Block soft limit: 61440000 (120000.00Mb)
Block hard limit: 64000000 (125000.00Mb)
Client store marker: 1145862657000000
As you can see, everything is quite transparent and clear.
Team:
#bbstoreaccounts setlimit account_name 30000M 35000M
will change the allowable backup for this user.(As I wrote above, the volume can be specified in gigabytes.)
To check the backup, use the command:
#bbstoreaccounts check account_name
and, in case of errors, fix it with:
#bbstoreaccount check account_name fix
And finally, the command:
#bbstoreaccounts delete account_name
will delete the existing account.
Restore files from backup.
After everything we talked about, perhaps it is time to find out how the actual files are restored from the backup. For this, there is a bbackupquery utility.
Figure 1. Help output by the bbackupquery utility.
This utility works like a remote shell. It does not need the bbackupd daemon running and allows you to communicate with the backup server using input commands. The connection to the server is established using the same SSL certificates and still passes through TLS channel encryption.
Figure 1 shows the output of the help command. As you can see, quite a large number of commands are available, among which there is even compare that allows you to compare versions of files on a local hard disk and files available in a backup. Working with bbackupquery is somewhat similar to communicating with an ftp server via a console client, so I will not dwell on it in detail.
Figure 2. Directory list (by tags from the configuration file).
Boxi graphical shell.
Of course, the world is not without good people and there is a graphical shell for working with backup. A project called boxi . It has a rather spartan interface, but nevertheless it makes it much more convenient to communicate with your backup than the console bbackupquery and allows you to perform all the basic operations for working with a backup. Such as - comparison of versions, removal from the archive, file recovery, review of the directory structure and so on.
Figure 3. Ascetic boxi.
However, at the moment the use of Boxi is not possible. The reason is that this utility can only work with Box Backup version 0.09, and as I wrote above, version 0.10 has undergone many changes and is recommended for installation. According to the developer of this utility, the next version, ready to work with the 0.10 version, should be expected no earlier than after three months.
But if convenience is more important to you, then it may be worthwhile to install an older version in order to be able to work with the graphical utility.
It should also be noted that to work, Boxi needs all the Box Backup system configuration files. Therefore, when it is used, many people launch the bbackupd process not from the system, but from their user.
Backup windows systems.
So far, I have ignored the use of the system backup windows windows workstations (and servers, of course). I will explain why.
On the site you can find the Windows native client, running at least in the systems of the Windows 2000 and Windows XP family. In the archive you will find all the necessary files that are recommended to be copied to the c: \ Program Files \ Box Backup \ directory. All that
remains is to generate a client certificate, sign it on the server and transfer the signed and server certificates back. And there may be some difficulties. The fact is that the scripts responsible for generating certificates are written in the Perl language and there are no guarantees that it will be in your windows system. It is possible by long suffering to achieve the desired result, but there is a way much faster and more convenient.
On any of your linux systems, first save the / etc / boxbackup / bbackupd directory in a safe place ... generate certificates for the windows system. Why not?After all, it does not matter where the encryption key and certificate will be created. After that, it will only be necessary to sign the newly created certificate and transfer the necessary files to the windows system. And do not forget to return the contents of the folder bbackupd to its rightful place.
Thus, connecting windows of a workstation to backup also becomes a very simple task.
In MS Windows, all the options of the Box Backup configuration files and both modes - lazy, snapshot are available to you. In order to install bbackupd as a system service, just run the command:
bbackupd -i
The Boxi graphical shell also exists under Windows, but for the reasons described above, it is unlikely to be useful for you until you return to Box Backup version 0.09 'but.
It is important.
It is important to remember that all information in the backup is encrypted and cannot be extracted without the FileEncKeys.raw key. Therefore, it is strongly recommended to copy the contents of all the / etc / boxbackup / bbackupd folders to a place protected from unauthorized access, as well as transfer them to external media and put them away. In case of loss of a key, recovery of files from the archive will become impossible.
Also, you should pay attention to the synchronization of time on the client and server machines, since Box Backup uses in its work the date of the last file change.
Good luck to your hot backup!
References:
[1] boxi.sourceforge.net
[2] boxbackup.hostworks.ca/index.php/0.10
akeeper Alexey Korshunov.
First published in the journal "System Administrator".
Source: https://habr.com/ru/post/8156/
All Articles