MVC 2: Validation Model

This is the second part of a series of articles on upcoming innovations in ASP.NET MVC 2, the release of which is just around the corner. This post is dedicated to validation enhancements added to ASP.NET MVC 2.
ASP.NET MVC 2 validation
Validation of user data, vital business logic and rules are a key requirement of most web applications. ASP.NET MVC 2 offers a wealth of new features that greatly facilitate the implementation of user data validation and validation logic of models and presentation models. The new functionality is designed based on mandatory server-side validation, but can also be additionally implemented on the client side using JavaScript. The validation infrastructure and functionality in ASP.NET MVC 2 is implemented as follows:
1) Developers can easily use the DataAnnotation validation built into the .NET Framework. DataAnnotation allows, in an easy way, to declaratively add validation rules to objects and properties using the minimum amount of code.
2) Developers can additionally integrate their validation engine or use third-party frameworks: Castle Validator, EntLib Validation Library. ASP.NET MVC 2 validation capabilities are designed with ease of extending the validation architecture.
This means that validation is very simple in a number of common cases, while retaining flexibility for expansion.
')
Connection Validations in ASP.NET MVC 2 and DataAnnotation
Let's look at a simple CRUD script, where we will use the new functionality - DataAnnotation. Specifically, create a form “Create”, which will add a friend to the user:
Before saving to the database, we want to make sure that the entered information is correct, and if not, output the appropriate error message:
We want the validation to take place on two sides - the server and the client, and also we want to make sure that the code conforms to the DRY principle (“don't repeat yourself”) - we apply the validation rules once, after that all controllers, actions and views follow their.
I implement this scenario using VS 2010, but you can also do this in VS 2008.
Step 1: Create FriendsController (for starters, without validation)
Let's start by adding a simple “Person” class to a new ASP.NET MVC 2 project:
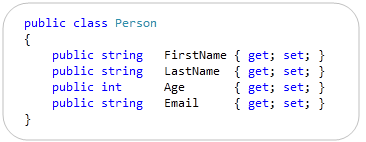
The class has four properties created using automatically implemented properties in C # that appeared in VB with VS 2010.
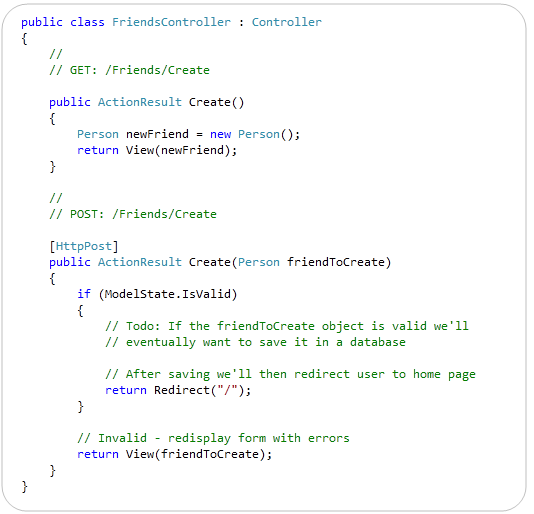
Let's add to our project the class controller “FriendsController”, which we will extend with two methods of “Create” actions. The first method is called during the GET request / Friends / Create - it will display an empty form for entering data about a person. The second method is called during the POST request / FriendsCreate - it binds the entered form data to the Person object, checks for errors during binding and, if no errors have occurred, ultimately saves it to the database (we implement the database operation implementation a little later) . If the data entered into the form contains errors, the method will return the form with errors to the user:
After creating our controller, we can right-click on one of the action methods and select “Add View”, we will use the scaffolding to create a “Create” view that accepts the Person object:
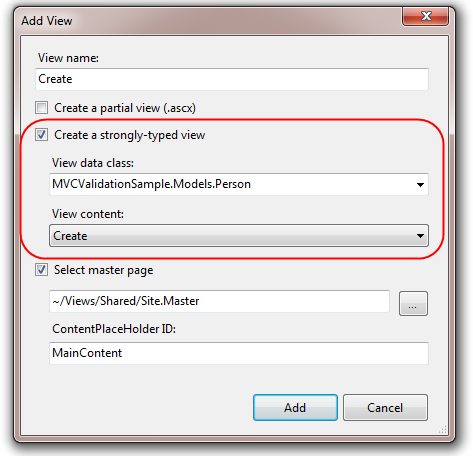
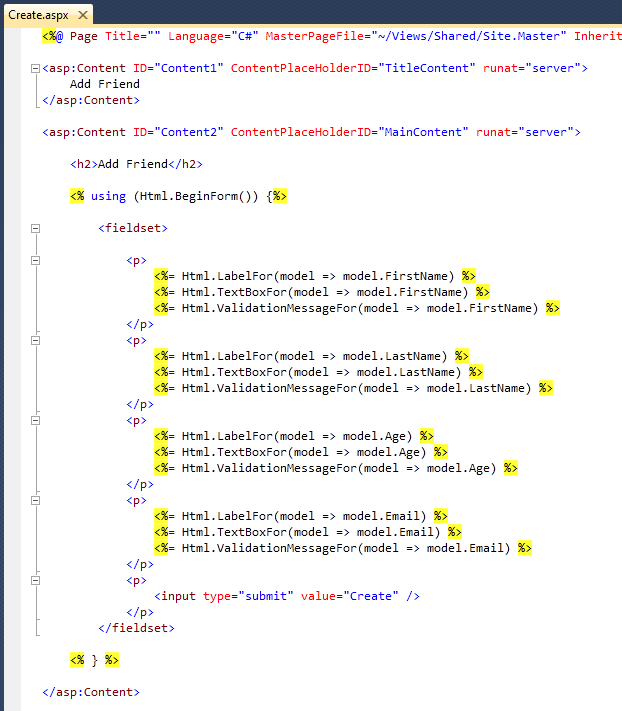
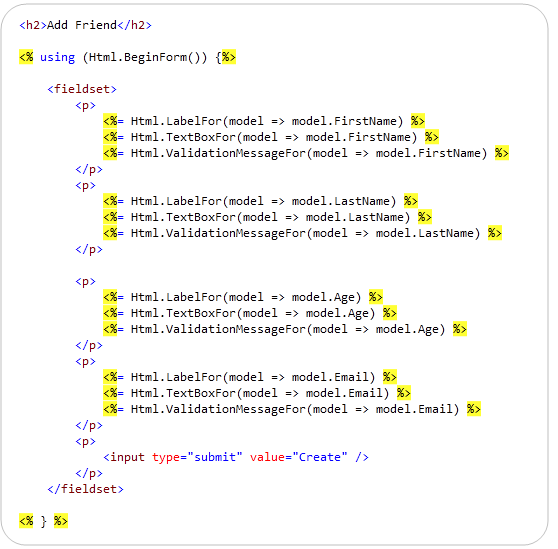
Visual Studio will generate for us the Create.aspx view file in the \ Views \ Friends directory of our project. Notice the use of strongly typed HTML helper methods :
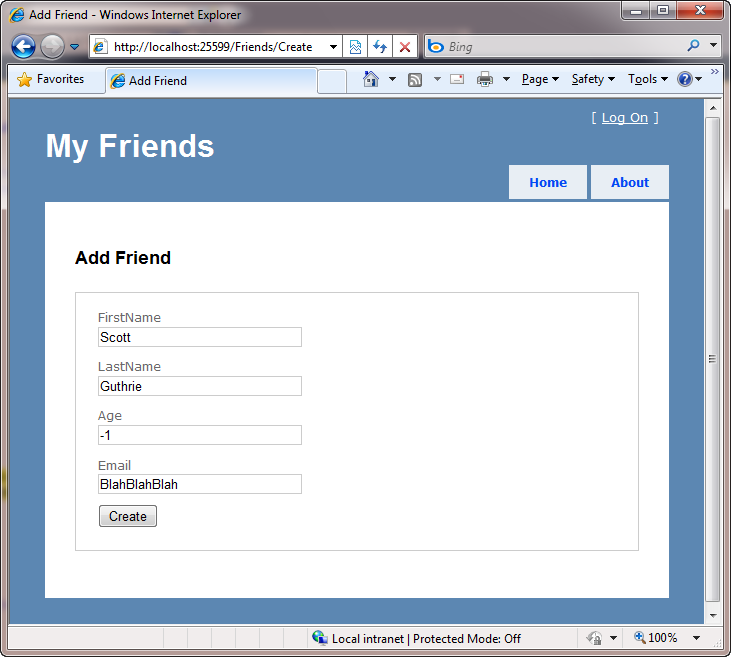
And now, when we run the application and go to / Friends / Create, we’ll get an empty data entry form:
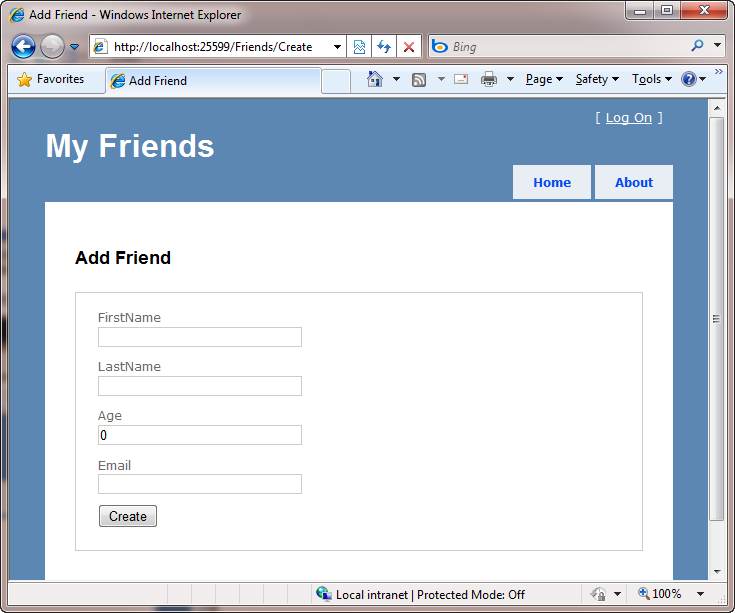
At the moment, nothing will stop us from entering incorrect data.
Step 2: Add Validation Using DataAnnotation
We will strengthen our application with simple rules for validating incoming data. We will implement these rules in the Person model, not in the controller or view. This approach will provide validation in any scenarios in our application that uses the Person object (for example, if we add an editing script), and also ensures that the code complies with the DRY principle and eliminates duplication of rules in different parts of the code.
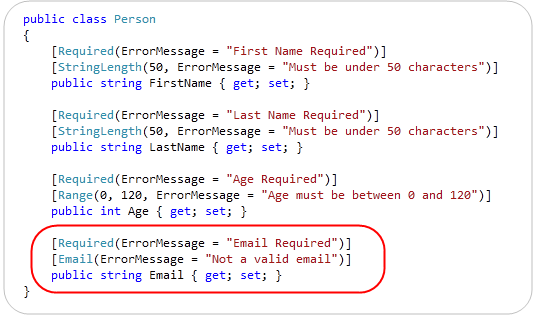
In ASP.NET MVC 2, developers can easily add declarative validation attributes to the model or view model classes that are later used in the model-binding operation. To see this in action, let's update the Person class by adding a few attributes. Add the “using” definition for the “System.ComponentModel.DataAnnotations” namespace, and then create the Person properties using the validation attributes [Required], [StringLength], [Range] and [RegularExpression]
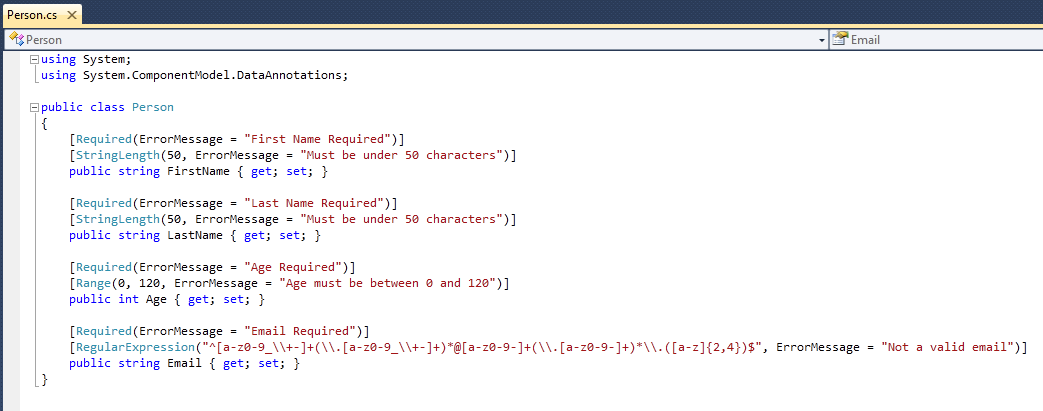
Pay attention to the declaration of the text of errors as strings. You can declare them in resource files and localize depending on the user’s chosen language or culture. More details about the localization of validation errors here .
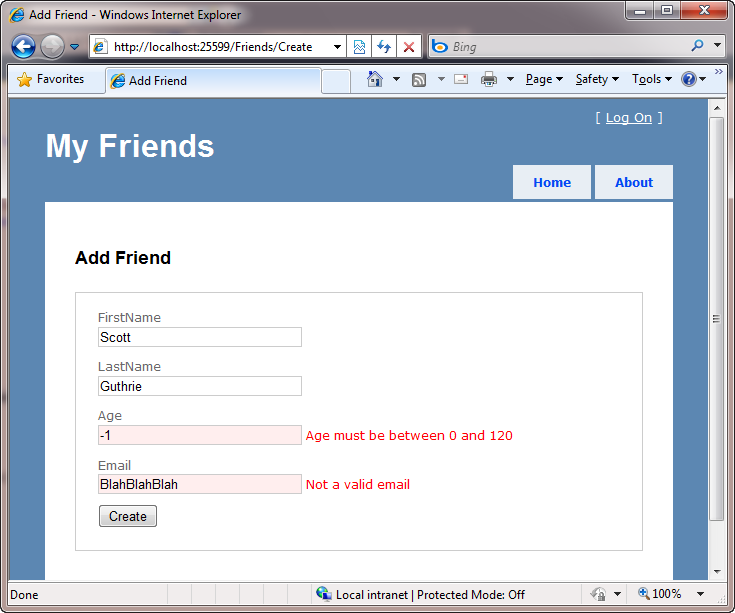
And so, when we added validation attributes to the Person class, let's restart our application to see the reaction to incorrectly entered data, sending it to the server:
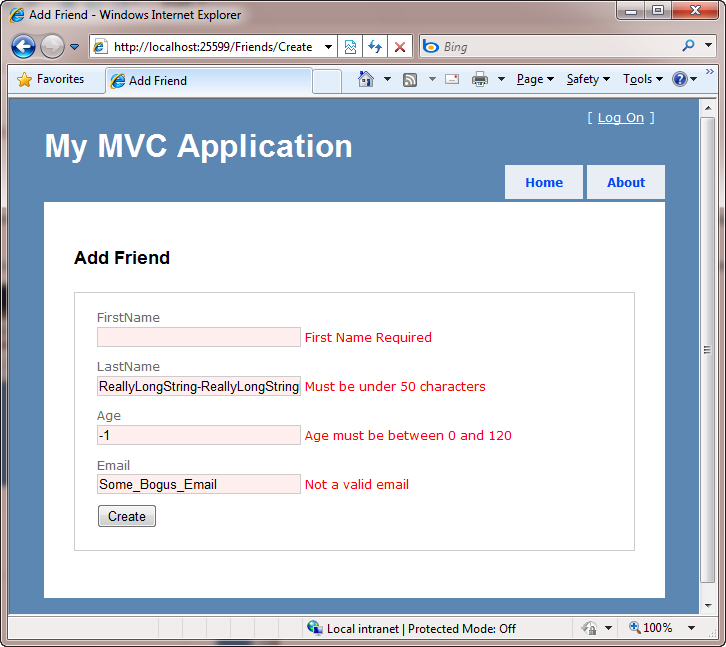
Noticed how everything went well with us? The error text is reddened, and the error itself is displayed next to the field. The form saves the entered data, so we eliminate the need to re-enter the user. And how the hell is all this happening?
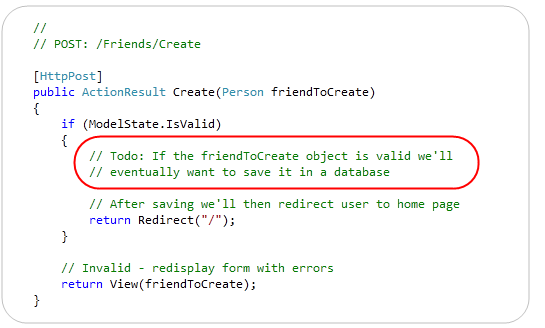
To understand how this works, let's take a look at the Create action method, which handles a POST request for our form:
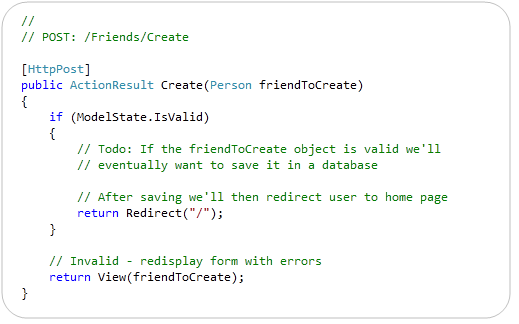
When our HTML form returns data to the server, the above method is called. Since the action method takes a Person object as a parameter, ASP.NET MVC will create a Person object and automatically associate the input form data with its values. Just as part of this process, a check will be made for compliance with the validation rules of the DataAnnotation of the Person object. In case of successful verification, ModelState.IsValid returns true and we will save the result in the database and transfer the user to the home page.
If any validation error occurs, our action method will again display the form with incorrect Person object data. This is implemented using the last line in the above code.
Error messages are displayed on the page due to the auxiliary method <% = Html.ValidationMessageFor ()%> after each <% = Html.TextBoxFor ()%> in the form Create. The Html.ValidationMessageFor () helper method will display the corresponding error message for any non-valid model property passed to the view:
The convenience of this pattern in the ease of implementation in the code, as well as the ease of adding or changing the validation rules of our Person class, without the need to change the code outside the model. The ability to define validation rules in one place and enforcing these rules anywhere in the application allows us to quickly develop our application with minimal effort, while avoiding duplication of code.
Step 3: Add Client-Side Validation
Currently, our application only supports server-side validation, which requires the user to send data to the server before he sees any error message.
One of the goodies in ASP.NET MVC 2 is the validation architecture, which supports server and client validation. To do this, we just need to add two JavaScript scripts in the view and write one line of code:
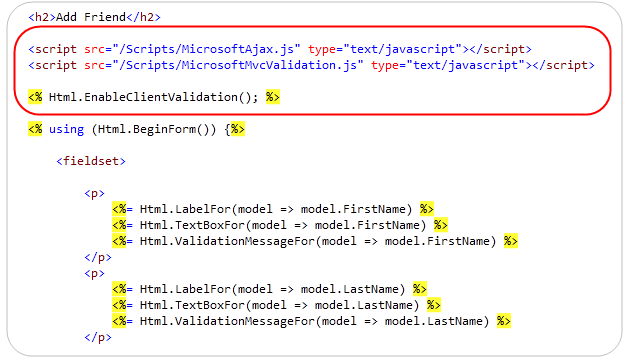
After adding three lines, ASP.NET MVC 2 will use the validation metadata we specified in the Person class and will create client-side validation logic using JavaScript. The user will see an error as soon as he switches to another element.
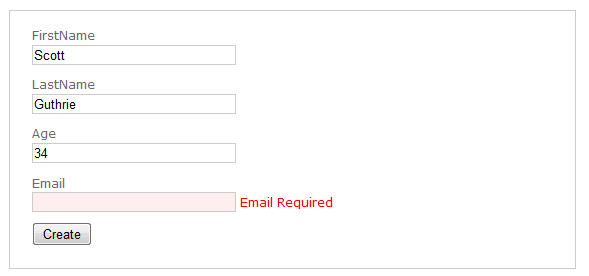
To see the test on the client in action, restart the application and fill in the first three text fields with valid data, and then try to click "Create". Notice how we got the error information, no sending data to the server happened:
If we enter text that is not a valid email address, the error immediately changes from “Email required” to “Not a valid email”, both of which we announced earlier in the Person class:

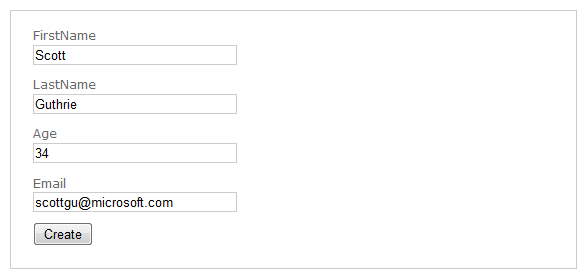
When we enter a valid email address, the error message will disappear and the background of the text field will return to its normal state:
We do not need to write any custom javascript code to add validation logic. Our code is still consistent with the principle of DRY.
For security reasons, validation rules always run on the server, even if you have enabled client-side validation. This prevents hackers from trying to cheat your server bypassing validation on the client.
Client JavaScript validation can work with any framework / engine that you use with ASP.NET MVC. There are no restrictions on using DataAnnotation, the entire infrastructure works independently of DataAnnotation and can work with the Castle Validator, EntLib Validation Block or any other solution.
If you do not want to use our javascript files, you can replace them with the jQuery validation plugin and use it. The ASP.NET MVC Futures add-on will include jQuery validation support.
Step 4: Create your own (email) validation attribute
The System.ComponentModel.DataAnnotations namespace contains several built-in validation attributes that you can use. We have already used four - [Required], [StringLength], [Range] and [RegularExpression].
But you can declare your own validation attribute and use it. You can create a completely new attribute inheriting from the ValidationAttribute class, which is in the System.ComponentModel.DataAnnotations namespace. And you can create an attribute based on existing ones, if you want to simply extend their functionality.
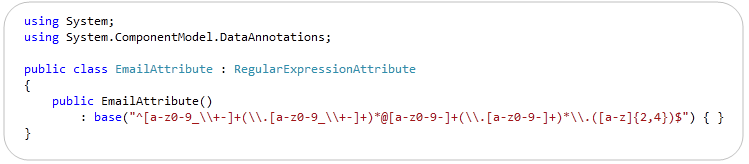
For example, to keep the code clean in our Person class, we want to create a new validation attribute [Email] that encapsulates a regular expression to validate email addresses. The easy way is to inherit from the RegularExpression class and call the constructor of the RegularExpression class with the corresponding regular expression:
Now we can update the Person class and use our new validation attribute [Email] instead of the previous regular expression, agree - the code has become cleaner:
When you create your own validation attribute, you can define validation rules for the server and client.
Finally, to create your own attributes that refer to the individual properties of an object, you can access the validation attributes at the class level. This allows you to implement logic in conjunction with several properties in the object. For example, you can look at the “PropertiesMustMatchAttribute” attribute, which is located in the AccountModels.cs / vb file in the standard ASP.NET MVC 2 application template (File> New ASP.NET MVC 2 Web Project in VS 2010).
Step 5: Go to the database
And now let's implement the logic needed to save our friends to the database.
We now use the old-style C # class (often referred to as the “POCO” class - “plain old CLR object”). One approach is to write a separate code that binds the existing class to the database. Today, such solutions based on object-relational projection (ORM), like NHibernate, perfectly support the POCO communication style. The ADO.NET Entity Framework (EF) that comes out with .NET 4 also supports POCO communication and, like NHibernate, additionally supports the ability to communicate through code without using any communication files or constructor.
If our Person object was connected to the database in one of the following ways, then we do not need to make any changes to the Person class.
What if we use a visual tool for our ORM links?
Today, many developers using Visual Studio do not write their own ORM-logic of links, but use the constructors built into VS to solve this problem.
Often the question arises when using DataAnnotation (or any other form of attributes based on validation) - “how do you apply rules when the object model that you work with is created using a GUI constructor?”. For example, if we replace the Person class, designed in the POCO style, we will create the Personal class in Visual Studio using the LINI to SQL or ADO.NET EF GUI-relations tool:
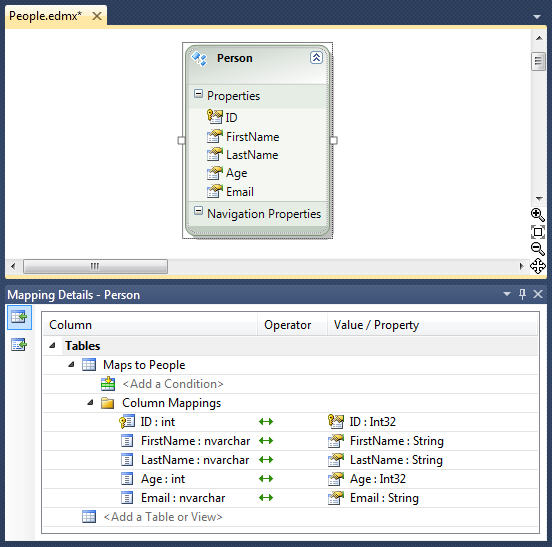
In the screenshot, you see the Person class, declared using the ADO.NET EF constructor in VS 2010. The upper window defines the Person class, the lower one displays the link editor, namely, how properties are bound to the People database table. After saving, the class Person is automatically generated. This is convenient, except that with each change you will need to save the file, which will lead to a complete regeneration of the Person class and you will lose all declared validation attributes.
A solution that will help to apply additional attribute metadata to the automatically created class is the friendly classes. In fact, you create a separate class that contains your validation and metadata attributes, and then bind it to the generated class by applying the “MetadataType” attribute to the generated partial-class. For example, we want to apply the validation rules that we used earlier to the Person class created using the LINQ to SQL or ADO.NET EF constructor. To do this, we move our validation code to the Person_Validation class and link it to the Person class:
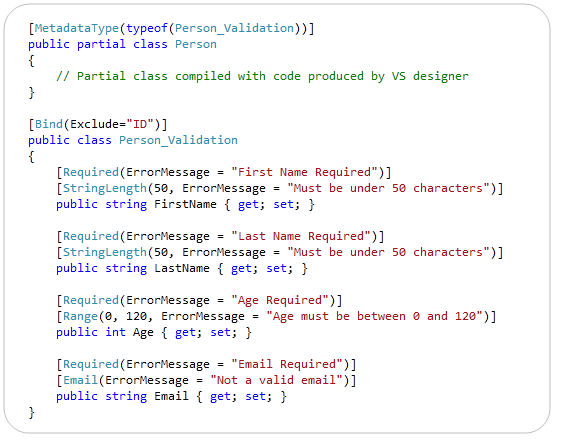
This option is inferior in elegance to the POCO version, but it has an advantage in working with most tools or with code generated by designers in Visual Studio.
The last step is to save the Friend to the database.
Our last step, regardless of the approach we used: POCO or the Person class generated by some tool, will be saving Friend valid objects to the database.
To do this, we replace the “Todo” tag in the FriendsController class with three lines of code that will save the new friend to the database. Below is the full version of the FriendsController class that works with ADO.NET EF:
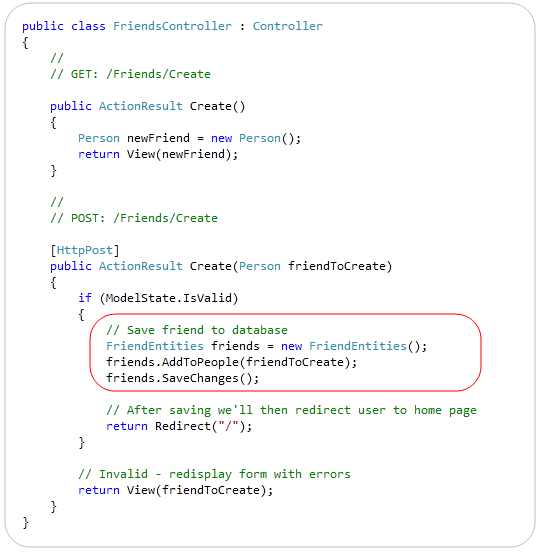
Now that we visit the URL / Friends / Create, we can easily add a new People object to our friends list in the database:
Validation of all data occurs on the client and on the server. We can easily add / change / delete validation rules and they will be used without fail by any controller or view in our application.
Let's sum up
ASP.NET MVC 2 makes it much easier to integrate validation into web applications. Offers a model-based validation approach that avoids duplication of code in different places and also ensures that validation rules are guaranteed to be used throughout the application. Built-in support for DataAnnotation allows you to implement common validation options out of the box. Supporting the extensibility of the validation infrastructure allows you to implement various validation scenarios and include any validation frameworks.
Source: https://habr.com/ru/post/80891/
All Articles