Dell XPS M1210 disassembly
This is a translation of an article from AhWee.com . © James
Since I have just such a laptop, I'll save myself a translation for history and various needs. Here it will be more convenient. As for literalness, please do not ask questions, do not aspire to the accuracy of the translation. And in general, slightly reduced.
So, how to disassemble a laptop Dell XPS M1210 .
For a start: everything you do, you do at your own peril and risk. Neither the author of the article, nor the translator, nor the sites on which these articles are located, bear any responsibility for any events that have occurred.
')
Required tools:
Before you start.
Before you begin to disassemble the laptop, you must perform several steps.
Now proceed to disassemble the laptop.
Step 1. Removing the hard drive, memory, communication boards and optical drive.
Removing these components is important for several reasons. Firstly, it will facilitate further disassembly, and secondly, it will protect the components themselves from possible damage, scratches, shock during disassembly.
How to remove the hard drive?
Handle a hard disk with care, do not drop or hit it. It is best to place it in an electrostatic bag during disassembly, in order to avoid static discharges.
How to remove the RAM?
The memory bars in M1210 are located in two places.
One of them is in the bottom of the laptop, under the lid located in the center of the bottom, under the latch of the battery. The second is located under the keyboard.
Memory strip removed standard:
How to remove the communication board?
Communication boards are under the cover, marked with the letter “C” in the upper left corner of the bottom of the notebook.
How to remove the optical drive?
The optical drive is located in the bottom left corner of the bottom of the M1210.
Step 2. Remove the hinge cover.
Step 3. Remove the keyboard.
Step 4. Remove the LCD.
Step 5. Remove the palm rest.
The palm rest is always the most difficult part to disassemble. Always remember that Dell makes its laptops in such a way that technicians can open them without breaking anything. This means that it is definitely not necessary to put an extra effort to lift or remove any part.
Some cleaning tips
That's it, your Dell XPS M1210 is disassembled.
Since I have just such a laptop, I'll save myself a translation for history and various needs. Here it will be more convenient. As for literalness, please do not ask questions, do not aspire to the accuracy of the translation. And in general, slightly reduced.
So, how to disassemble a laptop Dell XPS M1210 .
For a start: everything you do, you do at your own peril and risk. Neither the author of the article, nor the translator, nor the sites on which these articles are located, bear any responsibility for any events that have occurred.
')
Required tools:
- Phillips screwdriver (approximately 2.5 mm)
- Flat screwdriver
- Dusting brush
Before you start.
Before you begin to disassemble the laptop, you must perform several steps.
- Clear place on the table
Before you start, free yourself a place to lay out all the components in such a way that they do not roll away anywhere and fall. 1 square meter will do. - Remove battery
To remove the battery, slide the battery latch until it clicks, then pull the battery out along the guides.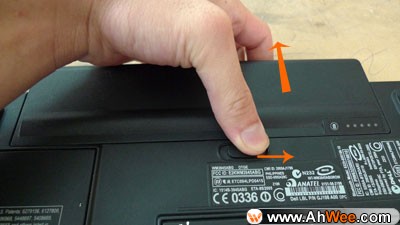
- Ground motherboard
After removing the battery, ground the motherboard by pressing the power button for a couple of seconds. - Ground your hands
Ground yourself by wearing a grounding bracelet, or from time to time touching an unpainted metal surface (for example, heating pipes).
Now proceed to disassemble the laptop.
Step 1. Removing the hard drive, memory, communication boards and optical drive.
Removing these components is important for several reasons. Firstly, it will facilitate further disassembly, and secondly, it will protect the components themselves from possible damage, scratches, shock during disassembly.
How to remove the hard drive?
- Turn the laptop over and find the hard drive cover below.
- Unscrew the four M3 x 3mm screws with a cylinder (container) symbol.
- Slide the hard drive along the guides out of the case

Handle a hard disk with care, do not drop or hit it. It is best to place it in an electrostatic bag during disassembly, in order to avoid static discharges.
How to remove the RAM?
The memory bars in M1210 are located in two places.
One of them is in the bottom of the laptop, under the lid located in the center of the bottom, under the latch of the battery. The second is located under the keyboard.
Memory strip removed standard:
- With two fingers, slide the latches on the sides of the memory bar.
- The bar will go up. Pull it out of the grooves forward.

How to remove the communication board?
Communication boards are under the cover, marked with the letter “C” in the upper left corner of the bottom of the notebook.
- Unscrew the cap screw and remove it
- Carefully disconnect the antenna cables from the cards.
- Removing a card is like removing a memory stick. Move the latches holding the card
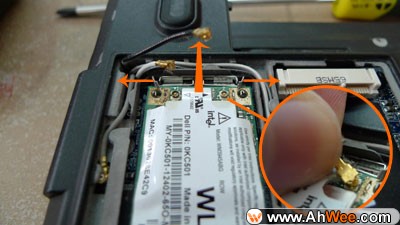
- The card will go up
- Pull out the card without bending it.
How to remove the optical drive?
The optical drive is located in the bottom left corner of the bottom of the M1210.
- Unscrew the screw M2.5 x 8mm marked with a lock icon
- Use a screwdriver to push the metal plate that held the screw
- The plate is attached to the optical drive, so that the entire drive will slide out to the side. Pull it out completely.

Step 2. Remove the hinge cover.
- Open the laptop and find a small notch on the top above the keyboard, to the left of the indicators
- Using an awl or flat screwdriver, pry out the hinge cover.

- Be very careful and do not overturn the cover to avoid damage.
Step 3. Remove the keyboard.
- Loosen the three M2.5 x 5mm screws on top of the keyboard
- Gently lift the keyboard until you see the connecting cable.
- Lift the latch on the connector to pull out the cable

Step 4. Remove the LCD.
- Remember the antenna cables disconnected a little earlier? Pull them out through the hole located in the upper left corner of the WLAN card compartment
- Pull all cables out of the guides.
- Unplug the display cable

- Unscrew the four M2.5 x 8mm “D” screws located at the back and bottom of the notebook.

- Gently pull the LCD frame out of the laptop base
Step 5. Remove the palm rest.
The palm rest is always the most difficult part to disassemble. Always remember that Dell makes its laptops in such a way that technicians can open them without breaking anything. This means that it is definitely not necessary to put an extra effort to lift or remove any part.
- Note the “P” mark on the palm rest.
- Remove all seven “P” marked M2.5 x 5mm screws.

- Remove four more M2.5 x 8mm screws on the bottom of the notebook.
- Loosen the captive screw located in the bottom right corner of the bottom of the notebook.
- Remove the small Bluetooth module located under the battery
- Disconnect the two cables from the tablet battery and touchpad.
- Separate the palm rest from the base, starting at the back of the notebook.
Some cleaning tips
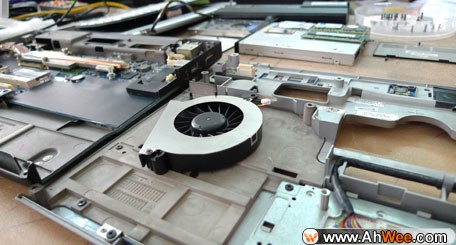
- Fan
Most dust is collected here. - Air vents
To improve the passage of air through the laptop. Here is an example of how dusty they can be:
- Motherboard
Gently brush off the dust with a brush. Do not use undue effort unless you want to break these small parts. - Closed palm rest part
- Keyboard
You will be surprised how many different things were hidden under the buttons.
That's it, your Dell XPS M1210 is disassembled.
Source: https://habr.com/ru/post/80035/
All Articles