Route Me is an alternative to the integrated Google Maps control from iPhone SDK 3.0+
I'm already tired of the limitations of the built-in card control, or rather, of fastening the crutches. Wait an example: Google Maps app knows how to show a route, a control doesn't know how. You have to draw on your own over the map.
Now I have a specific task: I need to add a display of the route traveled and its export (share) to my modest GPS Speed application, which, by the way, has been hanging in the Top 30 of the American App Store in the Navigation section for some time now . The reason for me remains a mystery, because the application is average and unique does not shine.
')
Returning to the problem.
Mat part
Even when there was no official card control, I worked with such “substitutes”:
Route Me:
- BSD license (decide whether it is good or bad)
- support for many map sources: OpenStreetMap, Microsoft Virtual Earth, Cloud Made, Yahoo Maps and other less popular
- formed active developer community - Google Group
Cloud Made:
- part of a large project and has an official development team (I will take this opportunity and say hello to Dima;), because it potentially has greater integration with Cloud Made cards
- has many themes (color sets) for cards
- used in the spring, it was still raw
I want to start a series of articles with something simple, for example, embed maps into an application and give the user the opportunity to choose the source of maps. I prefer Route Me, because, apart from everything else, it can also show Cloud Made.
Training
- Open xCode and create a new project. I chose the View-Based Application and called it RouteMeSourceSelection
- Download the latest version of Route Me
- Install control step by step on this guide.
After that you should have a compiled project. If you have any problems, you can download the source code of this example and compare.

Add control (code)
Open the UIViewController header (mine is called “RouteMeSourceSelectionViewController.h”) and:
- #import "RMMapView.h"
- we add the RMMapViewDelegate protocol
- create an IBOutlet RMMapView * mapView;

Override the "- (void) viewDidLoad" method:
- (void)viewDidLoad {
[super viewDidLoad];
[RMMapView class]; // ! . .
[mapView setDelegate:self];
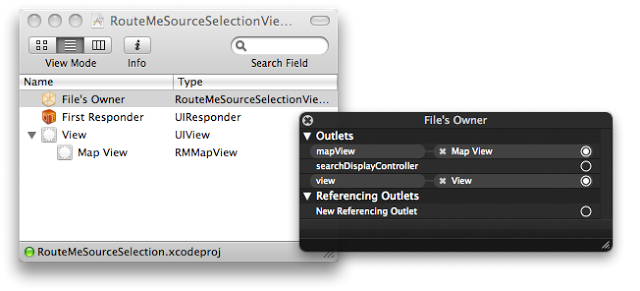
}Add control (design)
- Open the .xib file in Interface Builder (IB)
- Add a UIView (subview) to an existing one and define it as RMMapView
- We connect IBOutlet from our UIViewController with the newly created RMMapView
I understand that it is difficult to perceive such a text. In short, it should look like this:
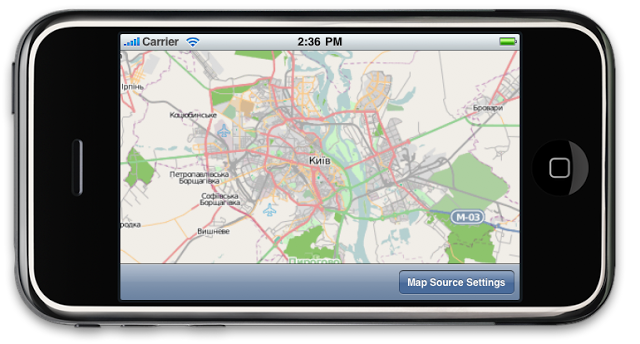
Now, running the application, you should see a map with the default source - Open Street Maps. I see this, I hope you too:
It was all very easy. Let's give the user the opportunity to choose the source of the map. To do this, place the UIPickerView control and link it to our UIViewController.
UIPickerView to select the map source (code)
We open the controller's header and add two UIPickerViewDelegate and UIPickerViewDataSource protocols, and several IBOutlet:
@interface RouteMeSourceSelectionViewController : UIViewController
<RMMapViewDelegate,
UIPickerViewDelegate, UIPickerViewDataSource>
{
IBOutlet RMMapView *mapView;
IBOutlet UIPickerView *mapSourcePicker;
IBOutlet UIBarButtonItem *mapSettingsBarButton;
}

- (IBAction) showMapsSettings;

@end
Now we implement several required methods for UIPickerView. This is simple, but will be useful for those who have not done it yet:
static NSArray *titles = nil;

- (NSString *)pickerView:(UIPickerView *)pickerView
titleForRow:(NSInteger)row
forComponent:(NSInteger)component
{
return [titles objectAtIndex:row];
}

- (NSInteger)pickerView:(UIPickerView *)pickerView
numberOfRowsInComponent:(NSInteger)component
{
if (!titles)
{
titles = [[NSArray alloc] initWithObjects:
@"Open Street Maps",
@"Yahoo Map",
@"Virtual Earth Aerial",
@"Virtual Earth Hybrid",
@"Virtual Earth Road",
@"Cloud Made Map",
nil];
}

return [titles count];
}

- (NSInteger)numberOfComponentsInPickerView:(UIPickerView *)pickerView
{
return 1;
}
Create a showMapsSettings method to show and hide UIPickerView, and also for a couple of UI tricks:
- (IBAction) showMapsSettings
{
BOOL toShow = [mapSourcePicker isHidden];

if (toShow)
{
[mapSettingsBarButton setStyle:UIBarButtonItemStyleDone];
}
else // hidding
{
[mapSettingsBarButton setStyle:UIBarButtonItemStyleBordered];
[self setMapSourceWithNumber:[mapSourcePicker selectedRowInComponent:0]];
}

[mapSourcePicker setHidden:![mapSourcePicker isHidden]];
[mapView setUserInteractionEnabled:[mapSourcePicker isHidden]];
}
And now the most important thing is the method for changing the source of the map. If they were attentive, they saw that it was called in “showMapsSettings”. There is a small trick: the map is not updated automatically when you change the source, so you have to shift and return to the previous position. It is invisible to the user. At the very end, we save the selected source number to the general settings of the application.
#import "RMVirtualEarthSource.h"
#import "RMYahooMapSource.h"
#import "RMCloudMadeMapSource.h"
#import "RMOpenStreetMapsSource.h"

#define CONST_MAP_KEY_bing @""
#define CONST_MAP_KEY_cloud @""

- (void) setMapSourceWithNumber:(int)number
{
if (mapSourceNumber == number)
return;

switch (number) {
case 0:
mapView.contents.tileSource = [[RMOpenStreetMapsSource alloc] init];
break;
case 1:
mapView.contents.tileSource = [[RMYahooMapSource alloc] init];
break;

case 2:
mapView.contents.tileSource = [[RMVirtualEarthSource alloc] initWithAerialThemeUsingAccessKey:CONST_MAP_KEY_bing];
break;
case 3:
mapView.contents.tileSource = [[RMVirtualEarthSource alloc] initWithHybridThemeUsingAccessKey:CONST_MAP_KEY_bing];
break;
case 4:
mapView.contents.tileSource = [[RMVirtualEarthSource alloc] initWithRoadThemeUsingAccessKey:CONST_MAP_KEY_bing];
break;

case 5:
mapView.contents.tileSource = [[RMCloudMadeMapSource alloc] initWithAccessKey:CONST_MAP_KEY_cloud styleNumber:1];
break;

default:
return;
break;
}

// this trick refreshs maps with new source
[mapView moveBy:CGSizeMake(640,960)];
[mapView moveBy:CGSizeMake(-640,-960)];

mapSourceNumber = number;
// remember user choice between runnings
[[NSUserDefaults standardUserDefaults] setInteger:mapSourceNumber forKey:@"mapSourceNumber"];
}
In order to make the Cloud Made and Virtual Earth (Bing) cards work, you need to get the “developer API key”:
The last thing I would like to add is remembering the user's choice between the launches of our program. Modify the "viewDidLoad" method:
- (void)viewDidLoad {
[super viewDidLoad];

[RMMapView class];
[mapView setDelegate:self];

int number = [[NSUserDefaults standardUserDefaults] integerForKey:@"mapSourceNumber"];
[self setMapSourceWithNumber:number];
[mapSourcePicker selectRow:mapSourceNumber inComponent:0 animated:NO];
}
UIPickerView to select the source of the map (design)
Opening IB and:
- add a UIToolbar with a single UIBarButtonItem button connected to its IBOutlet from the controller
- we connect event of clicking on UIBarButtonItem with showMapsSettings IBAction
- add a UIPickerView over the map and make it hidden (hidden)
- connect the UIPickerView with its IBOutlet and set its delegate and dataSource as “file's owner”
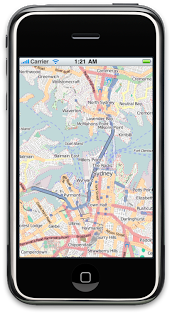
Again, the picture will replace a thousand words:

If everything is done correctly and neither I, nor you have forgotten anything, then you will see the working application:
All that has been shown is used in a real application - Meeting Point, it is free, try it .
You can download the source here.
English version of the article from my tech blog
In the comments, suggest what to add and I will expand this detailed guide:
- Determine the location of the user on the map and display on the map. I will do it for sure, too simple.
- Geo search. Don't know what it is yet, but it sounds cool
- Offer yours
Source: https://habr.com/ru/post/79397/
All Articles