How I did the site (my practical work at the university)
I have just defended my practice report on “Creating a site and its promotion in search engines.” In this regard, I would also like to hear the opinion of Habr's readers on my work. The result of the work is the EasySki.ru website. In this post I want to tell you about the process of creating a site.
My specialty at the university is “Applied Informatics in Economics”. I’ll say at once that I’m not a designer, not a layout designer or a programmer, therefore almost everything that will be described below is done on my enthusiasm and studied on my own in my spare time.
The purpose of my practice is to create a guide to foreign ski resorts. Ideally, the site is conceived as a social resource. Users are given a description of the resorts and other information on this topic, and users in turn leave reports, impressions and photos.
')
I tried to make a web 2.0 logo. I do not know how it turned out, but the logo came out like this:

If possible, I tried to find the icons on the Internet, but beautiful icons for the lifts were rare on the Internet and I had to open Photoshop again:


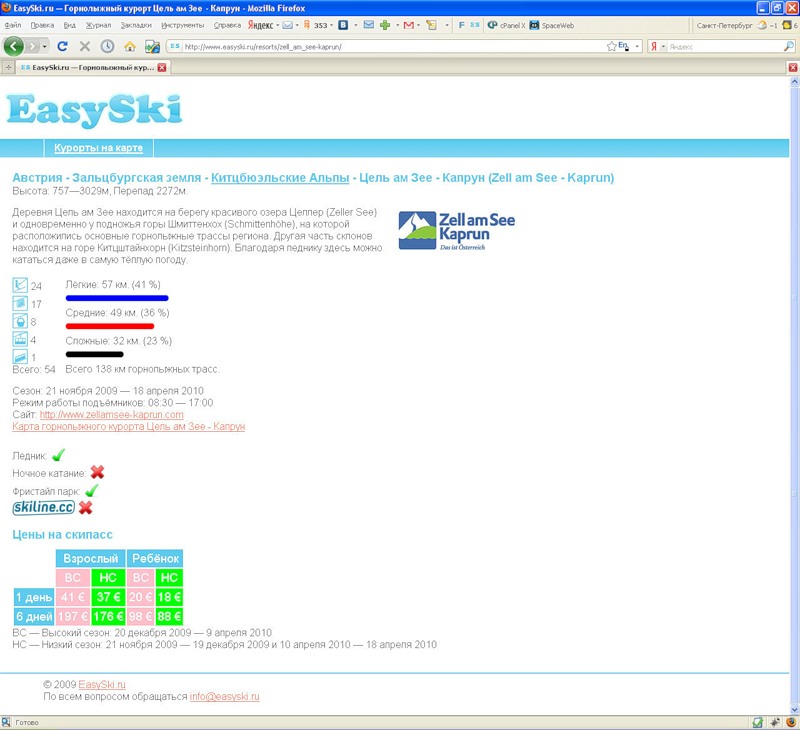
At the stage of layout, I learned that the tables are no longer typesetting, and began to master the layout of divas. The result was the following:
I wrote the site in a little-known language from a famous studio of my own. This language is called Parser . I became acquainted with this language while still at school and I really liked him for writing a hamster. How to create the simplest template engine is described in one of the lessons of the language documentation. I will not dwell on this, because I have the same principle. Let me just say that Parser allows you to quickly and conveniently create site page templates.
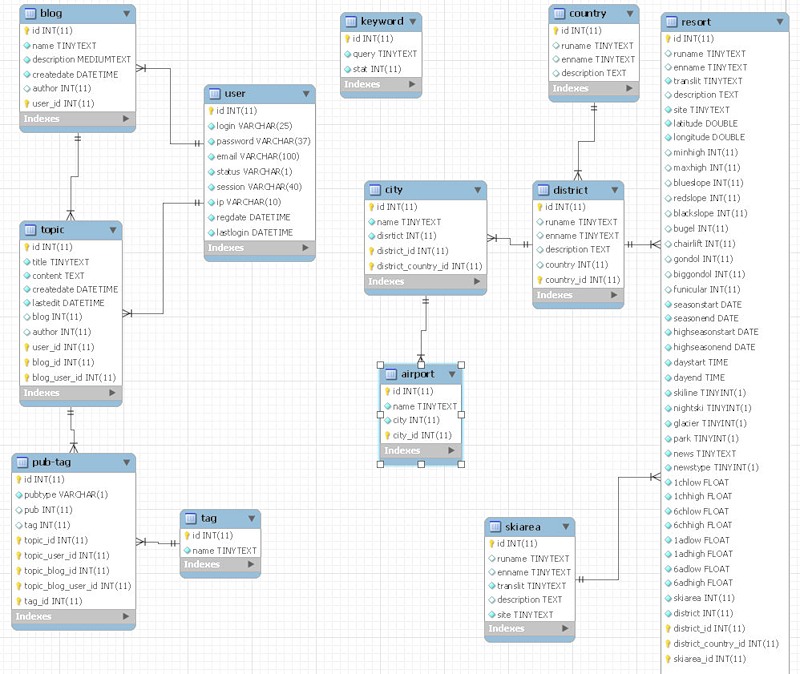
I used MySQL DBMS, ER-chart looks like this:
One of the most time consuming stages was filling the site. Now there is one country in the database - Austria, and these are 38 resorts. Collecting and filling in data for only one country took me 1.5 months, and I still have to fill in information for at least 9 countries. The difficulty is that it is not always possible to quickly find the necessary information on the site of the resort, then you have to look for other sources of information. The truth is worth considering that in Austria there are a lot of resorts and the Russians most often rest in this country.
So template engine is ready. Now you need to somehow display the content on each page of the site. Classes and their methods will be responsible for this. Several classes have been written:
To display the ski resorts on the map was selected Google map service. Google Maps can be used for free, they also have the most detail among similar projects, besides Google maps have a landscape view, which is especially important when it comes to mountains.
When accessing the "Resorts on the map" page, the following algorithm will be executed:
Graphically, this can be represented as follows:

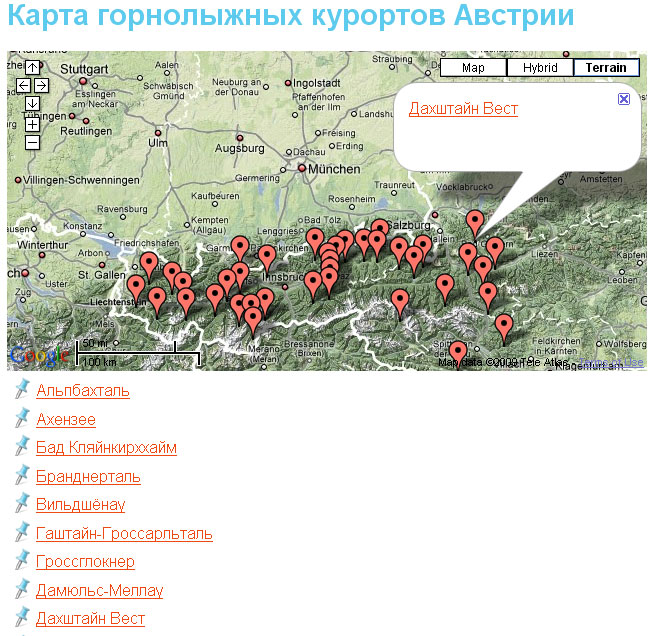
Screen - how it looks in work:
Directly the result of work: www.easyski.ru/resorts
Viewing the map of the resort slopes plays an important role when choosing a resort. Each resort has its own map of the slopes in JPEG format with a resolution of 1500 to 5500 pixels on one side. Such large images are inconvenient to view in the browser, so the site uses map scaling technology. The basis was taken by the development of students of University College London.
The principle of the application is the same as that of Google Maps. There are several zoom levels. At the top level, there is only one 256-pixel image, which is a reduced copy of the original image. At the second level, the image consists of four 256 squares by 256 pixels, and then sixteen, sixty-four and two hundred and fifty-six. This corresponds to 256, 512, 1024, 2048 and 4096 pixels of the image on one side.
You can see how it works, for example, here: www.easyski.ru/resorts/zell_am_see-kaprun/map
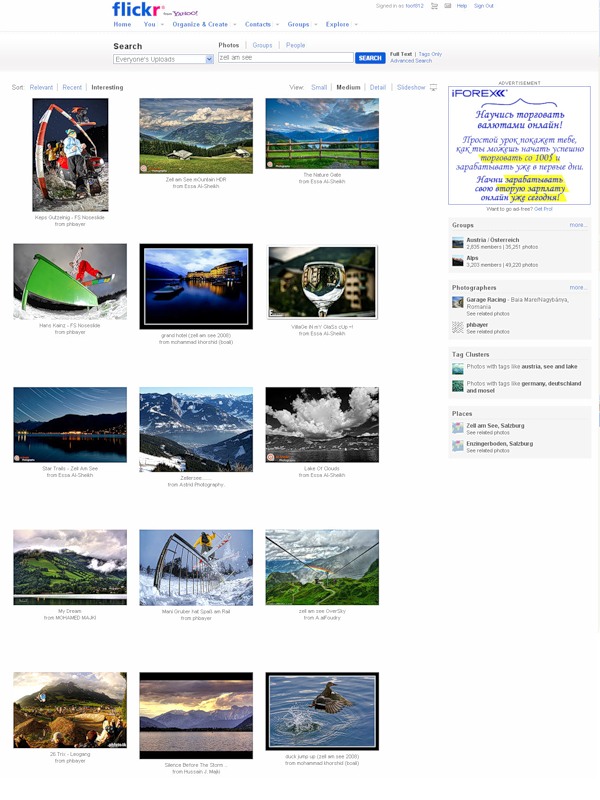
It is assumed that users themselves will add photos to the resorts from their trips. But at the development stage, while there are very few users, I decided to show them photos from Flickr using the Flickr API. The Flickr API allows you to request images by geographic coordinates, which significantly improves the quality of photo search for resorts. Since the graphic coordinates of the resort are already in the database, using the search function by geographic coordinates you can get a selection of photos for the resort. For photos used a bunch of AJAX + JSON. The implementation was done on jQuery.
Sample photos on flickr:
The same photos, but already on my site:

The mod_rewrite module of the Apache web server was used to create user-friendly URLs.
Consider the following example. The original URL for viewing resort information is as follows:
www.easyski.ru/resorts/showresort.html?name=zell_am_see-kaprun
Pretty cumbersome and incomprehensible for the average user. Therefore, we convert this URL using regular expressions:
RewriteRule ^ resorts /( [/] / / resorts / showres.html? Name=$1 [L]
After the conversion, the user will see the following URL in the browser string:
www.easyski.ru/resorts/zell_am_see-kaprun
Such an operation was performed for all URLs of the site.
At this stage, the book “Optimization and website promotion in search engines” by Ashmanov and Ivanov helped me a lot. First of all, I made a semantic core of the site - this is a list of key phrases that will be promoted. I have listed all search queries that have a frequency of 300 per year. It turned out about 70 key phrases. Further, in accordance with the recommendations from the book of Ashmanov, I carried out an internal optimization of the site, and then began to promote the site on the forums of skiing topics, social networks, blogs and services, "Question-Answer". As a result, a month later, my site got into the TOP 10 of the top three search engines (Yandex, Google, Rambler) on low-frequency queries. And for some requests even got into the TOP-3. I think this is a good result to start with.
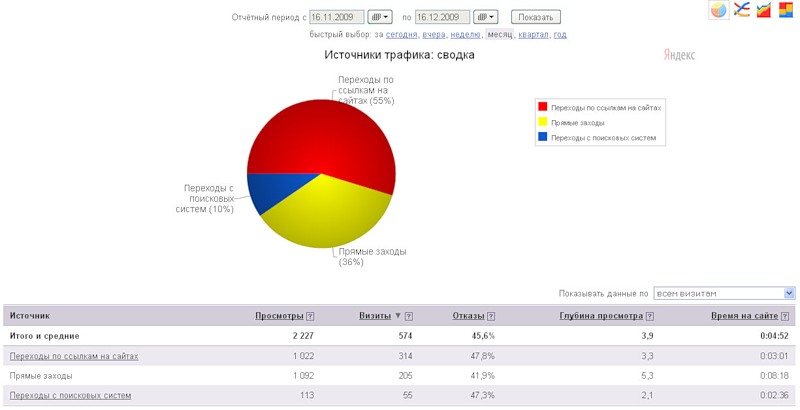
Sources of traffic for the month of the site:
Thanks to everyone who read to the end, I hope it was useful for you and you learned something new. I suggest you to test the site EasySki.ru . I would be very grateful for constructive criticism, suggestions and suggestions. I understand that I can’t make a quality resource alone, so I’m offering those who are interested in my project to join! Anyone can help! If interested, write to me. Thanks for attention!
My specialty at the university is “Applied Informatics in Economics”. I’ll say at once that I’m not a designer, not a layout designer or a programmer, therefore almost everything that will be described below is done on my enthusiasm and studied on my own in my spare time.
The purpose of my practice is to create a guide to foreign ski resorts. Ideally, the site is conceived as a social resource. Users are given a description of the resorts and other information on this topic, and users in turn leave reports, impressions and photos.
')
Stage number 1 - the creation of design
I tried to make a web 2.0 logo. I do not know how it turned out, but the logo came out like this:
If possible, I tried to find the icons on the Internet, but beautiful icons for the lifts were rare on the Internet and I had to open Photoshop again:
At the stage of layout, I learned that the tables are no longer typesetting, and began to master the layout of divas. The result was the following:
Stage 2 - creating a template engine
I wrote the site in a little-known language from a famous studio of my own. This language is called Parser . I became acquainted with this language while still at school and I really liked him for writing a hamster. How to create the simplest template engine is described in one of the lessons of the language documentation. I will not dwell on this, because I have the same principle. Let me just say that Parser allows you to quickly and conveniently create site page templates.
Stage number 3 - the creation of a database
I used MySQL DBMS, ER-chart looks like this:
Stage # 4 - site content
One of the most time consuming stages was filling the site. Now there is one country in the database - Austria, and these are 38 resorts. Collecting and filling in data for only one country took me 1.5 months, and I still have to fill in information for at least 9 countries. The difficulty is that it is not always possible to quickly find the necessary information on the site of the resort, then you have to look for other sources of information. The truth is worth considering that in Austria there are a lot of resorts and the Russians most often rest in this country.
Stage # 5 - Content Output System
So template engine is ready. Now you need to somehow display the content on each page of the site. Classes and their methods will be responsible for this. Several classes have been written:
- admin - the class is responsible for administering the site and testing its new components.
- resort - is responsible for displaying the contents of the pages of the "Resorts" section
- auth - the class defines methods related to authorization on the site
- blog - the class describes methods for working with the blogosphere site.
- dt - methods of this class are designed to convert dates to various formats.
- sql - class is designed to work with the database
Stage # 6 - creating a resort map
To display the ski resorts on the map was selected Google map service. Google Maps can be used for free, they also have the most detail among similar projects, besides Google maps have a landscape view, which is especially important when it comes to mountains.
When accessing the "Resorts on the map" page, the following algorithm will be executed:
- The /resorts/index.html page loads, which contains an empty block (the div element).
- After loading the HTML code, JavaScript is executed, which creates a map object, and also includes map controls.
- AJAX request is made to the /parser/map.html page, which displays the names and geographic coordinates of resorts in a given country from the database and gives them in JSON format.
- Based on the data obtained, the script places the markers on the map in accordance with the geographical coordinates of the resort and generates a list of resorts with links to the corresponding marker resorts.
- When you click on a marker or on the “Show resort on map” icon, an event handler is invoked, which, in place of the corresponding marker, displays a dialog box with brief information about the resort.
Graphically, this can be represented as follows:
Screen - how it looks in work:
Directly the result of work: www.easyski.ru/resorts
Stage number 7 - creating a map of the slopes of the resorts
Viewing the map of the resort slopes plays an important role when choosing a resort. Each resort has its own map of the slopes in JPEG format with a resolution of 1500 to 5500 pixels on one side. Such large images are inconvenient to view in the browser, so the site uses map scaling technology. The basis was taken by the development of students of University College London.
The principle of the application is the same as that of Google Maps. There are several zoom levels. At the top level, there is only one 256-pixel image, which is a reduced copy of the original image. At the second level, the image consists of four 256 squares by 256 pixels, and then sixteen, sixty-four and two hundred and fifty-six. This corresponds to 256, 512, 1024, 2048 and 4096 pixels of the image on one side.
You can see how it works, for example, here: www.easyski.ru/resorts/zell_am_see-kaprun/map
Stage 8 - creating a section with photos of resorts
It is assumed that users themselves will add photos to the resorts from their trips. But at the development stage, while there are very few users, I decided to show them photos from Flickr using the Flickr API. The Flickr API allows you to request images by geographic coordinates, which significantly improves the quality of photo search for resorts. Since the graphic coordinates of the resort are already in the database, using the search function by geographic coordinates you can get a selection of photos for the resort. For photos used a bunch of AJAX + JSON. The implementation was done on jQuery.
Sample photos on flickr:
The same photos, but already on my site:
Stage # 9 - Creating Friendly URLs
The mod_rewrite module of the Apache web server was used to create user-friendly URLs.
Consider the following example. The original URL for viewing resort information is as follows:
www.easyski.ru/resorts/showresort.html?name=zell_am_see-kaprun
Pretty cumbersome and incomprehensible for the average user. Therefore, we convert this URL using regular expressions:
RewriteRule ^ resorts /( [/] / / resorts / showres.html? Name=$1 [L]
After the conversion, the user will see the following URL in the browser string:
www.easyski.ru/resorts/zell_am_see-kaprun
Such an operation was performed for all URLs of the site.
Stage №10 - search promotion
At this stage, the book “Optimization and website promotion in search engines” by Ashmanov and Ivanov helped me a lot. First of all, I made a semantic core of the site - this is a list of key phrases that will be promoted. I have listed all search queries that have a frequency of 300 per year. It turned out about 70 key phrases. Further, in accordance with the recommendations from the book of Ashmanov, I carried out an internal optimization of the site, and then began to promote the site on the forums of skiing topics, social networks, blogs and services, "Question-Answer". As a result, a month later, my site got into the TOP 10 of the top three search engines (Yandex, Google, Rambler) on low-frequency queries. And for some requests even got into the TOP-3. I think this is a good result to start with.
Sources of traffic for the month of the site:
Conclusion
Thanks to everyone who read to the end, I hope it was useful for you and you learned something new. I suggest you to test the site EasySki.ru . I would be very grateful for constructive criticism, suggestions and suggestions. I understand that I can’t make a quality resource alone, so I’m offering those who are interested in my project to join! Anyone can help! If interested, write to me. Thanks for attention!
Source: https://habr.com/ru/post/78472/
All Articles