We finish the Django-admin chainsaw. Part II - WYSIWYG
So the promised continuation of the last post . As a result, we will tie TinyMCE to flatpages and turn the sheet / form of the created model with pictures into a simple file manager for inserting pictures. This will require quite a bit of Javascript and the only line in 'admin.py'.
Firstly, I want to immediately make a reservation that I am pleased with the fact that I divided this article into two parts - I had the opportunity to read the comments (on Habré), to take into account some errors and, on the basis of this, to immediately make a small warning. If you just want to fasten thumbnails or a WYSIWYG editor into your Django application, then this article is not for you: take a ready-made plugin and do not worry - you will certainly get a more powerful and functional solution. Although for each simple case, adding dependencies of dubious origin (ala djangosnippets) to the project is also not an option.
My goal is different - with simple examples to show how using custom JS you can solve such problems painlessly and other, much more complicated ones, which would probably require dirty low-level hacks in the Django code.
So, as a result of the first part, we have a model for additional images that we intend to use for flatpages, and a customized admin panel that can now display thumbnails of images in the list of objects and on the editing form.
')
First, let's connect TinyMCE. I prefer this editor - a matter of taste and habits. Moreover, now with it comes a jQuery plugin, which fits pretty well into the set of JS libraries I use. We have already connected this plugin together with the file 'base.js' globally, adding it to 'admin / base_site.html', which is quite convenient if you need WYSIWYG for several models. The initialization and setup code for TinyMCE will be in 'base.js'. Let's bring it to the following form:
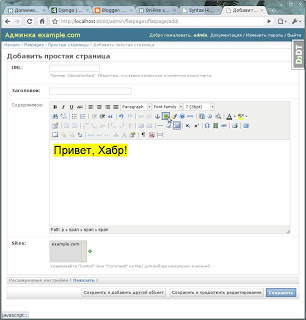
That's all. Now on the flatpages editing form we will have TinyMCE in almost the maximum configuration. Including the ability to insert images and edit their properties.
However, inserting pictures by their URLs is half the work, you need to ensure that you can directly upload a new picture to the server directly from the insert picture dialog, without any extra gestures, view the existing ones and select the one you want. This functionality is ensured by File / Image managers for popular WYSIWYG editors. Their distinguishing feature is that they need the server part to work - the so-called "connector", which allows you to perform the necessary actions on the file system, and the manager will only need to display the necessary information and return the parameters of the selected image to the dialog box.

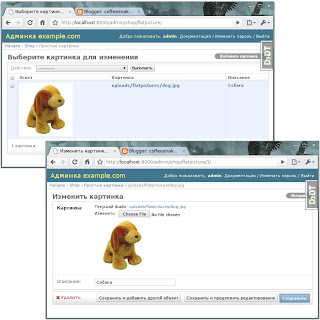
In general, all this functionality is already provided to us by Django itself, or rather, our ready-made model for managing images. It remains only to force TinyMCE to use it as a file manager. For this, we need the 'tinyDjangoBrowser ()' function and the TinyMCE 'file_browser_callback' option. All that this function does is open a model management page with pictures in a popup window. This is already enough to select / delete / upload pictures. The matter remains small - the page with the list of objects should distinguish whether it was opened just like that or from the TinyMCE window, and in the latter case return the parameters of the selected picture. For this, we decorate the admin panel for this model using the small script 'tiny_django_browser.js'.
Things are easy, we connect this script to the admin panel, FlatPictureAdmin at the moment will look like this:
That's all. Now the picture together with the description in the alt-attribute will be inserted by clicking on the thumbnail.

Next time I will try to pick up an example of more complex and rare functionality. I hope that it will be possible to draw some ideas and suggestions from your comments.
Firstly, I want to immediately make a reservation that I am pleased with the fact that I divided this article into two parts - I had the opportunity to read the comments (on Habré), to take into account some errors and, on the basis of this, to immediately make a small warning. If you just want to fasten thumbnails or a WYSIWYG editor into your Django application, then this article is not for you: take a ready-made plugin and do not worry - you will certainly get a more powerful and functional solution. Although for each simple case, adding dependencies of dubious origin (ala djangosnippets) to the project is also not an option.
My goal is different - with simple examples to show how using custom JS you can solve such problems painlessly and other, much more complicated ones, which would probably require dirty low-level hacks in the Django code.
So, as a result of the first part, we have a model for additional images that we intend to use for flatpages, and a customized admin panel that can now display thumbnails of images in the list of objects and on the editing form.
')
First, let's connect TinyMCE. I prefer this editor - a matter of taste and habits. Moreover, now with it comes a jQuery plugin, which fits pretty well into the set of JS libraries I use. We have already connected this plugin together with the file 'base.js' globally, adding it to 'admin / base_site.html', which is quite convenient if you need WYSIWYG for several models. The initialization and setup code for TinyMCE will be in 'base.js'. Let's bring it to the following form:
  function tinyDjangoBrowser (field_name, url, type, win) {
     var managerURL = window.location.toString ()
             + '../../../shop/pagepicture/?type=' + type;

     tinyMCE.activeEditor.windowManager.open ({
         file: managerURL,
         title: 'Click on the thumbnail of the desired image',
         width: 800,
         height: 450,
         resizable: 'yes',
         inline: 'yes',
         close_previous: 'no',
         popup_css: false
     }, {
         window: win,
         input: field_name
     });

     return false;
 }

 $ (). ready (function () {
     var tinymceOptions = {
         script_url: '/media/lib/tiny_mce/tiny_mce.js',

         theme: 'advanced',
         plugins: 'safari, pagebreak, layer, table, advhr, advimage, advlink, iespell, inlinepopups, insertdatetime, preview, media, searchreplace, print, contextmenu, fullscreen, noneditable, visualchars, nonbreaking, xhtmlxtras',

         theme_advanced_buttons1: 'bold, italic, underline, strikethrough, |, justifyleft, justifycenter, justifyright, justifyfull, formatselect, fontselect, fontsizeselect',
         theme_advanced_buttons2: 'search, replace, |, bullist, numlist, |, outdent, indent, blockquote, |, undo, redo, |, link, unlink, anchor, image, cleanup, help, code, |, insertdate, inserttime, preview , |, forecolor, backcolor ',
         theme_advanced_buttons3: 'tablecontrols, |, hr, removeformat, visualaid, |, sub, sup, |, charmap, iespell, media, advhr, |, print, |, fullscreen',
         theme_advanced_buttons4: 'insertlayer, moveforward, movebackward, absolute, |, cite, abbr, acronym, del, ins, attribs, |, visualchars, nonbreaking, pagebreak',
         theme_advanced_toolbar_location: 'top',
         theme_advanced_toolbar_align: 'left',
         theme_advanced_statusbar_location: 'bottom',
         theme_advanced_resizing: true

         // Drop lists for link / image / media / template dialogs
         template_external_list_url: 'lists / template_list.js',
         external_link_list_url: 'lists / link_list.js',
         external_image_list_url: 'lists / image_list.js',
         media_external_list_url: 'lists / media_list.js',

         doctype: '<! DOCTYPE HTML PUBLIC "- // W3C // DTD HTML 4.01 // EN" "http://www.w3.org/TR/html4/strict.dtd">',
         content_css: '/media/css/admin/editor.css',

         file_browser_callback: 'tinyDjangoBrowser'
     };

     $ ('textarea # id_content'). tinymce (tinymceOptions);
 });
That's all. Now on the flatpages editing form we will have TinyMCE in almost the maximum configuration. Including the ability to insert images and edit their properties.
However, inserting pictures by their URLs is half the work, you need to ensure that you can directly upload a new picture to the server directly from the insert picture dialog, without any extra gestures, view the existing ones and select the one you want. This functionality is ensured by File / Image managers for popular WYSIWYG editors. Their distinguishing feature is that they need the server part to work - the so-called "connector", which allows you to perform the necessary actions on the file system, and the manager will only need to display the necessary information and return the parameters of the selected image to the dialog box.
In general, all this functionality is already provided to us by Django itself, or rather, our ready-made model for managing images. It remains only to force TinyMCE to use it as a file manager. For this, we need the 'tinyDjangoBrowser ()' function and the TinyMCE 'file_browser_callback' option. All that this function does is open a model management page with pictures in a popup window. This is already enough to select / delete / upload pictures. The matter remains small - the page with the list of objects should distinguish whether it was opened just like that or from the TinyMCE window, and in the latter case return the parameters of the selected picture. For this, we decorate the admin panel for this model using the small script 'tiny_django_browser.js'.
  $ (). ready (function () {
     if (window.parent) {
         $ .getScript ('/ media / lib / tiny_mce / tiny_mce_popup.js', function () {
             $ ('# changelist tbody a.image-picker'). click (function (e) {
                 var url = $ (this) .attr ('href');
                 var win = tinyMCEPopup.getWindowArg ("window");
                 var alt = $ (this) .find ('img'). attr ('alt');

                 win.document.getElementById (tinyMCEPopup.getWindowArg ("input")). value = url;
                 win.document.getElementById ('alt'). value = alt;

                 if (typeof (win.ImageDialog)! = "undefined") {
                     if (win.ImageDialog.getImageData) win.ImageDialog.getImageData ();
                     if (win.ImageDialog.showPreviewImage) win.ImageDialog.showPreviewImage (url);
                 }

                 tinyMCEPopup.close ();
                 return false;
             });
         });
     }
 });
Things are easy, we connect this script to the admin panel, FlatPictureAdmin at the moment will look like this:
  class PagePictureAdmin (admin.ModelAdmin):
     class Media:
         js = ['js / admin / display_thumbs.js', 'js / admin / tiny_django_browser.js']
     list_display = ['get_thumbnail_html', '__unicode__', 'description']
     list_display_links = ['__unicode__']
 admin.site.register (PagePicture, PagePictureAdmin)
That's all. Now the picture together with the description in the alt-attribute will be inserted by clicking on the thumbnail.
Next time I will try to pick up an example of more complex and rare functionality. I hope that it will be possible to draw some ideas and suggestions from your comments.
Source: https://habr.com/ru/post/78469/
All Articles