Cluster Hyper-V 2008 R2 on the knee
Hello to you, habracheloveki.
I think everyone is somehow aware of the recent release of Windows Server 2008 R2 with an upgraded Hyper-V implementation. The main innovation, relative to the usual 2008 Hyper-V, is the support of Live Migration function for transferring virtual machines between the cluster nodes in real time. Of course, in order to demonstrate this function, we need an external data storage and a cluster ... and the extra SAN in the storage room usually does not roll.

')
In this article I will tell you how to implement a full-featured Hyper-V 2008 R2 cluster on the iron with handheld - three workstations, two of which support hardware virtualization. Under the cut instructions for assembling a Hyper-V failover cluster, taking into account the nuances and features, as well as a video demonstration of the Live Migration technology.

A brief tour of the technology itself Live Migration. Its main difference from Quick Migration is to transfer a virtual machine on the fly, without unloading memory onto a disk (this is illustrated by the previous picture). In addition, according to Microsoft, the transfer of the machine is faster than a TCP session breaks up, so if users experience discomfort, then small.
Of course, I have no excess SAN for testing.
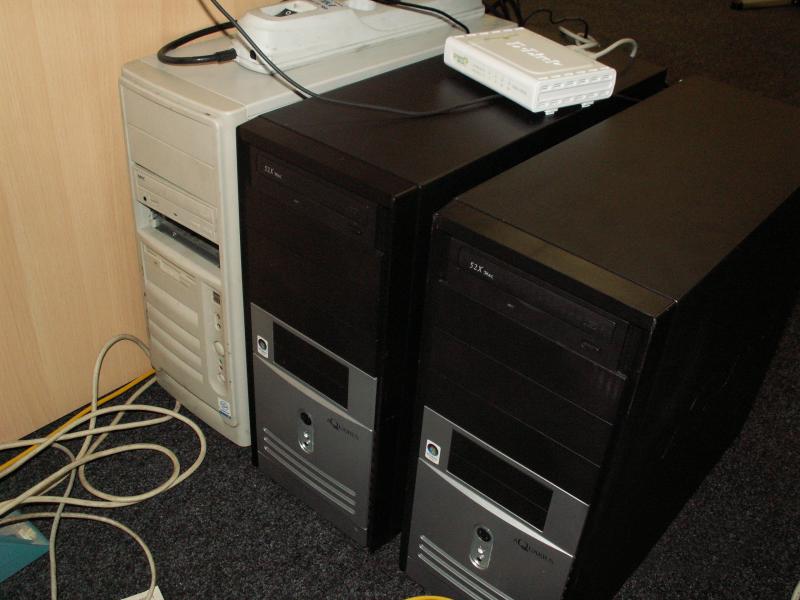
All I have is two Aquarius workstations (C2D 6420, 4Gb DDR2, 80Gb HDD) and one station on Celeron-D.
Of course, all processors should have 64bit support, since 2008 R2 exists only in 64-bit edition.
To implement the cluster, I will take the free version of Hyper-V Server 2008 R2, which is a modified Windows Server 2008 R2 in kernel mode, with a default hypervisor enabled and a relatively convenient console menu for centralized management. The choice is due to the fact that I do not want to spend the resources of the host machine to maintain any other roles other than the hypervisor.
In the case of using this hypervisor, only virtual machines will be licensed, which we will use to rotate it. I say this in case someone wants to implement this artisanal system in production.
I will use the weakest of my workstations as storage, throwing a couple of 250GB hard drives into it and combining them into software RAID0 using the operating system. To turn an improvised server into storage, I will use the cheapest possible option - iSCSI . The same machine will act as a control for the Hyper-V cluster, and at the same time it will be the controller of our small domain.
There are several implementations of iSCSI for Windows. The two most common:
Our improvised storage will work under the control of a full-featured Windows Server 2008 R2, the version in this case does not matter, but it was found out by experience that managing a cluster from 32-bit systems can cause some problems. Moreover, in 2008 R2 there is a fresh console Failover Clustering, and in other versions you will have to update the Remote Administration Tools. Well, do not forget that the machine will also perform the functions of a domain controller.
So, we have two clean and unconfigured Hyper-V Server 2008 R2, and one clean Windows Server 2008 R2.
Before setting up a cluster, you must configure the network infrastructure to work correctly. We set all servers local IP-addresses, having previously picked them up in a small switch (like the one on my photo). We allow remote access to nodes, both through RDP, and through the MMC console.
It is better to do this before the nodes are in the domain. There were situations when the server cursed the impossibility of changing the firewall policies. We lift the domain and we enter into it our future cluster nodes.
Of course, turn on the Failover Clustering Feature .
Now you can go directly to the configuration of the repository. To begin with, we divide our resulting stripe (RAID0) into two logical drives - one for the quorum (which is now called File Share Witness ), and the second for storing our virtual machines. I allocated about 15GB for the quorum, and left everything else for the data. In a good way - a quorum is more than enough gigabytes, but you never know what.
Go to the installation of StarWind iSCSI Target. To download from the manufacturer’s website , registration is required, which, in principle, does not oblige to anything. After registration, the link to the direct download of the installer and the license key file falls to the email. The installation consists of several clicks on the Next button, so that there is nothing essentially complex there. After installation, you must pass ports 3260 and 3261 through Windows Firewall. For the lazy, you can simply turn it off, since there are only three of our servers in our improvised network.
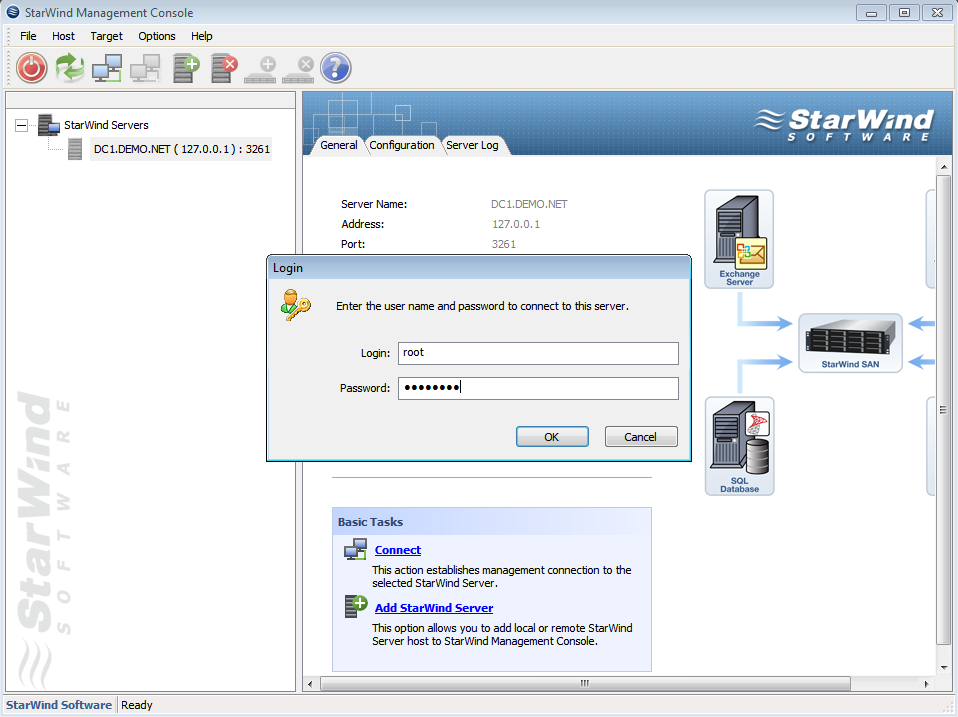
We start the StarWind console and try to connect to the iSCSI server, which in our case is the computer with the mysterious address 127.0.0.1. For authorization, you need a secret combination of default login and password, which in the basic version look like root and starwind, respectively. Why not asked to set a password during the installation process, or did not hang up a hint in the interface - a mystery.

After connecting to the server, you need to slip him a file with a license, dropped by e-mail. This is done in the Configuration tab of the StarWind server console. Everything is intuitive and simple, except for the link to download the file itself in the upper right corner. Only after registration, the program will allow us to create a target.

In the process of creating a target, we create pre-marked img files that will play the role of our LUNs. We place them on our partitions in accordance with the objectives, and do not forget to put a tick in charge of competitive iSCSI connections (i.e. clustering). You can also set data caching, it will be useful in the case of using our slow hardware.
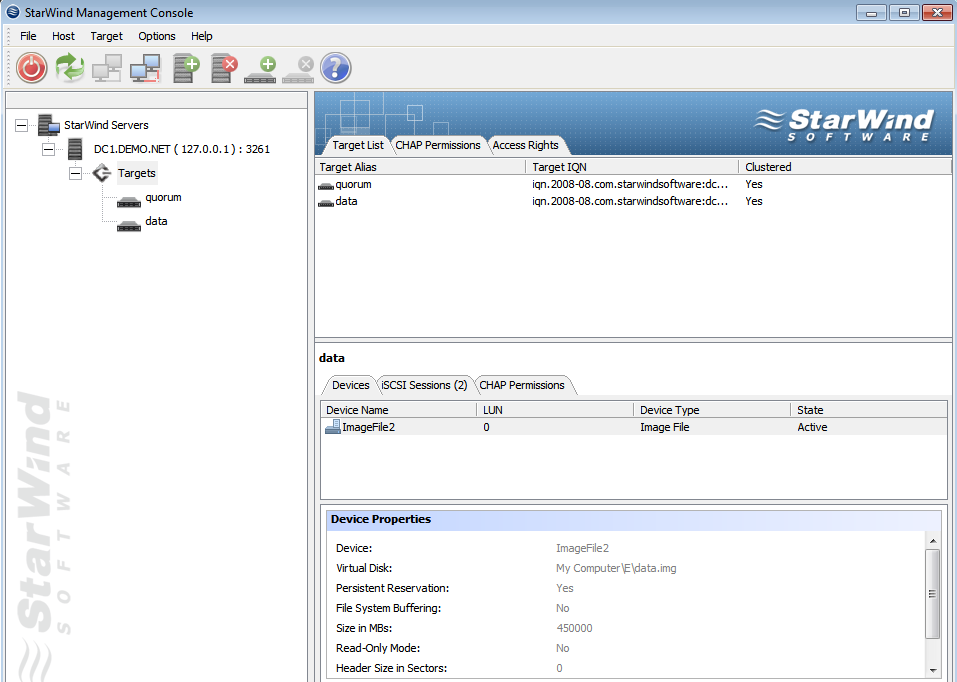
As a result, you should get something like the following picture. Two target - one with a quorum, the second under the data. It's time to pick them up to the servers.
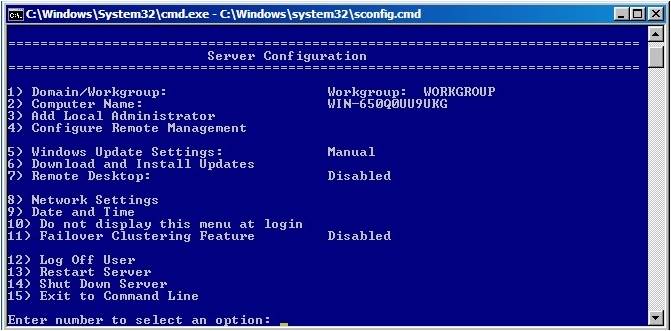
In servers of version 2008 R2, there is already a pre-installed iSCSI Initiator, which is responsible for connecting LUNs from our improvised storage, as local disks. True, due to the lack of an adequate GUI on the console Hyper-V Server, you will have to call it via the command line or Powershell using the iscsicpl command.
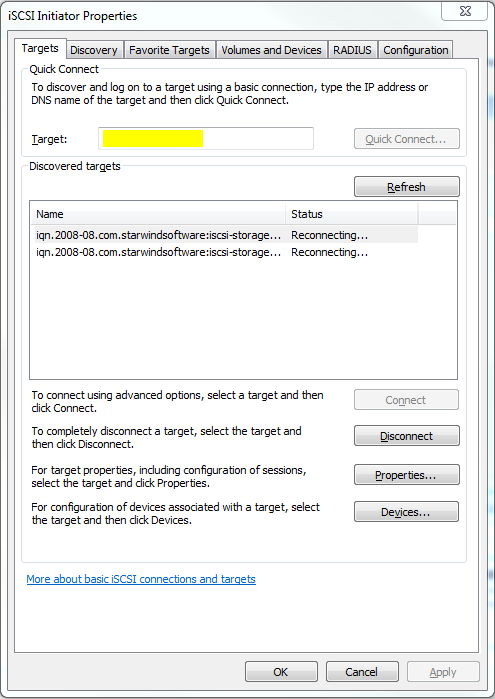
In the field highlighted in yellow you need to enter the IP address of our repository, after which a pop-up window should appear with the targets placed on the server. Of course, if the firewall was properly configured or disabled. After the targets are connected to our server, it will be possible to mount them as disks.

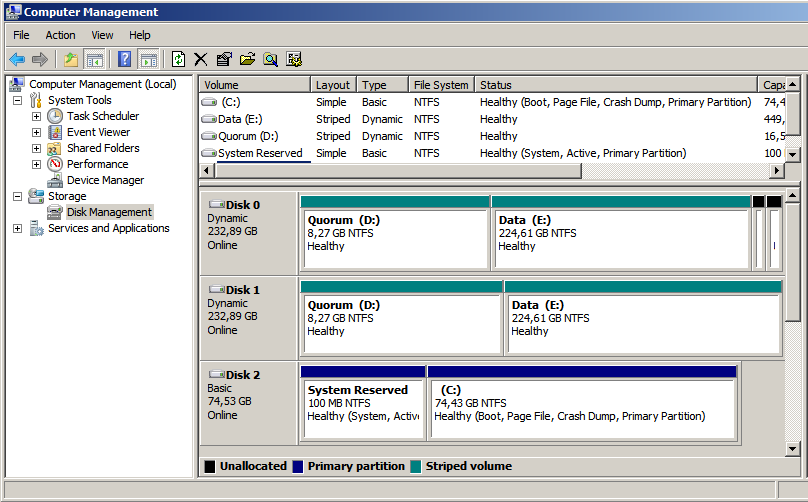
After clicking on Autoconfigure, two long paths to disks starting with \? \ Will appear in the empty window. After that, you can safely go to Disk Management and set the letters to the disks. By the way, after setting the letters on the first hypervisor, the second hypervisor picks up the drive names automatically.
As a result, we got two hypervisors with two shared disks connected via iSCSI to our storage. It's time to go directly to clustering.
When configuring a failover cluster on two existing hypervisors, the wizard itself chose file partitions for quorum and for data. If I understood the algorithm correctly, iSCSI-connected disks were selected as shared resources, and the smallest one was chosen as the quorum. Or maybe he chose them because I gave the label Quorum a smaller section ... =)
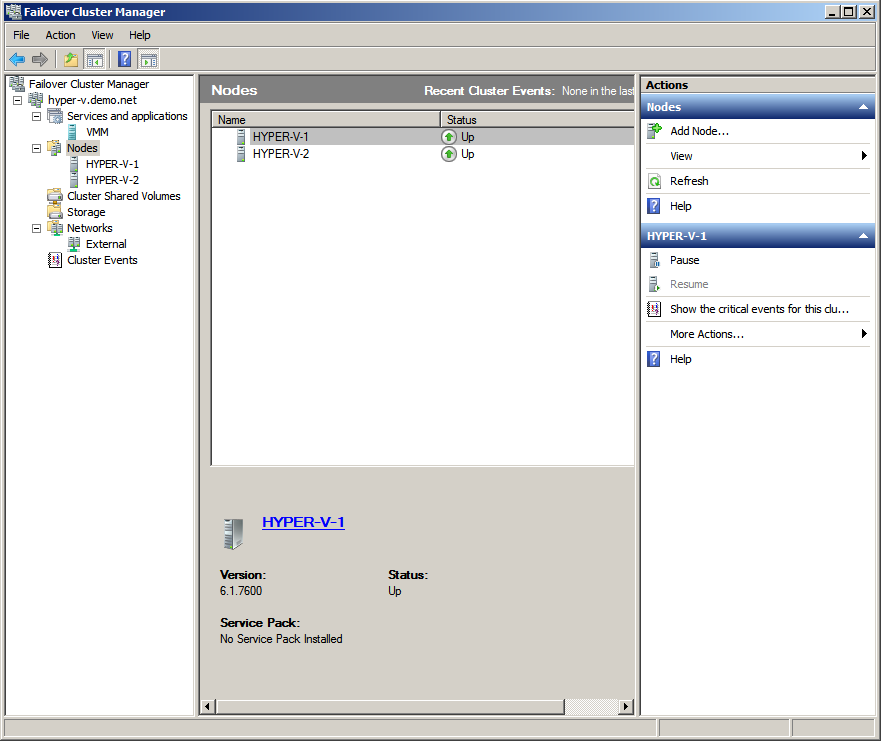
After merging the two hypervisors into a cluster, using a wizard and such-and-such mother, the console of the failover cluster will look something like the image above. It is worth noting that at the moment we have a fault-tolerant cluster in which only one node performs all the work, while the second one is idle at this time and waits until the first one dies. But we do not need this.

Here Cluster Shared Volumes will help us - a new tab in the cluster console, which appeared only in 2008 R2. It is on this storage that virtual machines can be placed to provide fault tolerance. Our task is to turn an ordinary cluster resource into a shared one using the magic button “Add Storage”. After the warning that this type of resource works only in versions 2008 R2 and above, our disk will appear in the shared resources tab. The disk, in turn, will be mounted on C: \ ClusterStorage \ Volume1 , so all shared data will be there. Including virtual machines. In order to avoid unnecessary glitches, in the settings of hypervisors on each node, I advise you to set default paths for disks and virtual machines, with placement on our shared disk.
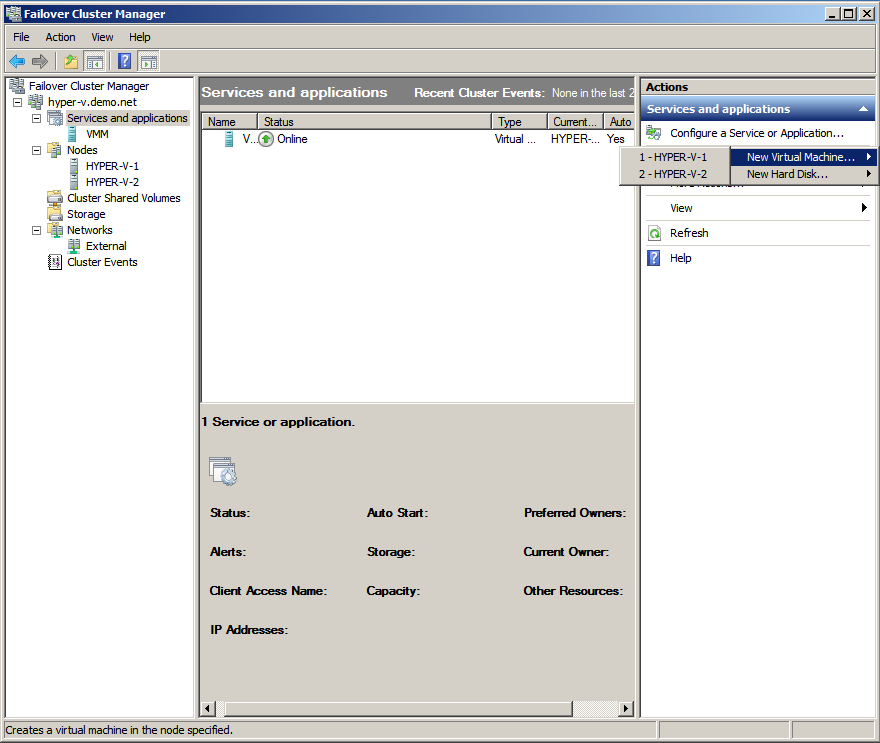
Now you can create virtual machines directly from the cluster management snap-in. In the services tab, select Virtual Machines, select the node and create the machine. We install the distribution from OS from somewhere, install and unmount it. For Live Migration to work correctly, you need no dependencies on external resources at each node.
The video shows the process of distilling memory from one node to another. On the portable virtual machine was the same Windows Server 2008 R2, and the memory of the machine was 1024mb. Immediately it is worth noting the very mediocre speed of migration, which is associated with the artisanal implementation of our storage and a network of 100 Mbps. Later I will rebuild the cluster using a gigabit network and look at the performance gains.
I hope the article will be useful for someone. Experiment!
I think everyone is somehow aware of the recent release of Windows Server 2008 R2 with an upgraded Hyper-V implementation. The main innovation, relative to the usual 2008 Hyper-V, is the support of Live Migration function for transferring virtual machines between the cluster nodes in real time. Of course, in order to demonstrate this function, we need an external data storage and a cluster ... and the extra SAN in the storage room usually does not roll.
')
In this article I will tell you how to implement a full-featured Hyper-V 2008 R2 cluster on the iron with handheld - three workstations, two of which support hardware virtualization. Under the cut instructions for assembling a Hyper-V failover cluster, taking into account the nuances and features, as well as a video demonstration of the Live Migration technology.
Introduction
A brief tour of the technology itself Live Migration. Its main difference from Quick Migration is to transfer a virtual machine on the fly, without unloading memory onto a disk (this is illustrated by the previous picture). In addition, according to Microsoft, the transfer of the machine is faster than a TCP session breaks up, so if users experience discomfort, then small.
The choice of hardware and software
Of course, I have no excess SAN for testing.
All I have is two Aquarius workstations (C2D 6420, 4Gb DDR2, 80Gb HDD) and one station on Celeron-D.
Of course, all processors should have 64bit support, since 2008 R2 exists only in 64-bit edition.
To implement the cluster, I will take the free version of Hyper-V Server 2008 R2, which is a modified Windows Server 2008 R2 in kernel mode, with a default hypervisor enabled and a relatively convenient console menu for centralized management. The choice is due to the fact that I do not want to spend the resources of the host machine to maintain any other roles other than the hypervisor.
In the case of using this hypervisor, only virtual machines will be licensed, which we will use to rotate it. I say this in case someone wants to implement this artisanal system in production.
I will use the weakest of my workstations as storage, throwing a couple of 250GB hard drives into it and combining them into software RAID0 using the operating system. To turn an improvised server into storage, I will use the cheapest possible option - iSCSI . The same machine will act as a control for the Hyper-V cluster, and at the same time it will be the controller of our small domain.
There are several implementations of iSCSI for Windows. The two most common:
- Microsoft iSCSI Software Target - comes only in a pair with Windows Storage Server 2008, when buying servers from OEM-partners of Microsoft. Finding it in the public domain is not so easy, but if someone finds it, he can try. True, it is put again, exclusively on the Storage Server, which is not very suitable for our needs.
- StarWind iSCSI Software Target is a product of StarWind company (having a completely unpopular blog on Habré) with support for the Russian language. StarWind has a free version , limited in storage to 2TB, and two competitive connections to the same target. And we do not need to check more.
Our improvised storage will work under the control of a full-featured Windows Server 2008 R2, the version in this case does not matter, but it was found out by experience that managing a cluster from 32-bit systems can cause some problems. Moreover, in 2008 R2 there is a fresh console Failover Clustering, and in other versions you will have to update the Remote Administration Tools. Well, do not forget that the machine will also perform the functions of a domain controller.
Customization
Stage one. Preliminary
So, we have two clean and unconfigured Hyper-V Server 2008 R2, and one clean Windows Server 2008 R2.
Before setting up a cluster, you must configure the network infrastructure to work correctly. We set all servers local IP-addresses, having previously picked them up in a small switch (like the one on my photo). We allow remote access to nodes, both through RDP, and through the MMC console.
It is better to do this before the nodes are in the domain. There were situations when the server cursed the impossibility of changing the firewall policies. We lift the domain and we enter into it our future cluster nodes.
Of course, turn on the Failover Clustering Feature .
Stage Two. Storage.
Now you can go directly to the configuration of the repository. To begin with, we divide our resulting stripe (RAID0) into two logical drives - one for the quorum (which is now called File Share Witness ), and the second for storing our virtual machines. I allocated about 15GB for the quorum, and left everything else for the data. In a good way - a quorum is more than enough gigabytes, but you never know what.
Go to the installation of StarWind iSCSI Target. To download from the manufacturer’s website , registration is required, which, in principle, does not oblige to anything. After registration, the link to the direct download of the installer and the license key file falls to the email. The installation consists of several clicks on the Next button, so that there is nothing essentially complex there. After installation, you must pass ports 3260 and 3261 through Windows Firewall. For the lazy, you can simply turn it off, since there are only three of our servers in our improvised network.
We start the StarWind console and try to connect to the iSCSI server, which in our case is the computer with the mysterious address 127.0.0.1. For authorization, you need a secret combination of default login and password, which in the basic version look like root and starwind, respectively. Why not asked to set a password during the installation process, or did not hang up a hint in the interface - a mystery.
After connecting to the server, you need to slip him a file with a license, dropped by e-mail. This is done in the Configuration tab of the StarWind server console. Everything is intuitive and simple, except for the link to download the file itself in the upper right corner. Only after registration, the program will allow us to create a target.
In the process of creating a target, we create pre-marked img files that will play the role of our LUNs. We place them on our partitions in accordance with the objectives, and do not forget to put a tick in charge of competitive iSCSI connections (i.e. clustering). You can also set data caching, it will be useful in the case of using our slow hardware.
As a result, you should get something like the following picture. Two target - one with a quorum, the second under the data. It's time to pick them up to the servers.
Stage Three. We cling to the repository.
In servers of version 2008 R2, there is already a pre-installed iSCSI Initiator, which is responsible for connecting LUNs from our improvised storage, as local disks. True, due to the lack of an adequate GUI on the console Hyper-V Server, you will have to call it via the command line or Powershell using the iscsicpl command.
In the field highlighted in yellow you need to enter the IP address of our repository, after which a pop-up window should appear with the targets placed on the server. Of course, if the firewall was properly configured or disabled. After the targets are connected to our server, it will be possible to mount them as disks.
After clicking on Autoconfigure, two long paths to disks starting with \? \ Will appear in the empty window. After that, you can safely go to Disk Management and set the letters to the disks. By the way, after setting the letters on the first hypervisor, the second hypervisor picks up the drive names automatically.
As a result, we got two hypervisors with two shared disks connected via iSCSI to our storage. It's time to go directly to clustering.
Stage Four. Clustering
When configuring a failover cluster on two existing hypervisors, the wizard itself chose file partitions for quorum and for data. If I understood the algorithm correctly, iSCSI-connected disks were selected as shared resources, and the smallest one was chosen as the quorum. Or maybe he chose them because I gave the label Quorum a smaller section ... =)
After merging the two hypervisors into a cluster, using a wizard and such-and-such mother, the console of the failover cluster will look something like the image above. It is worth noting that at the moment we have a fault-tolerant cluster in which only one node performs all the work, while the second one is idle at this time and waits until the first one dies. But we do not need this.
Here Cluster Shared Volumes will help us - a new tab in the cluster console, which appeared only in 2008 R2. It is on this storage that virtual machines can be placed to provide fault tolerance. Our task is to turn an ordinary cluster resource into a shared one using the magic button “Add Storage”. After the warning that this type of resource works only in versions 2008 R2 and above, our disk will appear in the shared resources tab. The disk, in turn, will be mounted on C: \ ClusterStorage \ Volume1 , so all shared data will be there. Including virtual machines. In order to avoid unnecessary glitches, in the settings of hypervisors on each node, I advise you to set default paths for disks and virtual machines, with placement on our shared disk.
Stage Five. Virtual machines.
Now you can create virtual machines directly from the cluster management snap-in. In the services tab, select Virtual Machines, select the node and create the machine. We install the distribution from OS from somewhere, install and unmount it. For Live Migration to work correctly, you need no dependencies on external resources at each node.
The video shows the process of distilling memory from one node to another. On the portable virtual machine was the same Windows Server 2008 R2, and the memory of the machine was 1024mb. Immediately it is worth noting the very mediocre speed of migration, which is associated with the artisanal implementation of our storage and a network of 100 Mbps. Later I will rebuild the cluster using a gigabit network and look at the performance gains.
I hope the article will be useful for someone. Experiment!
Source: https://habr.com/ru/post/77836/
All Articles