OAuth: protocol description in simple and understandable language
 OAuth is a popular protocol that allows social services to integrate with each other and provides a secure way to share personal information. OAuth can connect 2 services among themselves, each of which has its own user base - I call them “social” in this case. When you start working with OAuth, the first feeling is that the protocol is very complicated and redundant. In this article I will try to explain the basics of OAuth in human language.
Sample Cross Authorization
Let's go back to the year 2005 and imagine that we are writing a social network. It has a form for importing contacts from the GMail address book. What do you need to access GMail contacts? Of course, the username and password of the box. But if we ask to enter them on our site, the user will suspect that something is wrong. Where is the guarantee that we do not save the entered passwords on the server? Therefore, we want the password to be entered only on the GMail website , and after that access to contacts through the GMail API is provided to our social network (perhaps for a while).
| It looks like this: the form consists of a single button - “Import contacts”. After clicking on it, the user will temporarily redirect to GMail, where he enters his username and password (and if he is already authorized, he does not enter anything). Next, the user is returned back to our site, where the script already gets the opportunity to download contacts through the internal GMail API. |
- Consumer : consumer; script processing forms of import contacts in the social network.
- Service Provider : data provider; GMail, which contains address book data that is interesting to the consumer.
- User : a user who has an account with both a Consumer and a Service Provider.
- Protected Resource : personal data; contacts from the address book on GMail (i.e. Service Provider resources).
- Provider API : GMail API, allowing any script to get contacts from the GMail address book.
| Now I ask you to close the upper part of the screen with a sheet of paper and, as an exercise, answer the questions: who is the Service Provider? What is Protected Resource? who is Consumer and how is it different from User? Where is the API located? Further in the article we freely operate with these terms. If you are not well-versed in them, there may be problems with understanding. |
How is OAuth different from OpenID?
OAuth is often called the “protocol for robots,” as opposed to OpenID, the “protocol for users.” Do not confuse them!
- OpenID - protocol for accelerated registration. OpenID allows a user to get an account on any service without entering a password if he is already registered somewhere else on the Internet. (And then you can log in to the service without having to enter the password, being authorized “somewhere”.) For example, if you have an account on Yandex, you can “log in” with it to any service that supports OpenID authorization.
- OAuth is a protocol for authorized access to a third-party API. OAuth allows the Consumer script to get limited API access to the data of a third-party Service Provider, if User gives the go-ahead. Those. this is a means to access the API.
Police analogyImagine that you are an employee of the Criminal Investigation Department, looking for tips in the case of the theft of WebMoney for the 1973rd year. Agree on terms:
|
Plan for this article
Before turning to the main part, let's see how we are going to move.
- Consider the problems that arise when the "manual" implementation of cross-authorization.
- Let's talk about what an “app” is and who a Consumer is.
- Let's touch upon the basics of cryptography.
- Denote the demo application that we will write in this article.
- We will be defined with the test OAuth server on which we will experiment.
- Let's go through all the steps of the OAuth protocol and give the source code of the script.
About the invention of bicycles
A good way to understand something is to do it yourself by stepping on all the rakes that were laid out. Now we will reinvent the wheel: let's try to imagine how we would solve the problem of interaction between Consumer and Service Provider without any standardized protocols.
')
First, let's write the very form of importing contacts with GMail:
| Code Listing 1: Contact import form |
<form action = "http://gmail.com/auth.php?retpath=http://oursocialnetwork.ru/import.php" method = "get"> <input type = "submit" value = "Load Address Book" /> </ form> |
So, after entering the password, the user will return to our website at the following address:
| Code Listing 2: Bicycle return cycling address |
http://oursocialnetwork.ru/import.php?secret=Y49xdN0Zo2B5v0RR |
| Code Listing 3: Running a bicycle API method |
$ contacts = $ gmailApi-> getContacts ($ _ GET ['secret']); |
Rake first: substitute return address retpath
Well, of course, you guessed it that the attacker would first of all place a link on his website
| Code Listing 4: Link on the attacker's website |
http://gmail.com/auth.php?retpath=http://hackersite.ru/save.php |
| Code Listing 5: Bike secret in return address |
http://hackersite.ru/save.php?secret=Y49xdN0Zo2B5v0RR |
Second rake: "eavesdropping" the secret key
Suppose we somehow protected the retpath, and now it can only point to our site. But the problem with the secret parameter remains.
| Code Listing 6: Bicycle return cycling address |
http://oursocialnetwork.ru/import.php?secret=Y49xdN0Zo2B5v0RR |
| It must be remembered that the secret key is transmitted not only in the URL, but also when calling API methods. There is also an interception. Of course, using SSL here helps. |
Third rake: too many redirects
If each API call requires a different secret, then we will have to organize as many redirects to the site of the Service Provider, as we have calls. With intensive use of the API, it works very slowly, and it is inconvenient in order ...
Fourth Rake: Consumer bad identification
GMail, of course, wants to know who uses its API. Allow access to some sites and prohibit others ... So, when forming a request in the form of importing contacts, the Consumer (site) should be “introduced” by the Service Provider (GMail). In our case, this function is partially performed by retpath (the name of the site in it), but this method is not universal, since The “presentation” mechanism should also be used when invoking API methods.
OAuth Foundation
It is noteworthy that there are still many “underwater rakes”. I will not describe them here, because this rake lies in the Mariana Trench (deep, 10920 m). The description of vulnerabilities would have to spend a dozen pages. So I’ll go straight to the description of OAuth, where all the problems have been solved.
| There is a wonderful series of articles about OAuth: Beginner's Guide to OAuth (in English; from the author with the talking nickname hueniverse). His study will take you about 4 hours if you are completely unfamiliar with the topic up to this point. |
Application = Consumer + API Access
When working with OAuth, it is important that the term Consumer is not limited to “site”. Consumer is some application , and where it is located is not so important. Examples of real life Consumers:
- Script of the import form of contacts from GMail (see example above).
- An iPhone application that allows you to tweet.
- Rectangular widget on your site, which displays the latest chat messages and have the opportunity to write a new one.
Token = Key + Secret
One of the principles of OAuth says that no secret keys should be passed on in open requests (in the example above, we considered why). Therefore, the protocol operates with the concept of Token. The token is very similar to the login + password pair: login is open information, and the password is known only to the sending and receiving parties. In OAuth terms, the login equivalent is called Key, and the password analog is called Secret. The situation when Secret is known only to the sender and recipient, but no one else, is called Shared Secret.
So, if Consumer and Provider somehow agree among themselves about Shared Secret, they can openly exchange corresponding keys (Key) in the URL without fear that interception of these keys will be dangerous. But how to protect the URL from Key from a fake?
Message = Document + Digital Signature
“Digital Signature” sounds scary, but in fact it’s quite an obvious thing. When you sign a document with a pen, you certify that this document was written by you and not by someone else. Your signature is “added” to the document and goes with it in the “one set”.
Similarly, a digital signature is added to some data block, certifying: the one who generated this data does not impersonate another. A digital signature does not encrypt a document, it only guarantees its authenticity! The Shared Secret allows to sign, which is known to the recipient and the sender, but no one else.
How it works? Let our $ sharedSecret = 529AeGWg, and we told him in a whisper in his ear to the receiving party. We want to send the message "My Phone 1234567" with guaranteed protection against fraud by the attacker.
- Consumer adds a digital signature to the message, in general -
$ transfer = $ message. "-". md5 ($ message. $ sharedSecret); // $ transfer = "My Phone 1234567". "-". md5 ("My Phone 1234567". "529AeGWg") - The Service Provider takes the data, breaks it back into 2 parts - $ message and $ signature - and does the exact same operation:
  $ signatureToMatch = md5 ($ message. $ sharedSecret);
 // $ signatureToMatch = md5 ("My Phone 1234567". "529AeGWg");
Then it remains only to compare the resulting value of $ signatureToMatch with what was in the received $ signature data and report about a fake, if the values did not match.
| So, to form an MD5 signature, you must know Shared Secret. (By the way, besides MD5 there are other irreversible hashing algorithms.) The attacker does not know Shared Secret, so he cannot forge the signature. |
Demonstration of the work of OAuth on the example of a simple application
In order to "live" OAuth, we need two things:
- The script that implements the client part of the protocol. I wrote just such a small PHP script ( link to zip-archive ). This is a widget that can be inserted into PHP sites.
- OAuth Test Server, where we can experiment. For this purpose it is convenient to use RuTvit: there is a page http://rutvit.ru/apps/new , which allows you to add a test application in 30 seconds. (By the way, the return URL in the form can be omitted - we still pass it from the test script.)
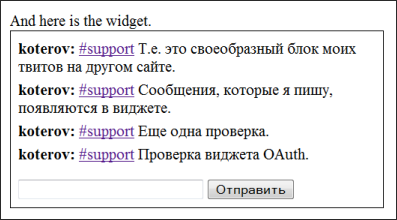
You can paste this widget to any PHP site by simply copying its code and correcting the layout. All tweets from the RuTvit service are displayed , marked with the specified hash tag, and there is an opportunity to add new tweets (this is where OAuth is involved). The widget uses API and RuTvit OAuth authorization, which, by the way, coincide with the standard of the Twitter API.
| Currently, there is only one universal library for working with OAuth in PHP: OAuth.php by Andy Smith . It has two drawbacks: it is written dirty, and it has not been updated for more than a year. Links to other libraries are provided on the OAuth website , but these tools either require the installation of PHP extension, are either too raw, or have extensive external dependencies on other libraries (although the draft library for Zend Framework looks very promising). So, as they say, “the mice cried, injected, but continued to eat the cactus” - we will use OAuth.php. |
- Download the script code and deploy it to any convenient directory on the web server.
- Register a new test application on the OAuth server.
- After registering the application, replace the OA_CONSUMER_KEY and OA_CONSUMER_SECRET parameters in the script with the values received from the server.
| The script is specially written without OOP and as much as possible "in the forehead." Two goals were pursued: a) to achieve brevity and clarity of the code, b) to make the code run parallel to the storyline in the article (hence this finite state machine and switch ... case). Oh, and one more. The OAuth.php file is not self-written, it is the Andy Smith library unchanged (enjoy). |
Application registration and its parameters
Let's talk about where applications come from and how the Service Provider will find out about them. Everything is quite simple: Service Provider has a special application registration form that anyone can use. Here is an example of this form:
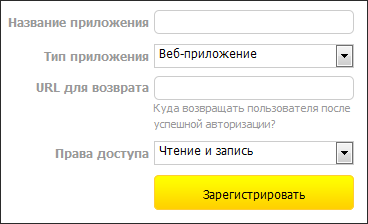
After registering the application, you are given 5 parameters that are required to work with OAuth. Here is what they might look like:

Here, the Consumer key and Consumer secret are a kind of “login + password” of your application (remember the above talk about tokens? This is just one of them). Let me remind you that the Consumer secret is a Shared Secret, known only to the sender and the recipient, but no one else. The remaining 3 values define the service URL, the meaning of which we now consider.
| Code Listing 7: OAuth parameters and variable definitions |
  <? php
 require_once "OAuth.php";

 // Miscellaneous options.
 define ("ENCODING", "windows-1251");  // Encoding of the site.  If you have UTF-8, then you are well done!
 define ("TAG", "support");  // Tag used to filter tweets.

 // OAuth options.  Memorize them (especially SECRET).
 define ("OA_CONSUMER_KEY", "JId0zVAbQCVnqjD9OlvM");  // OAuth access parameters.
 define ("OA_CONSUMER_SECRET", "qocMBQg1P17CBcdVsJizsNPnlGbTU4fvlGxAszmzB5");
 define ("OA_URL_REQ_TOK", "http://api.rutvit.ru/oauth/request_token");
 define ("OA_URL_AUTH_TOK", "https://api.rutvit.ru/oauth/authorize");
define ("OA_URL_ACCESS_TOK", "http://api.rutvit.ru/oauth/access_token"); |
OAuth = Fetch Request Token + Redirect to Authorization + Fetch Access Token + Call API
... or, translated into the great mighty:
|
And we revealed a number of security problems, which suggests that there should be more challenges. This is what happens in OAuth: more intermediate requests from the Consumer script to the Provider operating with tokens are added. Let's consider them.
| Code Listing 8: Handling state transitions via a finite state machine |
  // To work with OAuth, we need 3 variables that save their values
 // between page loads (for simplicity, we store them in session).
 session_start ();
 $ S_MSG = & $ _ SESSION ['msg'];
 $ S_REQUEST_TOK = & $ _ SESSION ['REQUEST_TOK'];
 $ S_ACCESS_TOK = & $ _ SESSION ['ACCESS_TOK'];

 // Way:
 // form_is_sent ->
 // fetch_request_token ->
 // authorize_request_token (via browser) ->
 // fetch_access_token (exchange request_token for access_token) ->
 // send_msg (via API)
 // Or:
 // form_is_sent ->
 // send_msg (via API)
 $ action = @ $ _ GET ['action'];
 while ($ action) {
switch ($ action) { |
- Processing form submission. This is not part of OAuth, but part of our application. Before accessing the Provider API, we must receive a purchase order for this action from the user. Here is an example of such an “order”:
Code Listing 9: Form submission processing // 1. Requested form submission. Determine what step to start: // either with OAuth, or by sending a message through the API. case 'form_is_sent': { // Save the message to the session, we will need it later. $ S_MSG = $ _POST ['msg']; if ($ S_ACCESS_TOK && $ S_ACCESS_TOK-> secret) { // The user has already sent comments in the current session. $ action = 'send_msg'; } else { // Authorization is not yet completed, we run the OAuth procedure. $ action = 'fetch_request_token'; } break; } - Fetch Request Token (internal request).
- The Consumer script refers to the Request token URL Provider: for example, api.rutvit.ru/oauth/request_token . The request sends the Consumer key - “application login”, and the request itself is signed using the Consumer secret - “application password”, which protects it from counterfeit.
- In response, the Provider generates and returns a garbage-filled token called Request Token. It is still useful to us, so we have to save it somewhere — for example, in the $ S_REQUEST_TOK session variable.
Code Listing 10: Fetch Request Token // 2. Request Request Token requested. // Call the Service Provider through the socket and get a token. case 'fetch_request_token': { // Create a request for a Request Token. $ consumer = new OAuthConsumer (OA_CONSUMER_KEY, OA_CONSUMER_SECRET); $ req = OAuthRequest :: from_consumer_and_token ( $ consumer, NULL, "GET", "http://api.rutvit.ru/oauth/request_token" ); // Add a digital signature to the request so that it is not forged. $ req-> sign_request (new OAuthSignatureMethod_HMAC_SHA1 (), $ consumer, NULL); // Get Request Token and send it for authorization. $ parsed = OAuthUtil :: parse_parameters (file_get_contents ($ req-> to_url ())); $ S_REQUEST_TOK = new OAuthToken ($ parsed ['oauth_token'], $ parsed ['oauth_token_secret']); // Go to the next state. $ action = 'authorize_request_token'; break; } - Redirect to Authorization (via redirect in the browser). Now our application has a unique Request Token. Required user permission to use this token, i.e. ask him to authorize Request Token .
- Consumer redirects the browser to a special Authorize URL Provider: for example, api.rutvit.ru/oauth/authorize . The parameters passed Request Token Key.
- Provider displays an authorization form for his user and, if he is logged in, redirect the browser back. Where exactly? And we specify this in the oauth_callback parameter.
Code Listing 11: Redirect to Authorization // 3. Authorization (confirmation by the user) Request Token's via redirect. // Forward the browser to the Service Provider to confirm access by the user. // Returning back to the GET parameters will be action = fetch_access_token. case 'authorize_request_token': { // This URL will return the browser after confirmation. $ callbackUrl = "http: // {$ _SERVER ['HTTP_HOST']} {$ _SERVER ['SCRIPT_NAME']}" . "? action = fetch_access_token"; // Pass the callback URL in the parameters (OAuth 1.0; in 1.0a - not so!). $ authUrl = "http://api.rutvit.ru/oauth/authorize". "?" . "& oauth_token = {$ S_REQUEST_TOK-> key}" . "& oauth_callback =". urlencode ($ callbackUrl); // Browser Redirect. header ("Location: $ authUrl"); exit (); } - Fetch Access Token (internal request). So, the browser is back in our application after a series of redirects. This means that the authorization on the Provider is successful, and Request Token is allowed to work. However, in OAuth for security, each token has its own, strictly limited purpose. For example, Request Token is used only to receive confirmation from the user, and for nothing else. To access resources, we need to get a new token - Access Token - or, as they say, “exchange Request Token for Access Token”.
- Consumer accesses the Access token URL — for example, api.rutvit.ru/oauth/access_token — and asks to give it Access Token instead of its Request Token. The request is digitally signed based on the Request Token secret.
- Provider generates and returns Access Token filled with garbage. It also marks in its tables that for this Access Token, access to the API is allowed. Our application should retain Access Token if it is going to use the API in the future.
Code Listing 12: Fetch Access Token // 4. Exchange Request Token for Access Token and write Access Token to session. // Returned from the redirect here after the user has confirmed access. case 'fetch_access_token': { $ consumer = new OAuthConsumer (OA_CONSUMER_KEY, OA_CONSUMER_SECRET); $ req = OAuthRequest :: from_consumer_and_token ( $ consumer, $ S_REQUEST_TOK, "GET", "http://api.rutvit.ru/oauth/access_token", array () // ext. options ); $ req-> sign_request (new OAuthSignatureMethod_HMAC_SHA1 (), $ consumer, $ S_REQUEST_TOK); // Execute the request and write Access Token to the session. $ parsed = OAuthUtil :: parse_parameters (file_get_contents ($ req-> to_url ())); $ S_ACCESS_TOK = new OAuthToken ($ parsed ['oauth_token'], $ parsed ['oauth_token_secret']); // Go to send the message. $ action = 'send_msg'; break; } - Call API (internal request). Well, now we have Access Token, and we can pass its key when calling API methods.
- Consumer generates a request to the Provider API (for example, using a POST request according to the REST ideology). The request passes the Access Token Key, and it is signed using the Shared Secret of this token.
- The provider processes the API call and returns the data to the application.
Code Listing 13: Call API // 5. Send the message. // Wrap the API URL in the OAuth container. case 'send_msg': { $ consumer = new OAuthConsumer (OA_CONSUMER_KEY, OA_CONSUMER_SECRET); $ req = OAuthRequest :: from_consumer_and_token ( $ consumer, $ S_ACCESS_TOK, 'POST', 'http://api.rutvit.ru/statuses/update.xml', array ('status' => "#". TAG. "". iconv (ENCODING, "UTF-8", $ S_MSG)) ); $ req-> sign_request (new OAuthSignatureMethod_HMAC_SHA1 (), $ consumer, $ S_ACCESS_TOK); // Send a POST request. $ h = curl_init (); curl_setopt ($ h, CURLOPT_URL, $ req-> get_normalized_http_url ()); curl_setopt ($ h, CURLOPT_POST, true); curl_setopt ($ h, CURLOPT_RETURNTRANSFER, true); curl_setopt ($ h, CURLOPT_POSTFIELDS, $ req-> to_postdata ()); $ resp = curl_exec ($ h); $ code = curl_getinfo ($ h, CURLINFO_HTTP_CODE); // If successful, redirect back to the page with the widget. if ($ code! = 200) { e ($ resp); exit (); } header ("Location: {$ _SERVER ['SCRIPT_NAME']}"); exit (); }
End of script: widget output
The end of the script should be clear and without detailed explanations.
| Code Listing 14: Finishing the script: displaying the widget |
  // end of case
     }
 }

 // Get all the available tweets.
 $ text = file_get_contents ("http://api.rutvit.ru/search.xml?rpp=5&q=". urlencode ("#". TAG));
 $ TWEETS = new SimpleXMLElement ($ text);

 // Shortcut to display a message with recoding and quoting.
 function e ($ text, $ quote = 1)
 {
     $ text = iconv ("utf-8", ENCODING, $ text);
     echo $ quote?  htmlspecialchars ($ text): $ text;
 }
 ?>

 <style>
 .hiddenLink {display: none}
 </ style>

 <div style = "border: 1px solid black; padding: 0.5em">
 <? foreach ($ TWEETS-> status as $ tweet) {?>
     <div style = "margin-bottom: 6px">
         <b> <? e ($ tweet-> user-> screen_name)?>: </ b>
         <? e ($ tweet-> text_formatted, 0)?>
     </ div>
 <?}?>
 <form method = "post" action = "<? e ($ _ SERVER ['SCRIPT_NAME'])?>? action = form_is_sent" style = "margin: 1em 0 0 0">
     <input type = "text" size = "30" name = "msg" />
     <input type = "submit" value = "Send" />
 </ form>
</ div> |
OAuth useful links
- Original current article on dklab.ru
- The official OAuth website .
- OAuth.php by Andy Smith .
- Implementation of the OAuth protocol in various programming languages.
- Beginner's Guide to OAuth : The article about OAuth in English, I highly recommend reading.
- http://rutvit.ru/apps/new : registration of the application on the RuAvit OAuth server.
- Full source code for examples of this article.
Source: https://habr.com/ru/post/77648/
All Articles