Master class on drawing surround character (a bit strange) in Adobe Photoshop
Illustrator Yevgeniya Rodina jodybastet decided to share her skills and wrote a lesson on drawing a 3D character in Adobe Photoshop using a graphic tablet. The character is a bit strange, but we hope he has not insulted anyone’s feelings.
The lesson is recommended both to designers / illustrators (of whom, we believe, quite a lot on Habré), and simply to fans to draw at the computer.
First, we explain how such a character appeared. Turbomilkers love Twitter very much and most of us happily write there life-giving remarks. When it became necessary to share this with twitter-users from other countries, we developed our own convenient service that will translate tweets from Russian into any other language (languages in the assortment) and automatically post on Twitter.
')
The whole team puzzled over the name of the project, adding the words Twitter and translate, as a result, the colleagues cheered up and gave out " Transvestitor "!
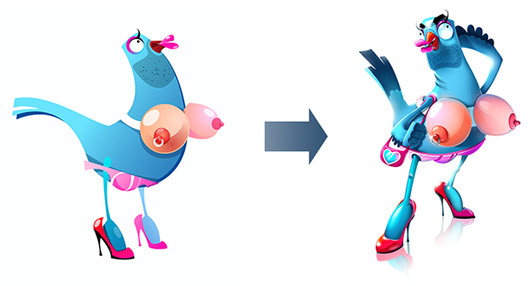
We took the blue bird as the basis for the logo, the same as the original service. But with a "twist" - this is a male bird, unshaven, generously repaired, in men's swimming trunks, with false tits (oops!) And in red shoes. The result can be seen here. )))

Now, actually, to the point - how to draw a voluminous character from a flat logo?
I draw in Photoshop CS4. Open the program and quickly draw a preliminary sketch with a brush. I am going to portray Ptich on a turning point in ¾. By long-standing habit, I paint all the characters with their faces to the left, it is more convenient for me. But I’ll turn the finished sketch mirror to the right, because it will look better this way.
Here, something like this is the work in the second minute.

And so - on the twentieth. I added Bird's hands and a glamorous handbag.

The main details have already been drawn, now we rotate the picture, as planned, mirror it, and add little things - a bra, bristle, draw a smile and shrink the head. As a result, the sketch will be like this:

Now paint the bird color.
With the pen tool, I create contours in curves for all objects, then assign a vector mask.
With the help of the “pipette” we copy the colors from the flat logo of the Transvestitor and color the character accordingly.

In the process, the file acquires a large number of layers. By the principle of nesting dolls, they are collected in small groups, and those in large groups. Every highlight, shadow, reflex and so on. lies in its own layer, and so up to several hundred layers.

If you need a clear outline of the object - then the best choice, in my opinion, is a vector mask. You can use many layers, draw shadows, highlights, reflexes, ornaments, textures, etc. in them, but the contour of the object formed by the masks will remain smooth and clear. For raster graphics under 72dpi, this is a very topical issue.
An example is a highlighted mask on an object (this is the final stage of the drawing).

And for comparison - the same layers with the mask turned off.

Vector masks and a large number of layers allow, if necessary, quite easily (for raster graphics) to make changes to the drawing. You can transform objects in size and shape, enable and disable layers and whole groups.
And again to the character. The following image should be the result of painting the layers:

Now let's draw shadows and light on the bird.
Our conventional light source is located in the upper left corner, respectively, draw light on the character's body on the left, and shadows on the right.

For our own shadows, we take a brush with soft edges, and for the falling ones - with a clear edge. If necessary, the edges of the shadows shade or wipe the eraser.
The transparency mode of the layer I set multiplay, so the shadows look more natural.

Now add the light! We draw light in the same way as shadows, but we use the most whitened colors or pure white at all. In the transparency settings of the layer, we set overlay or softlite. It should turn out like this:

Next, add reflexes to the drawing. This is a kind of "glue" that allows you to combine parts of an object together. For example, the light falls on a plastic boob and is reflected from it on Ptich's blue body. And back - blue flare is reflected in pink plastic. That is, both objects glare at each other with reflected light.

And now we will add the picture “snacks” - small details on the bra, stubble on the face and bushy eyebrows with traces of shaving. And also all sorts of small glare on glossy surfaces. )))

The picture is almost ready, but we decided to add a reflection. To reflect the right leg, its own mirror copy was used, and for the left leg it was necessary to draw a new reflection corresponding to the perspective. Further, I slightly erased the reflection on the plane with a rubber band and made blur around the edges with the blur tool.
Bird ready.

The lesson is recommended both to designers / illustrators (of whom, we believe, quite a lot on Habré), and simply to fans to draw at the computer.
First, we explain how such a character appeared. Turbomilkers love Twitter very much and most of us happily write there life-giving remarks. When it became necessary to share this with twitter-users from other countries, we developed our own convenient service that will translate tweets from Russian into any other language (languages in the assortment) and automatically post on Twitter.
')
The whole team puzzled over the name of the project, adding the words Twitter and translate, as a result, the colleagues cheered up and gave out " Transvestitor "!
We took the blue bird as the basis for the logo, the same as the original service. But with a "twist" - this is a male bird, unshaven, generously repaired, in men's swimming trunks, with false tits (oops!) And in red shoes. The result can be seen here. )))
Now, actually, to the point - how to draw a voluminous character from a flat logo?
I draw in Photoshop CS4. Open the program and quickly draw a preliminary sketch with a brush. I am going to portray Ptich on a turning point in ¾. By long-standing habit, I paint all the characters with their faces to the left, it is more convenient for me. But I’ll turn the finished sketch mirror to the right, because it will look better this way.
Here, something like this is the work in the second minute.
And so - on the twentieth. I added Bird's hands and a glamorous handbag.
The main details have already been drawn, now we rotate the picture, as planned, mirror it, and add little things - a bra, bristle, draw a smile and shrink the head. As a result, the sketch will be like this:
Now paint the bird color.
With the pen tool, I create contours in curves for all objects, then assign a vector mask.
With the help of the “pipette” we copy the colors from the flat logo of the Transvestitor and color the character accordingly.
In the process, the file acquires a large number of layers. By the principle of nesting dolls, they are collected in small groups, and those in large groups. Every highlight, shadow, reflex and so on. lies in its own layer, and so up to several hundred layers.
If you need a clear outline of the object - then the best choice, in my opinion, is a vector mask. You can use many layers, draw shadows, highlights, reflexes, ornaments, textures, etc. in them, but the contour of the object formed by the masks will remain smooth and clear. For raster graphics under 72dpi, this is a very topical issue.
An example is a highlighted mask on an object (this is the final stage of the drawing).
And for comparison - the same layers with the mask turned off.
Vector masks and a large number of layers allow, if necessary, quite easily (for raster graphics) to make changes to the drawing. You can transform objects in size and shape, enable and disable layers and whole groups.
And again to the character. The following image should be the result of painting the layers:
Now let's draw shadows and light on the bird.
Our conventional light source is located in the upper left corner, respectively, draw light on the character's body on the left, and shadows on the right.
For our own shadows, we take a brush with soft edges, and for the falling ones - with a clear edge. If necessary, the edges of the shadows shade or wipe the eraser.
The transparency mode of the layer I set multiplay, so the shadows look more natural.
Now add the light! We draw light in the same way as shadows, but we use the most whitened colors or pure white at all. In the transparency settings of the layer, we set overlay or softlite. It should turn out like this:
Next, add reflexes to the drawing. This is a kind of "glue" that allows you to combine parts of an object together. For example, the light falls on a plastic boob and is reflected from it on Ptich's blue body. And back - blue flare is reflected in pink plastic. That is, both objects glare at each other with reflected light.
And now we will add the picture “snacks” - small details on the bra, stubble on the face and bushy eyebrows with traces of shaving. And also all sorts of small glare on glossy surfaces. )))
The picture is almost ready, but we decided to add a reflection. To reflect the right leg, its own mirror copy was used, and for the left leg it was necessary to draw a new reflection corresponding to the perspective. Further, I slightly erased the reflection on the plane with a rubber band and made blur around the edges with the blur tool.
Bird ready.
Source: https://habr.com/ru/post/77495/
All Articles