Installing a VNC server on VDS and tuning recommendations
This guide is focused on virtual servers (VDS / VPS), which are accessed via VNC via the Internet. This sets the main priorities - economical use of server resources and work on a fast enough channel. As the base system on which the installation is performed, the minimal installation of Ubuntu 9.10 is used. With minor changes, this guide applies to other Linux distributions and Unix family operating systems, as well as to configure VNC on regular dedicated servers and on servers in the local network.
* Ways to organize the work of VNC-servers
** Embedded VNC server in hardware emulators (Xen / HVM, VMWare, Qemu)
** VNC server associated with a running X server (GNOME vino)
** VNC server with embedded X server
*** Manual VNC Server
*** VNC server running in daemon mode
*** VNC server running via inetd
* Select VNC server
* Tuning server
** Tuning the desktop
** VNC server options
The main ways of organizing remote work with a graphic desktop on virtual servers:
1. Built-in VNC server in hardware emulators (Xen / HVM, VMWare, Qemu)
2. VNC server associated with a working X server (GNOME vino)
3. VNC Server with Embedded X Server
3.1 Manually started VNC server
3.2 VNC server running in daemon mode
3.3 VNC server running via inetd
')
Consider these methods and evaluate their advantages and disadvantages.
Many virtualization platforms that support hardware emulation (VMWare, Qemu, Xen in HVM mode) provide a virtual machine with virtual devices — a graphics adapter, a keyboard, a mouse — that simulate the operation of actually existing devices. The operating system in the virtual machine treats them as with ordinary hardware, not distinguishing the difference. The program that manages the virtual machine can link these emulated devices with the VNC server embedded in it, redirecting the information displayed on the graphics adapter of the virtual machine to the VNC client and transmitting the keystroke information received from the VNC- customer For the operating system and the programs running in the virtual machine, the existence of the VNC server and the VNC client imperceptibly, they do not require additional drivers or settings — only the standard drivers of the hardware that emulates the virtualization platform.
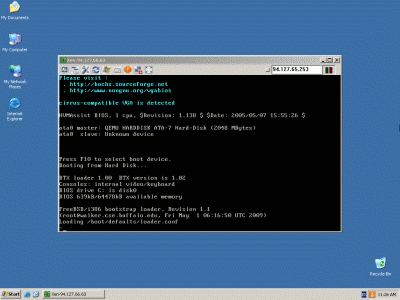
1. VNC-client connected to the VNC-server of the Xen virtual machine in HVM mode, the moment of booting the FreeBSD OS.
In Xen, the VNC server for a virtual machine is enabled by specifying the vnc type in the vfb configuration parameter. Additional options in this parameter: vnclisten - indicates the IP address on which the VNC server accepts connections; vncpasswd is the password that the VNC client must communicate.
For example, adding a line to the virtual machine configuration file:
means the inclusion of a VNC server that accepts connections on all available IP addresses and requires authorization with the qwerty password.
The main and exhaustive advantage of using a virtualization platform VNC server: simplicity - just enable VNC server support in the virtual machine settings.
The main disadvantages: a very large expenditure of resources on the site of equipment emulation and a limited number of virtualization platforms that support this feature.
For some virtualization platforms, there is also a less resource-intensive option, in which, instead of emulating a real graphics device, a simplified abstraction is transferred to the virtual machine - the framebuffer. Xen supports a framebuffer as a virtual machine graphics adapter; for XFree86 and X.org X servers, there are screen drivers for the framebuffer. When using a framebuffer, processor and RAM costs for emulating real hardware are eliminated, but all other shortcomings remain.
The option is best suited for remote access to the desktop of a regular computer (desktop, home). Accessing the desktop via VNC in GNOME is trivially included — simply enable the options in the System menu in the System / Preferences / Remote Desktop section. When they are turned on, the GNOME VNC server (vino) that is tied to the display of the X server and completely duplicates the information displayed on the screen for the VNC client is launched.
But on a virtual server, everything becomes more complicated. First, you need to start the X server in some way, for example, on the virtual machine emulated graphics adapter, and only after that it will be possible to allow VNC access to the display of this X server in the manner described above. Compared with the VNC server on the hardware emulator, plus only one: lower emulation costs. But the remaining disadvantages remain and a new one appears - a more time-consuming setting. All together makes this option the worst candidate for a virtual server.
There are a number of programs - VNC-servers, which independently act as the X-server for applications. Unlike the standard X-server that works with real devices (graphics adapter, keyboard, mouse) or emulates them in virtual machines, the X-server integrated into the VNC server, this functional part is not required - instead of hardware, only VNC- by the client. The X-server embedded in the VNC server does not require complex configuration or computational resources for working with equipment, so this option is best suited for virtual servers.
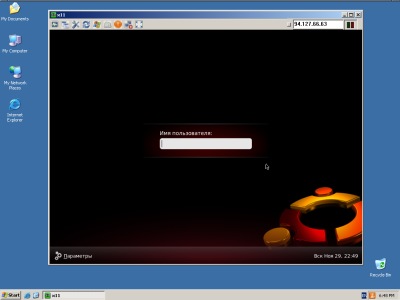
In Ubuntu 9.10, the vnc-server virtual package offers two alternatives as a VNC server: vnc4server (RealVNC) and tightvncserver (TightVNC). There is no significant difference between them, there are only small nuances in their use, which will be described later. Now consider the vnc4server.
Minimum OS installations for VDS, as a rule, do not include graphical environments, so you also need to install GNOME. To install the RealVNC server and GNOME, it’s enough to install two packages:
The default settings allow you to use the VNC server without additional configuration immediately after installation. We start from the command line the VNC server that creates the X server on the zero display (and accepts the VNC connections on port 5900):
and on the created null display, launch GNOME:
When you first start, vncserver will ask you to set a password that you will need to enter in the VNC client when connecting. To change the password for the VNC server, use the vncpasswd command.
But every time you log into the server via SSH and start the VNC server manually - the option is not suitable for everyday work. It is preferable to configure the automatic start of the VNC server.
In order not to manually start the VNC server after each reboot, you can add it to the starting procedure. If you wish, you can build a full-fledged set of scripts for upstart, but in practice it is enough to do by adding lines to /etc/rc.local :
where as $ USER you need to specify the user login for which the desktop is started. If necessary, you can simultaneously run multiple VNC servers for the same or different users on different displays.
When a VNC client is disconnected, the desktop session and the running programs do not terminate, but continue to work in the same way as with a connected VNC client. When you reconnect the VNC client to this display, the user will end up in the same desktop session as if there were no disconnects. Several VNC clients can connect to the same VNC server (X-display) and they will work with the same desktop.
It is possible to start a VNC server only on demand - when a VNC client is connected. To do this, the port of the VNC server 5900 is transferred to the inetd daemon for maintenance. As long as there is no connected VNC client, no VNC server will be started. When a client requests a connection, inetd starts the VNC server and associates the client with it. The VNC server creates a display and starts a work session. After disconnecting the client, the VNC server closes the session and terminates all programs that work with the display.
When several clients are connected to the same port, each will run a separate VNC server with its own display. Thus, all connected clients will have independent work sessions. This allows using GDM authentication to easily configure the system for multi-user work - after the connection, the username and password of the virtual server user are requested, after they are entered correctly, the working session of this user will be started.
2. User authorization via GDM when connecting to a VNC server.
In addition to the RealVNC and GNOME server already installed, we will need to install gdm and xinetd.
First you need to configure the GDM display manager: allow receiving requests for user authentication via XDMCP and disable launching the X server from gdm. Edit the /etc/gdm/gdm.conf configuration file according to the patch:
or save the patch to the /tmp/gdm.conf.patch file and use it with the command:
In order for xinetd to start the VNC server, create for it the configuration file /etc/xinetd.d/xvnc with the following contents:
The Xvnc startup arguments must include -inetd , letting the VNC server know that it is started via the inetd daemon, and -query 127.0.0.1 , meaning that when the VNC server starts, it will need to authenticate the user via the local display manager (GDM ). The -once option reports that after disconnecting the client, the X server must also be disabled. -SecurityTypes none disables its own VNC server authorization, as users are authenticated via gdm.
Restart xinetd and gdm commands:
We start the VNC client and connect to our server. Enter the username and password of the system user, and get a standard desktop:
3. Ubuntu 9.10, GNOME desktop.
The main advantage of the inetd method is the lack of consumption of resources for the operation of the X server and desktop programs without VNC clients. An additional plus is full-fledged multi-user work: everyone connects to a standard VNC port, the number of users is unlimited.
In Ubuntu 9.10, the standard distribution has two VNC servers: vnc4server (RealVNC) and tightvncserver (TightVNC).
There are problems with some clients with RealVNC as a server. For example, a number of versions of the TightVNC and UltraVNC clients cannot use compression algorithms with this server, which leads to slower work through the Internet. The server TightVNC such problems with clients is not observed. In addition, unlike RealVNC, the TightVNC server supports the Tight encoding algorithm, which allows you to compress data using JPEG — when displaying photos and other complex images, this significantly reduces the amount of data transferred. Otherwise, there are no noticeable differences between the servers.
In the installation description of the VNC server with inetd, all settings were cited for the RealVNC server. When used as a TightVNC server, small changes in settings will be required.
The TightVNC server does not require the -SecurityTypes none and -extension XFIXES arguments , so the argument string in the xetd /etc/xinetd.d/xvnc configuration file should look like this:
You also need to disable keyboard remapping in GNOME, otherwise pressing some keys will not be transmitted correctly. To do this, you need to set the environment variable XKL_XMODMAP_DISABLE. The easiest way to do this is to create a file /etc/X11/Xsession.d/10tightvncserver with the contents:
The file will automatically run when the GNOME session starts.
Desktop settings can have a noticeable effect on network speed. The task of reducing the amount of data transferred is reduced to two subtasks: minimizing changes on the screen and using well-compressible images.
Most of the information the user works with is text: windows with text, menus, forms, etc. The included anti-aliasing of fonts increases by 1.5-3 times the amount of data transmitted when displaying text, as the halftone areas on the borders of characters carry additional poorly compressible information.
Anti-aliasing can be turned off in the GNOME Font Settings window, but this deactivation will not work in all programs — for example, Firefox will still smooth the fonts. Therefore, it is better to make settings in the system configuration file /etc/fonts/fonts.conf (the anti-aliasing of all fonts smaller than 14 pixels is disabled):
The amount of data transmitted and the display speed on the channel 1 Mbit / s drop-down menu (color depth: 16 bits, encoding: Tight):
Desktop background can greatly slow down the work if it will be located a photograph or drawing. Any minimization of a window or menu entails a redrawing of that part of the background that was covered by it. And the more complex the image, the more data will be transmitted. To minimize bandwidth costs in the background, it is recommended to use a single-color background, the best is white.
The design of the interface elements can also affect the amount of data transferred. To minimize traffic, choose a theme with flat colors, no gradients. However, many topics that use vertical gradients, are compressed quite well and can be used without significant loss in speed.
Reducing the size of fonts for system menus and text fields entails a decrease in the geometric size of text areas, and consequently, a decrease in the amount of data transferred.
The VNC server has many options, but we are interested in the following three: geometry - screen size, depth - color depth, deferupdate - change transfer delay.
Screen size in pixels. Format: -geometry WIDTH x HEIGHT . For example, -geometry 800x600 is 800 pixels wide and 600 pixels high. The larger the screen size, the more data there needs to be transferred — but there is no direct relationship between them. When the information on the display changes, the client does not transmit the image of the display completely, but only the section with the changed information - an open window, an open menu item or a printed character. Therefore, there is no significant gain when using 800x600 instead of 1024x768.
Color depth in bits. Format: -depth NUMBERS , NUMBERS - 8, 15, 16 or 32. The greater the depth of color, the better the semitones and shades are shown, but the more information is required to transmit. Reducing the depth of color reduces the amount of data, and, accordingly, increases the speed. For working via the Internet, a 16-bit color depth is quite suitable. When using a slow channel (<256 Kbps) it is recommended to use a color depth of 8 bits.
The amount of data transmitted and the display speed on the channel 1 Mbit / s drop-down menu for different color depths (coding: Tight):
VNC clients have the ability to enforce a reduced 8-bit color depth (256 colors), while ignoring the color depth specified on the server.
The delay in sending changes on the display, in milliseconds. Format: -deferupdate NUMBER_MILLISECOND , the default is 40. Allows you to combine into one update a large number of small screen changes made during the time interval specified in the option. When you merge several changes that have occurred on the same area of the screen, the total amount of data transferred decreases. An increase in this parameter impairs interactivity - a visual response to an action is displayed on the VNC client only after the expiration of the deferupdate time. Taking into account delays in data transmission over the network, the total response delays can reduce the workability.
Most of the operations on virtual servers are drawn fairly quickly, and the deferupdate value can be reduced to 10 ms. In networks with large bandwidth, the delay can be completely disabled by specifying -deferupdate 0 .
Using the VNC server launched via inetd, along with the tuning recommendations made, allows you to work with the desktop via the Internet, even on entry-level virtual servers. In total, tuning allows you to reduce delays by 2-5 times, compared with the standard settings. Starting a VNC server on demand will free up memory for other tasks.
For example, the Ubuntu 9.10 VNC preset compiled according to this scheme provides acceptable work with a desktop on a VDS with a 128 Mb RAM / 320 MHz CPU over an ADSL channel of 1 Mbps. With an increase in connection speed up to 5-10 Mbit / s and a virtual server power up to 512 Mb RAM / 960 MHz CPU, the work on the level of comfort is close to working with a local computer. The reaction time for most interface operations is within 0.05-0.2 seconds.
The consumption of RAM on Ubuntu 9.10 with a VNC server running via inetd:
Other articles in this series:
VNC - remote access to a computer over a network. Introduction to VNC.
Connecting to a remote computer via VNC. Work with the VNC client.
* Ways to organize the work of VNC-servers
** Embedded VNC server in hardware emulators (Xen / HVM, VMWare, Qemu)
** VNC server associated with a running X server (GNOME vino)
** VNC server with embedded X server
*** Manual VNC Server
*** VNC server running in daemon mode
*** VNC server running via inetd
* Select VNC server
* Tuning server
** Tuning the desktop
** VNC server options
Ways to organize the work of VNC-servers
The main ways of organizing remote work with a graphic desktop on virtual servers:
1. Built-in VNC server in hardware emulators (Xen / HVM, VMWare, Qemu)
2. VNC server associated with a working X server (GNOME vino)
3. VNC Server with Embedded X Server
3.1 Manually started VNC server
3.2 VNC server running in daemon mode
3.3 VNC server running via inetd
')
Consider these methods and evaluate their advantages and disadvantages.
1. Built-in VNC server in hardware emulators (Xen / HVM, VMWare, Qemu)
Many virtualization platforms that support hardware emulation (VMWare, Qemu, Xen in HVM mode) provide a virtual machine with virtual devices — a graphics adapter, a keyboard, a mouse — that simulate the operation of actually existing devices. The operating system in the virtual machine treats them as with ordinary hardware, not distinguishing the difference. The program that manages the virtual machine can link these emulated devices with the VNC server embedded in it, redirecting the information displayed on the graphics adapter of the virtual machine to the VNC client and transmitting the keystroke information received from the VNC- customer For the operating system and the programs running in the virtual machine, the existence of the VNC server and the VNC client imperceptibly, they do not require additional drivers or settings — only the standard drivers of the hardware that emulates the virtualization platform.
1. VNC-client connected to the VNC-server of the Xen virtual machine in HVM mode, the moment of booting the FreeBSD OS.
In Xen, the VNC server for a virtual machine is enabled by specifying the vnc type in the vfb configuration parameter. Additional options in this parameter: vnclisten - indicates the IP address on which the VNC server accepts connections; vncpasswd is the password that the VNC client must communicate.
For example, adding a line to the virtual machine configuration file:
vfb = [ 'type=vnc,vnclisten=0.0.0.0,vncpasswd=qwerty' ]means the inclusion of a VNC server that accepts connections on all available IP addresses and requires authorization with the qwerty password.
The main and exhaustive advantage of using a virtualization platform VNC server: simplicity - just enable VNC server support in the virtual machine settings.
The main disadvantages: a very large expenditure of resources on the site of equipment emulation and a limited number of virtualization platforms that support this feature.
| pros | Minuses |
|---|---|
|
|
For some virtualization platforms, there is also a less resource-intensive option, in which, instead of emulating a real graphics device, a simplified abstraction is transferred to the virtual machine - the framebuffer. Xen supports a framebuffer as a virtual machine graphics adapter; for XFree86 and X.org X servers, there are screen drivers for the framebuffer. When using a framebuffer, processor and RAM costs for emulating real hardware are eliminated, but all other shortcomings remain.
2. VNC server associated with a working X server (GNOME vino)
The option is best suited for remote access to the desktop of a regular computer (desktop, home). Accessing the desktop via VNC in GNOME is trivially included — simply enable the options in the System menu in the System / Preferences / Remote Desktop section. When they are turned on, the GNOME VNC server (vino) that is tied to the display of the X server and completely duplicates the information displayed on the screen for the VNC client is launched.
But on a virtual server, everything becomes more complicated. First, you need to start the X server in some way, for example, on the virtual machine emulated graphics adapter, and only after that it will be possible to allow VNC access to the display of this X server in the manner described above. Compared with the VNC server on the hardware emulator, plus only one: lower emulation costs. But the remaining disadvantages remain and a new one appears - a more time-consuming setting. All together makes this option the worst candidate for a virtual server.
| pros | Minuses |
|---|---|
|
|
3. VNC Server with Embedded X Server
There are a number of programs - VNC-servers, which independently act as the X-server for applications. Unlike the standard X-server that works with real devices (graphics adapter, keyboard, mouse) or emulates them in virtual machines, the X-server integrated into the VNC server, this functional part is not required - instead of hardware, only VNC- by the client. The X-server embedded in the VNC server does not require complex configuration or computational resources for working with equipment, so this option is best suited for virtual servers.
In Ubuntu 9.10, the vnc-server virtual package offers two alternatives as a VNC server: vnc4server (RealVNC) and tightvncserver (TightVNC). There is no significant difference between them, there are only small nuances in their use, which will be described later. Now consider the vnc4server.
Minimum OS installations for VDS, as a rule, do not include graphical environments, so you also need to install GNOME. To install the RealVNC server and GNOME, it’s enough to install two packages:
apt-get install vnc4server gnome-core3.1 Manually started VNC server
The default settings allow you to use the VNC server without additional configuration immediately after installation. We start from the command line the VNC server that creates the X server on the zero display (and accepts the VNC connections on port 5900):
vncserver :0and on the created null display, launch GNOME:
DISPLAY=:0 gnome-sessionWhen you first start, vncserver will ask you to set a password that you will need to enter in the VNC client when connecting. To change the password for the VNC server, use the vncpasswd command.
But every time you log into the server via SSH and start the VNC server manually - the option is not suitable for everyday work. It is preferable to configure the automatic start of the VNC server.
3.2 VNC server running in daemon mode
In order not to manually start the VNC server after each reboot, you can add it to the starting procedure. If you wish, you can build a full-fledged set of scripts for upstart, but in practice it is enough to do by adding lines to /etc/rc.local :
su -l $USER -c "vncserver :0"where as $ USER you need to specify the user login for which the desktop is started. If necessary, you can simultaneously run multiple VNC servers for the same or different users on different displays.
When a VNC client is disconnected, the desktop session and the running programs do not terminate, but continue to work in the same way as with a connected VNC client. When you reconnect the VNC client to this display, the user will end up in the same desktop session as if there were no disconnects. Several VNC clients can connect to the same VNC server (X-display) and they will work with the same desktop.
| pros | Minuses |
|---|---|
|
|
3.3 VNC server running via inetd
It is possible to start a VNC server only on demand - when a VNC client is connected. To do this, the port of the VNC server 5900 is transferred to the inetd daemon for maintenance. As long as there is no connected VNC client, no VNC server will be started. When a client requests a connection, inetd starts the VNC server and associates the client with it. The VNC server creates a display and starts a work session. After disconnecting the client, the VNC server closes the session and terminates all programs that work with the display.
When several clients are connected to the same port, each will run a separate VNC server with its own display. Thus, all connected clients will have independent work sessions. This allows using GDM authentication to easily configure the system for multi-user work - after the connection, the username and password of the virtual server user are requested, after they are entered correctly, the working session of this user will be started.
2. User authorization via GDM when connecting to a VNC server.
In addition to the RealVNC and GNOME server already installed, we will need to install gdm and xinetd.
apt-get install xinetd gdm-2.20First you need to configure the GDM display manager: allow receiving requests for user authentication via XDMCP and disable launching the X server from gdm. Edit the /etc/gdm/gdm.conf configuration file according to the patch:
--- /etc/gdm/gdm.conf.orig 2009-09-11 23:46:30.000000000 +0400
+++ /etc/gdm/gdm.conf 2009-11-30 02:36:06.000000000 +0300
@@ -311,3 +311,3 @@
# the security of XDMCP.
-Enable=false
+Enable=true
# Honor indirect queries, we run a chooser for these, and then redirect the
@@ -604,3 +604,3 @@
#
-0=Standard device=/dev/console
+#0=Standard device=/dev/console
or save the patch to the /tmp/gdm.conf.patch file and use it with the command:
patch /etc/gdm/gdm.conf /tmp/gdm.conf.patchIn order for xinetd to start the VNC server, create for it the configuration file /etc/xinetd.d/xvnc with the following contents:
service xvnc { type = UNLISTED disable = no socket_type = stream protocol = tcp wait = no user = gdm server = /usr/bin/Xvnc server_args = -inetd -query 127.0.0.1 -once -SecurityTypes none -extension XFIXES port = 5900 } The Xvnc startup arguments must include -inetd , letting the VNC server know that it is started via the inetd daemon, and -query 127.0.0.1 , meaning that when the VNC server starts, it will need to authenticate the user via the local display manager (GDM ). The -once option reports that after disconnecting the client, the X server must also be disabled. -SecurityTypes none disables its own VNC server authorization, as users are authenticated via gdm.
Restart xinetd and gdm commands:
service gdm restart
service xinetd restart
We start the VNC client and connect to our server. Enter the username and password of the system user, and get a standard desktop:
3. Ubuntu 9.10, GNOME desktop.
The main advantage of the inetd method is the lack of consumption of resources for the operation of the X server and desktop programs without VNC clients. An additional plus is full-fledged multi-user work: everyone connects to a standard VNC port, the number of users is unlimited.
| pros | Minuses |
|---|---|
|
|
VNC server selection
In Ubuntu 9.10, the standard distribution has two VNC servers: vnc4server (RealVNC) and tightvncserver (TightVNC).
There are problems with some clients with RealVNC as a server. For example, a number of versions of the TightVNC and UltraVNC clients cannot use compression algorithms with this server, which leads to slower work through the Internet. The server TightVNC such problems with clients is not observed. In addition, unlike RealVNC, the TightVNC server supports the Tight encoding algorithm, which allows you to compress data using JPEG — when displaying photos and other complex images, this significantly reduces the amount of data transferred. Otherwise, there are no noticeable differences between the servers.
Differences in setting up a TightVNC server
In the installation description of the VNC server with inetd, all settings were cited for the RealVNC server. When used as a TightVNC server, small changes in settings will be required.
The TightVNC server does not require the -SecurityTypes none and -extension XFIXES arguments , so the argument string in the xetd /etc/xinetd.d/xvnc configuration file should look like this:
server_args = -inetd -query 127.0.0.1 -onceYou also need to disable keyboard remapping in GNOME, otherwise pressing some keys will not be transmitted correctly. To do this, you need to set the environment variable XKL_XMODMAP_DISABLE. The easiest way to do this is to create a file /etc/X11/Xsession.d/10tightvncserver with the contents:
export XKL_XMODMAP_DISABLE=1The file will automatically run when the GNOME session starts.
Server tuning
Tuning the desktop
Desktop settings can have a noticeable effect on network speed. The task of reducing the amount of data transferred is reduced to two subtasks: minimizing changes on the screen and using well-compressible images.
Font smoothing
Most of the information the user works with is text: windows with text, menus, forms, etc. The included anti-aliasing of fonts increases by 1.5-3 times the amount of data transmitted when displaying text, as the halftone areas on the borders of characters carry additional poorly compressible information.
Anti-aliasing can be turned off in the GNOME Font Settings window, but this deactivation will not work in all programs — for example, Firefox will still smooth the fonts. Therefore, it is better to make settings in the system configuration file /etc/fonts/fonts.conf (the anti-aliasing of all fonts smaller than 14 pixels is disabled):
<match target="font"> <test name="size" compare="less"> <double>14</double> </test> <edit name="antialias" mode="assign"> <bool>false</bool> </edit> </match> <match target="font"> <test name="pixelsize" compare="less" qual="any"> <double>14</double> </test> <edit mode="assign" name="antialias"> <bool>false</bool> </edit> </match> The amount of data transmitted and the display speed on the channel 1 Mbit / s drop-down menu (color depth: 16 bits, encoding: Tight):
| Subpixel anti-aliasing enabled | No smoothing | |
 |  | |
| Volume | 30 Kb | 13.8 Kb |
| Speed | 0.24 sec | 0.11 sec |
Desktop Background
Desktop background can greatly slow down the work if it will be located a photograph or drawing. Any minimization of a window or menu entails a redrawing of that part of the background that was covered by it. And the more complex the image, the more data will be transmitted. To minimize bandwidth costs in the background, it is recommended to use a single-color background, the best is white.
Desktop theme
The design of the interface elements can also affect the amount of data transferred. To minimize traffic, choose a theme with flat colors, no gradients. However, many topics that use vertical gradients, are compressed quite well and can be used without significant loss in speed.
Font size
Reducing the size of fonts for system menus and text fields entails a decrease in the geometric size of text areas, and consequently, a decrease in the amount of data transferred.
VNC server options
The VNC server has many options, but we are interested in the following three: geometry - screen size, depth - color depth, deferupdate - change transfer delay.
geometry
Screen size in pixels. Format: -geometry WIDTH x HEIGHT . For example, -geometry 800x600 is 800 pixels wide and 600 pixels high. The larger the screen size, the more data there needs to be transferred — but there is no direct relationship between them. When the information on the display changes, the client does not transmit the image of the display completely, but only the section with the changed information - an open window, an open menu item or a printed character. Therefore, there is no significant gain when using 800x600 instead of 1024x768.
depth
Color depth in bits. Format: -depth NUMBERS , NUMBERS - 8, 15, 16 or 32. The greater the depth of color, the better the semitones and shades are shown, but the more information is required to transmit. Reducing the depth of color reduces the amount of data, and, accordingly, increases the speed. For working via the Internet, a 16-bit color depth is quite suitable. When using a slow channel (<256 Kbps) it is recommended to use a color depth of 8 bits.
The amount of data transmitted and the display speed on the channel 1 Mbit / s drop-down menu for different color depths (coding: Tight):
 | |  | |
| Color depth | 24 bits | 16 bits | 8 bit |
| Volume | 15.2 Kb | 13.8 Kb | 9 Kb |
| Speed | 0.12 sec | 0.11 sec | 0.07 seconds |
VNC clients have the ability to enforce a reduced 8-bit color depth (256 colors), while ignoring the color depth specified on the server.
deferupdate
The delay in sending changes on the display, in milliseconds. Format: -deferupdate NUMBER_MILLISECOND , the default is 40. Allows you to combine into one update a large number of small screen changes made during the time interval specified in the option. When you merge several changes that have occurred on the same area of the screen, the total amount of data transferred decreases. An increase in this parameter impairs interactivity - a visual response to an action is displayed on the VNC client only after the expiration of the deferupdate time. Taking into account delays in data transmission over the network, the total response delays can reduce the workability.
Most of the operations on virtual servers are drawn fairly quickly, and the deferupdate value can be reduced to 10 ms. In networks with large bandwidth, the delay can be completely disabled by specifying -deferupdate 0 .
Conclusion
Using the VNC server launched via inetd, along with the tuning recommendations made, allows you to work with the desktop via the Internet, even on entry-level virtual servers. In total, tuning allows you to reduce delays by 2-5 times, compared with the standard settings. Starting a VNC server on demand will free up memory for other tasks.
For example, the Ubuntu 9.10 VNC preset compiled according to this scheme provides acceptable work with a desktop on a VDS with a 128 Mb RAM / 320 MHz CPU over an ADSL channel of 1 Mbps. With an increase in connection speed up to 5-10 Mbit / s and a virtual server power up to 512 Mb RAM / 960 MHz CPU, the work on the level of comfort is close to working with a local computer. The reaction time for most interface operations is within 0.05-0.2 seconds.
The consumption of RAM on Ubuntu 9.10 with a VNC server running via inetd:
| Running programs | Used RAM |
|---|---|
| server without VNC clients connected | 41 Mb |
| one VNC client, GNOME desktop | 80 Mb |
| two VNC clients, two GNOME desktop sessions | 127 Mb |
| one VNC client, GNOME desktop, Firefox launched, www.ubuntu.com website launched | 121 Mb |
| one VNC client, GNOME desktop, running text editor OpenOffice.org | 112 Mb |
Other articles in this series:
VNC - remote access to a computer over a network. Introduction to VNC.
Connecting to a remote computer via VNC. Work with the VNC client.
Source: https://habr.com/ru/post/77159/
All Articles