Secrets and technique of quality page turning effect
The page turning technique has been present in Flash for several years. However, not all implementations are the same. Usually, the quality components for paging the pages that you can buy are significantly different from the free manuals that you find online. The biggest difference is in the range of motion for the corner of the page. Most free manuals offer a fixed path radius instead of using a wider range of motion. In other words, it doesn’t matter where you drag the page with the mouse, the corner will always move along the same curve from one side to the other. Mathematics for such a technique is quite simple and options for its implementation can be found everywhere. It is curious that high-quality components with the paging effect make it possible to use a much larger range of movements, which allows one to achieve effects of much greater quality. And how to achieve this, no one says!
')


The most important variable at this stage is our calculated limiting corner (point C above). I never use these positions from mouse events directly, instead, I create a follower ( follow variable) that makes it easier to get the position of the mouse. However, in order for the page to work, a restriction point (Constraint) is required, which indicates the position of the corner of the page in order to limit the maximum width of the page. In other words, the line SB> C cannot be greater than the line SB> EB .


Now that the corner point C is limited in both radii, we can take on the solution of the main problem: the critical triangle. The critical triangle is obtained by taking the intersection point of the bisector of the angle SB with the line EB (point T0). Perpendicular from this point will give the point T2 , and the point T1 will complete the triangle. The critical triangle is used to control both the location and the rotation of the page object, in addition, the triangle serves as a determinant of borders. Below is the triangle counting code:

You can experiment with this code to see how it affects the final result.


An important part of the implementation is that the angle defined by T2 and C determines the required page rotation when the mouse is moved to point C. You can determine the angle in radians by performing the operation Math.atan2 () on the variables specified above. Having obtained the tangent value, you can set the page rotation angle to this value after converting to degrees from radians (by multiplying Math.PI / 180.0). Thus, the page will always cross T2 when paging.


When we want to implement a solution, the red rectangle object used above must be converted to a collection of shape segments (Path figure segments) with PathGeometry inside, which will define the clipped region for the page control (believe me, it’s easier to do so than trying to perform complex rotation on cut the way). The good news is that the Silverlight GeneralTransform class makes it very easy:

And it's all! The purple region in the picture above, formed by the intersection of the blue page and the red rectangle, determines which part of the page should be visible while paging the page. Using the calculated point values, you can convert the rectangle to the correct pathGeometry values that will allow you to cut out the page control, creating the look that the page is scrolling through. All this trigonometry determines the mathematical apparatus of the effect of high-quality page turning. With this knowledge, you can structure it in order to add shadows or add a few more pages. Scrolling from left to right is just a mirror image of the geometry, and scrolling from top to bottom is just inverting. I leave it to you to play with shadows and add logic to process the pages. Enjoy!

Scrolling pages for Silverlight
Today we will deal with the explanation of the mathematical implementation of the qualitative effect of page turning for Silverlight. The implementation on Silverlight, which can be viewed above [the video is attached to the article, the implementation on Silverlight is available on the author's blog ] was done using trigonometry, the clever masking technique and a slight effect of smoke and mirrors for shadows. As in most of my articles, the implementation of the effect is divided into the mechanical part (mathematics) and the part of the presentation (rendering tricks). Since Silverlight and Flash support the mechanics of masking, clipping, and transforming differently, this guide is mainly aimed at Silverlight developers. However, mathematical secrets in the paging technique are also applicable to developers who make interactive applications in other languages, since this guide is focused on explaining the mechanics of moving to solve a problem.')
Step 1: Follow the mouse while holding the corner.

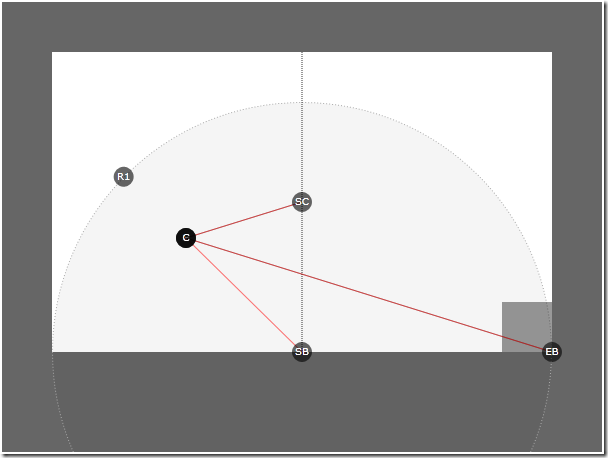
In the original, instead of the image - an interactive SL-application . Go to the page of the original article to try a live example. [Download BlogPageFlipStudy01.zip ]PageFlipStudy01 sets up the framework for the purposes we need. Please read it carefully, as the next three stages will be built each on top of each other. If you open the first archive, you will find a solution with only two elements, MainPage.xaml and Dot.xaml, which are created to visualize variables. If you look at the MainPage.xaml.cs code, you will find that the function loaded () is mainly concerned with initializing variables and setting mouse event handlers. All logic occurs in the CompositeTarget.Rendering () loop of the animation. Key variables are listed below:
- M - mouse position, set by the MouseMove () event;
- F is the follower of the mouse, which allows us to simplify processing the initial position of the mouse;
- C - point of limitation, which determines where the corner of the page should be;
- R1 is the radius point on the bounding circle, the arc of which defines the maximum width allowed for the page;
- SC - spine center;
- SB - bottom of the spine;
- EB - lower right corner.

The most important variable at this stage is our calculated limiting corner (point C above). I never use these positions from mouse events directly, instead, I create a follower ( follow variable) that makes it easier to get the position of the mouse. However, in order for the page to work, a restriction point (Constraint) is required, which indicates the position of the corner of the page in order to limit the maximum width of the page. In other words, the line SB> C cannot be greater than the line SB> EB .
Step 2: Adding a second constraint and defining a critical triangle

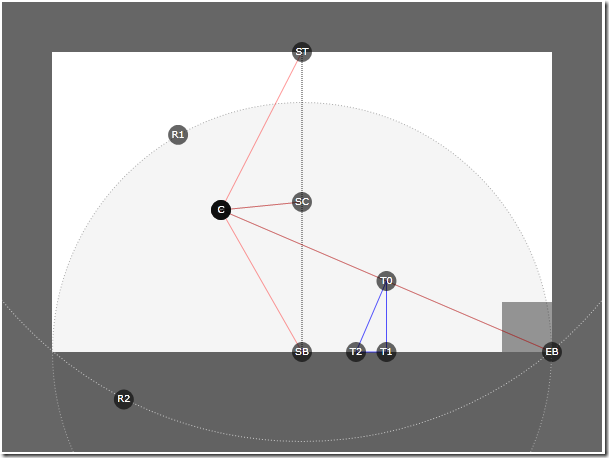
In the original, instead of the image - an interactive SL-application . Go to the page of the original article to try a live example. [Download BlogPageFlipStudy02.zip ]In PageFlipStudy02 we add an additional constraint on radius R2 in order to determine the maximum distance that a page corner can be distant from the top of the spine ( ST point is higher). In other words, the line ST> C cannot be greater than the line that connects ST and R2 . Below is the additional limit code for the second radius:

Now that the corner point C is limited in both radii, we can take on the solution of the main problem: the critical triangle. The critical triangle is obtained by taking the intersection point of the bisector of the angle SB with the line EB (point T0). Perpendicular from this point will give the point T2 , and the point T1 will complete the triangle. The critical triangle is used to control both the location and the rotation of the page object, in addition, the triangle serves as a determinant of borders. Below is the triangle counting code:

You can experiment with this code to see how it affects the final result.
Step 3: Adding a Page and Angle Rotation

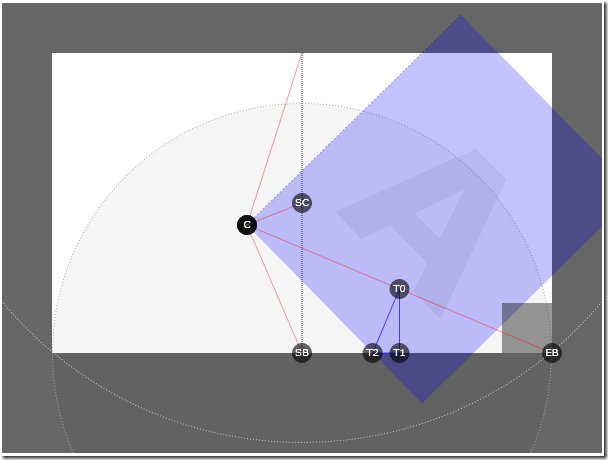
In the original, instead of the image - an interactive SL-application . Go to the page of the original article to try a live example. [Download BlogPageFlipStudy03.zip ]The most significant change in PageFlipStudy03 is the addition of the pageBack.xaml control, which contains the graphics you need to display. If you look at the control, you will notice that both points of the position and rotation of the control fall at its point at the bottom left corner. This is important, because when the page is scrolled, the corner for which you have flipped it becomes the bottom left. In MainPage.xaml.cs, the positioning and rotation of the page is calculated as follows:

An important part of the implementation is that the angle defined by T2 and C determines the required page rotation when the mouse is moved to point C. You can determine the angle in radians by performing the operation Math.atan2 () on the variables specified above. Having obtained the tangent value, you can set the page rotation angle to this value after converting to degrees from radians (by multiplying Math.PI / 180.0). Thus, the page will always cross T2 when paging.
Step 4: Determining the region to be shown (Clipping Region)

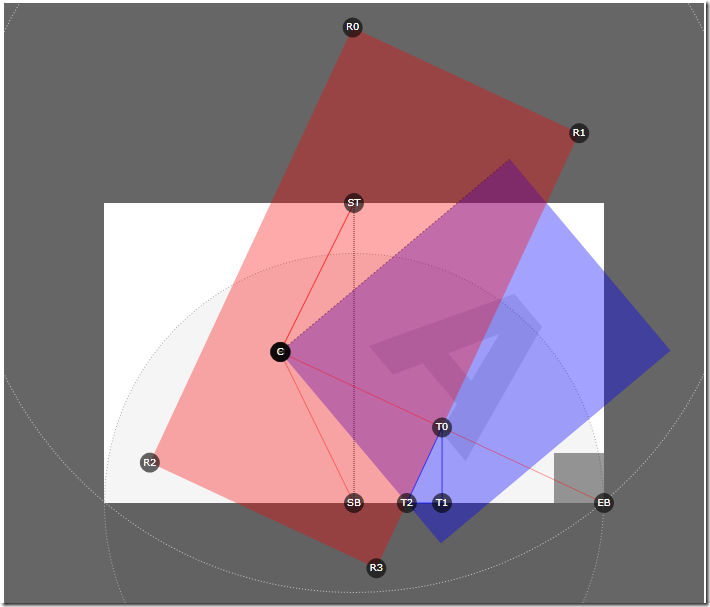
In the original, instead of the image - an interactive SL-application . Go to the page of the original article to try a live example. [Download BlogPageFlipStudy04.zip ]At this stage, you should be aware of all the logic required for the proper limitation and rotation of the page. The last important step, however, is to define the clipping region, which will also be part of the animation, to determine how much of the page should be visible while paging. Since the purpose of this manual is to demonstrate the mathematical apparatus of the technique, I will leave the rectangle visible so that you can see what is actually happening. The red box above, which gives me points for the cut region, was created depending on where T2 is located. You can calculate its location and rotation as follows:

When we want to implement a solution, the red rectangle object used above must be converted to a collection of shape segments (Path figure segments) with PathGeometry inside, which will define the clipped region for the page control (believe me, it’s easier to do so than trying to perform complex rotation on cut the way). The good news is that the Silverlight GeneralTransform class makes it very easy:

And it's all! The purple region in the picture above, formed by the intersection of the blue page and the red rectangle, determines which part of the page should be visible while paging the page. Using the calculated point values, you can convert the rectangle to the correct pathGeometry values that will allow you to cut out the page control, creating the look that the page is scrolling through. All this trigonometry determines the mathematical apparatus of the effect of high-quality page turning. With this knowledge, you can structure it in order to add shadows or add a few more pages. Scrolling from left to right is just a mirror image of the geometry, and scrolling from top to bottom is just inverting. I leave it to you to play with shadows and add logic to process the pages. Enjoy!
Source: https://habr.com/ru/post/76768/
All Articles