OpenCV (computer vision). Installation under MSVS 2008. "Hello World"
OpenCV is a library of computer vision and image processing algorithms. The source code is public.
This thing is very interesting and you can find many uses for it: user identification at the computer, object recognition, object tracking, and even more in robotics!
In this post I will describe the detailed installation of this library and we will write the simplest program - a sort of “Hello World” in computer vision. :)
')
Installation
one.
You need to download and install OpenCV for Windows. Better download version 1.0 - this version was created back in Intel.opencvlibrary.sourceforge.net (I installed in the default folder C: / Program Files / OpenCV /)
2
Download and install MS Visual Studio 2008, if you have not already done so, or MS Visual C ++ 2008 Express Edition via the link www.microsoft.com/express/vc (I think it’s not necessary to remind you about registration :)).3
Now you have everything you need installed, so let's proceed to including OpenCV in MSVS 2008:- In the main menu, select Tools-> Options (Tools-> Options).
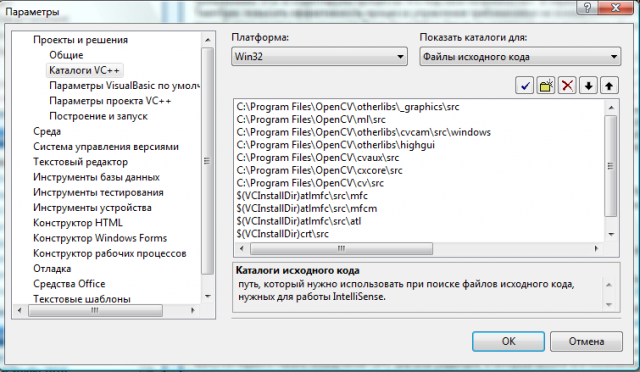
- In the list on the right, select Projects and Solutions-> VC ++ Directories (Projects and Solutions-> VC ++ Directories)
- First, from the “Show Directories for:” list box, select “Include Files” (“Include Files”).
- Click on the Insert New icon and add the following lines:
"C: \ Program Files \ OpenCV \ cv \ include"
"C: \ Program Files \ OpenCV \ cxcore \ include"
"C: \ Program Files \ OpenCV \ otherlibs \ highgui"
"C: \ Program Files \ OpenCV \ cvaux \ include"
"C: \ Program Files \ OpenCV \ otherlibs \ cvcam \ include"
"C: \ Program Files \ OpenCV \ ml \ include"
"C: \ Program Files \ OpenCV \ otherlibs \ _graphics \ include"
"C: \ Program Files \ OpenCV \ otherlibs \ _graphics \ include \ jasper"
The result can be seen in the screenshot.

Next, select “Library files” in the list box and add
following lines:
"C: \ Program Files \ OpenCV \ lib"
"C: \ Program Files \ OpenCV \ otherlibs \ _graphics \ lib"

Then, in the same list box, select “Source Files” and add:
"C: \ Program Files \ OpenCV \ cv \ src"
"C: \ Program Files \ OpenCV \ cxcore \ src"
"C: \ Program Files \ OpenCV \ cvaux \ src"
"C: \ Program Files \ OpenCV \ otherlibs \ highgui"
"C: \ Program Files \ OpenCV \ otherlibs \ cvcam \ src \ windows"
"C: \ Program Files \ OpenCV \ ml \ src"
"C: \ Program Files \ OpenCV \ otherlibs \ _graphics \ src"
four.
When you create a new project using OpenCV, you need to do the following:- In MSVS, select File-> Create-> Project (File-> Create-> Project) and create a console application in VC ++

- In an open project, select: Project-> Properties (Project-> Properties).
- Further Configuration Properties-> Linker-> Input
- And add library names to the “Additional Dependencies” field (Additional dependencies): cxcore.lib cv.lib highgui.lib cvaux.lib cvcam.lib

Remember that when you switch from Debug mode to Release, you will need to re-add the libraries to “Additional dependencies”!
So with the settings complete and we can proceed to the first program!
The first program.
In the first program, we will learn how to create a window, display an image, wait for a keystroke, and close the application.
OpenCV provides opportunities to work with a wide range of image types, as well as video and video streams from cameras. These features are part of the HighGUI library, which is included in the OpenCV package.
Here is the listing of our first program:
#include "stdafx.h"
#include "highgui.h"

int main (int argc, char** argv)
{
IplImage* img = cvLoadImage( argv[1] );
cvNamedWindow( "Example1", CV_WINDOW_AUTOSIZE);
cvShowImage( "Example1", img );
cvWaitKey(0);
cvReleaseImage( &img );
cvDestroyWindow( "Example1" );
}
This program must be run from the command line, passing as the first parameter the path to the image.
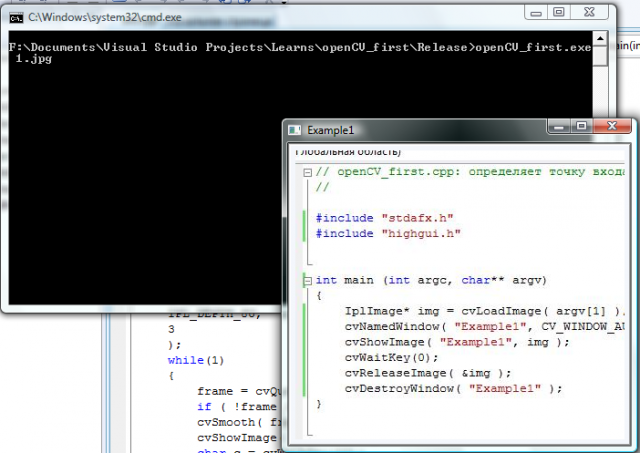
As an image for upload, I chose the screen from the first program.
Consider the principle of operation. When it starts, the program loads the image transmitted by the first argument into memory and displays it on the screen, then waits for any key to be pressed and closes after pressing.
Now we will consider each team separately.
IplImage* img = cvLoadImage( argv[1] );This line directly loads the image. The cvLoadImage () function itself allocates the required amount of memory for an image and can work with a large number of formats, including:
BMP, DIB, JPEG, JPE, PNG, PBM, PGM, PPM, SR, RAS, and TIFF. As a result, it returns a pointer to the image data structure. This structure is called IplImage. We use the cvLoadImage () pointer to work with the image and its data.
cvNamedWindow( "Example1", CV_WINDOW_AUTOSIZE);cvNamedWindow () creates a window that can contain an image. The first parameter we pass the name of the window itself, and the second is its size, the CV_WINDOW_AUTOSIZE flag, which indicates that the window will be the same size as the loaded image. You can pass the second parameter "0" (zero) and then you can resize the window yourself when the program is running.
cvShowImage( "Example1", img );Directly displays the image in the window, the name of which we pass by the first parameter, the second parameter passes the image itself.
cvWaitKey(0);This function stops the program and waits for the key to be pressed, if the function argument is greater than zero, then the program expects this number of milliseconds and continues the program if nothing is pressed. If the argument is zero or less, then the program will wait for the key to be pressed and then continue.
cvReleaseImage( &img );The function frees the memory associated with the image and then sets the img pointer to NULL.
cvDestroyWindow( "Example1" );At the end we close the window and release the allocated memory. In simple programs, the last two actions are not mandatory, since the OS will do everything itself, after closing the program. But do not always rely on it, and for safety it is better to do everything yourself. :)
Thanks for attention.
This is my first post here, I hope that many will like it. ;)
Source: https://habr.com/ru/post/76133/
All Articles