Exponator - extension for viewing EXIF data of photos
 I have long wanted to make an extension that would allow viewing the exposure data of a photograph stored in EXIF. And so, inspired by the post " Creating an extension for Google Chrome " decided to spend time on it.
Link to the extension: Exponator .
Under the cat will be briefly described the process of creation, several pitfalls and asked the question to experienced developers. :-)
First, I attended to searching for a javascript library that would read the EXIF block from jpeg files: there was no desire to reinvent the wheel. Almost immediately, I found what was needed on the Nihigoloc website: http://www.nihilogic.dk/labs/exif/ . In the library, the script goes through all the images, downloads them in binary form, checks for EXIF-data, parses them and adds a new field to the original image. Practically what you need.
')
The second step was the study of documentation and a more detailed reading of the article about the creation of the extension. The extension does not need a button in the address bar, and the settings page at this stage is superfluous. Without thinking twice, I opened the Content Scripts section and proceeded to the third step: I wrote what seemed to be a working code that, oddly enough, did not work.
At the same time, Chrome's debugger (I didn’t even expect him to be so good) didn’t swear at anything: XMLHttpRequest was sent, but there was no answer. I killed about an hour for this, and then I learned that Content scripts cannot access data outside the page’s domain. And photos, for the most part, are hosted on servers other than those on which they are displayed.
The solution was a background page , which is limited only in the extension manifest in the permissions section. If you specify http: // * / there, then from the background page you can send a request to any domain. Manifest piece:
"background_page" : "background.html" ,

"permissions" : [
"http://*/"
],

"content_scripts" : [
{
"matches" : [ "http://*/*" ],
"js" : [ "EXIF.js" , "js.js" ],
"run_at" : "document_start"
}
]

* This source code was highlighted with Source Code Highlighter .
But the solution of one problem entails the appearance of the following: how does the background page exchange data with Content Script? The documentation describes two ways : a one-time request and a connection that can live indefinitely. I needed to send a link to the image to the background page, load it there, and return back the array with the disassembled EXIF data. According to the logic of things, a one-time request is quite suitable for me, but I could not figure out how it works. And the usual connection went right away.
As a result, a message handler was added to the background page, which receives the image address, downloads the image, extracts the necessary data from it, and using the same port, sends it back:
chrome.extension.onConnect.addListener( function (port) {
port.onMessage.addListener( function (imgSrc) {
BinaryAjax(
imgSrc,
function (HTTP) {
var EXIF = EXIF.findEXIFinJPEG(HTTP.binaryResponse);
port.postMessage(EXIF);
}
)
});
});

* This source code was highlighted with Source Code Highlighter .
And in the script of the page a port is created, a link to the image is sent, and when a response message is received, the data array is assigned to the exifdata field:
var port = chrome.extension.connect({name: "exif" });
port.onMessage.addListener( function (oEXIF) {
oImg.exifdata = oEXIF || {};
});
port.postMessage(oImg.src);
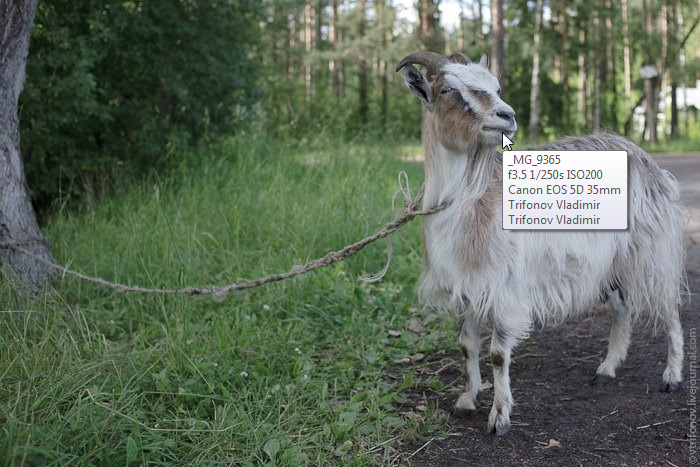
* This source code was highlighted with Source Code Highlighter .Then, the aperture, the shutter speed and the photosensitivity are taken from EXIF and added to the Title of the image:
Question to the audience: is it possible to access the Chrome cache? Does Chrome Cache XMLHttpRequest ? And now every image is downloaded twice: once when the page loads, a second time when EXIF data is received.
Link to the extension: Exponator .
UPD: Some pictures may not work. For some reason, some servers do not allow them to load.
UPD: If desired, the template can be changed in the settings.
UPD: The * character in the template displays all available EXIF fields.
Source: https://habr.com/ru/post/76030/
All Articles