Creating an extension for Google Chrome
 The topic of creating extensions is fairly well disclosed in the network, there are many articles, documentation on this topic . But I did not find a single resource that would describe the process of creating an extension from start to finish. I'm going to fix this situation, and tell you about how to create an extension, how to store, read settings, how to add support for multiple languages.
To work with extensions you will need to switch the update channel to Dev or Beta .
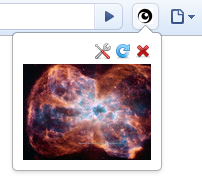
The extension will have a button with an icon on the Chrome toolbar. When you click on the button, a popup window will appear with a random image from the Hubble telescope photo gallery. At the top of the window there will be buttons:
 configure (show settings page),
  update (show another photo),
  close (close the popup window).
The extension will contain a settings page (options) where you can select the interface language (Russian, English) and select the size of the image (small, large).
')

Creating an extension begins with creating a folder in which we will create everything necessary for the operation of the extension files. Create a folder HubblePics. Next, create a file that will contain the description of our extension - manifest.json . This file is required for each extension. It is from it that Chrome gets all the necessary information about the extension (name, version, permissions, extension pages, etc.).
{
"name" : "Hubble pictures extension" , //
"version" : "1.0" , //
"description" : "Hubble pictures extension" , //

"permissions" : [
"tabs" , //
"http://hubblesite.org/*" //
],

"browser_action" : { //
"default_title" : "Hubble" , //
"default_icon" : "images/icon.png" , //
"popup" : "popup.html" //
},

"options_page" : "options.html" //
}

* This source code was highlighted with Source Code Highlighter .
A detailed description of the manifest.json file can be found here.
Settings
Create a settings page - options.html . I will not give the full code of the page, only interesting, in my opinion moments, namely saving, extracting settings and localization.
You can save the settings in the localStorage object, which, in essence, is an associative array storing pairs of "name", "value". For example, to save the state of the “Picture Size - Small” radio button, the code is used:
localStorage[ "previewSmall" ] = document .getElementById( "previewSmall" ). checked ;
To restore condition:
document .getElementById( "previewSmall" ). checked = (localStorage[ "previewSmall" ] == "true" ) ? true : false ;
In my project, I wrapped the call to localStorage in the readProperty function to get rid of unnecessary checks and be able to get the default value:
function readProperty(property, defValue)
{
if (localStorage[property] == null )
{
return defValue;
}

return localStorage[property];
}

//
document .getElementById( "previewSmall" ). checked = readProperty( "previewSmall" , true );

* This source code was highlighted with Source Code Highlighter .
Localization
With the settings figured out, proceed to localization. The method that I propose may not be the best, but at the moment I couldn’t think of anything better. If someone prompts another, simpler option - I will be glad.
The idea is simple - there are a number of elements that need to be translated. They have ids. An associative array or object is created in which the localized text corresponds to the element identifier. The function that deals with localization "runs through" the array, by identifier finds the control and sets the text to it.
Create a file with the name of the elements and the language. The language is “registered” by adding an item to the “Language” drop-down list. For example, the Russian language adds an element to the list with the text “Russian” and the value “ru_RU”.
File \ locale \ en_RU \ options.js
RegisterLang();

lang_ru_RU =
{
lngLanguage: "" , // - (id) ,

lngPreviewSize: " " ,
lngPreviewSmall: "" ,
lngPreviewBig: "" ,

lngSave: "" ,
lngExit: ""
}

function RegisterLang()
{
var ctrl = document .getElementById( "language" );

ctrl.add(createOption( "Russian" , "ru_RU" ));
}

* This source code was highlighted with Source Code Highlighter .
This script is added to the settings page ( options.html )
< script type ="text/javascript" src ="locale/ru_RU/options.js" ></ script >On the page, all localizable elements must have corresponding identifiers, for example:
< span id ="lngPreviewSmall" > Small </ span >Localization is engaged in localization
function getSelectedLanguage()
{
var lang = getSelectedValue( "language" ); // "Language"
return eval( "lang_" + lang);
}

function localize()
{
var lang = getSelectedLanguage();

// lang_ru_RU
for ( var ctrlId in lang)
{
var value = lang[ctrlId];

// id
var ctrl = document .getElementById(ctrlId);

// ,
if (ctrl == null )
{
continue ;
}

// ,
if (ctrl.tagName == "SPAN" )
{
ctrl.innerText = value;
}
else if (ctrl.tagName == "INPUT" )
{
ctrl.value = value;
}
}
}

* This source code was highlighted with Source Code Highlighter .
Now, if we need to add a new language, for example English, we simply create the folder \ locale \ en_US , in it we create the script options.js
RegisterLang();

lang_en_US =
{
lngLanguage: "Language" ,

...

lngExit: "Exit"
}

function RegisterLang()
{
var ctrl = document .getElementById( "language" );

if (ctrl != null )
{
ctrl.add(createOption( "English" , "en_US" ));
}
}

* This source code was highlighted with Source Code Highlighter .
And add the script to the page
< script type ="text/javascript" src ="locale/en_US/options.js" ></ script >Pop-up window
Inside the file popup.html is a simple markup, which provides space for the downloaded image, control buttons and a loading process indicator.
< ul class ="menu" >
< li >< img src ="images/options.png" onclick ="showOptions();" /></ li >
< li >< img src ="images/update.png" onclick ="getPicture();" /></ li >
< li >< img src ="images/close.png" onclick ="closePopup();" /></ li >
</ ul >

< div id ="loader" >
< img src ="images/loader.gif" />
</ div >

< div id ="image" style ="display: none;" >
< a href ="#" id ="hrefPlace" onclick ="return openImage();" >< img id ="imgPlace" /></ a >
</ div >

* This source code was highlighted with Source Code Highlighter .
In general, nothing interesting. All interesting rendered in the file popup.js .
This script, using XMLHttpRequest loads the page hubblesite.org/gallery/wallpaper , finds links to images, selects a random one and displays it in a popup.
xhr = new XMLHttpRequest();

xhr.onreadystatechange = function () {
if (xhr.readyState == 4)
{
if (xhr.responseText)
{
var xmlDoc = xhr.responseText;

var imgs = xmlDoc.match(/http:\/\/imgsrc.hubblesite.org\/hu\/db\/images\/hs-[0-9]{4}-[0-9]{2}-[az]/g);
var hrefs = xmlDoc.match(/gallery\/wallpaper\/pr[0-9]{4,}[az]/g);

if (imgs.length > 0)
{
var randIdx = Math.floor(Math.random() * imgs.length);

var imgSize = "-wallpaper_thumb.jpg" ;

// ?
if (readProperty( "previewBig" , "false" ) == "true" )
{
imgSize = "-640_wallpaper.jpg" ;
}

showImage( "http://hubblesite.org/" + hrefs[randIdx], imgs[randIdx] + imgSize);
}
}
}

xhr.open( "GET" , "http://hubblesite.org/gallery/wallpaper/" , true );
xhr.send( null );

function showImage(url, imgSrc)
{
var imgPlace = document .getElementById( "imgPlace" );
imgPlace.setAttribute( "src" , imgSrc);

var hrefPlace = document .getElementById( "hrefPlace" );
hrefPlace.setAttribute( "href" , url);

displayLoader( false );
}

* This source code was highlighted with Source Code Highlighter .
Installation and packaging expansion
The extension has been created; now you need to upload it to Chrome. Launch Chrome, click the Configure and Manage button
 , select the menu item Extensions .
On the opened tab, click Load Extension ... , specify the path to the folder and, if everything is done correctly, we see a new button on the toolbar.
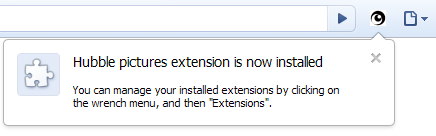
And in the list of extensions we see our extension.
Now we will pack our extension so that it can be put on any resource and any user could download and install it in a couple of clicks. To do this, on the same tab Installed Extensions, click the Pack Extension ... button, specify the path to the folder containing the extension files, leave the Private key file field empty for the first time.

Click OK , we see a message that the extension is packaged.
If we are going to release updated versions of the extension, we will save the created file with the HubblePics.pem key and specify the path to it each time the extension is packaged, otherwise, a new file will be generated each time, which will lead to the appointment of a new identifier for our extension, in turn, instead of updating, the user will install a new copy of the extension.
Extension source archive
Virtually all the information needed to develop extensions is focused on the Google Chrome Extensions: Developer Documentation page. If this seems to be not enough, then you can always take a ready-made extension, change the extension from crx to zip , unpack it and see how it is done “for them”.
Just a source of information, so to speak, first-hand, can be a list of changes when new versions of Google Chrome are released.
Source: https://habr.com/ru/post/75639/
All Articles