How to make Gif - animation in Photoshop: the complete guide
I decided to write this lesson in my blog and duplicate it here due to frequent requests from friends to draw a userbar on the forum. I hope the lesson will be useful to the habrosocommunity
In this tutorial, we will look at the techniques for creating animation in Photoshop using the example of userbar.
So let's get started!
I must say that the lesson is aimed at beginners. Photoshop gurus can stand, smoke, and glimpse (and suddenly missed something interesting =))
Part 1. Creating a userbar
First you need to create a blank for creating animation.
Step 1. Creating a document
Create a new document. I took the size of 350x20.
')
Step 2. Gradient.
Take the Gradient Tool (G) and fill with gradient our future userbar.
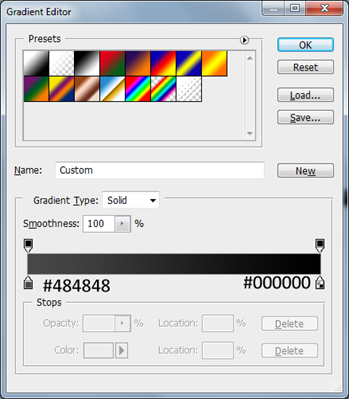
Result:
Step 3. Texture
Next, I decided to add our userser texture.
Drawing carbon texture
To do this, draw a carbon texture that we can use in the future.
Create a new document with the size of 8x8 pixels and paint it as follows. You can take arbitrary shades of gray. The main thing here is order.
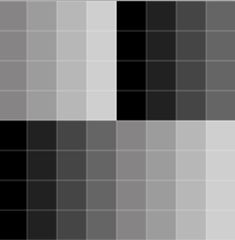
Next, go to the Bleding Options layer with the userbar.
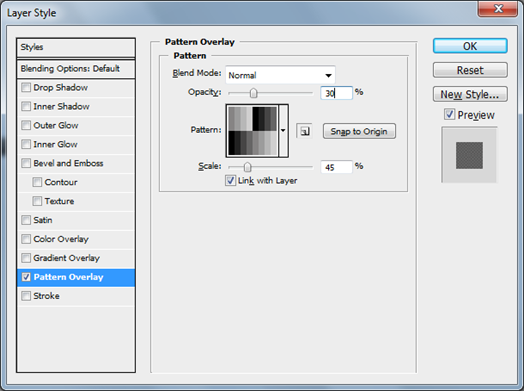
Result:
Step 4. Text.
It remains to add text. For this we need the font Visitor .
Take the Visitor TT1 BRK set the size of 10 points. I wrote “Adobe Photoshop CS4 User”.
Step 5. Frame.
Add a frame. To do this, select the entire userbar using the Rectangular Marquee Tool. Go to Edit -> Stroke and put there:
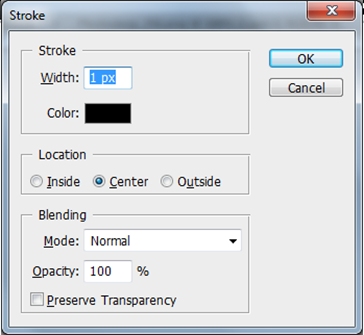
Result:
Part 2. Animation of userbar in photoshop
Step 1. Add an icon to the animation.
Now add an icon and go to the animation.
I added the classic icon of the fourth photoshop and scaled it.
Step 2. Understand the animation palette.
Make her move.
To do this, first configure our workstation by choosing Window> Workspace> Video or simply turning on the Animation palette.
Go to the frame-by-frame animation mode.

We will understand the palette of animation.
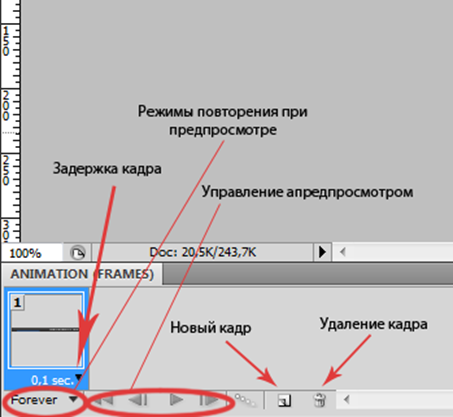
Step 3. We animate userbar.
What's next? Now I select the layer with the icon and move it up a bit, then create a new frame (see step 2). And I repeat until the whole icon scrolls. This is the basic principle of creating animation in Photoshop.
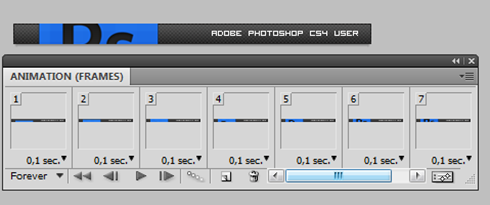
In case of errors, you can delete the frame you didn't like with the delete button (basket).
Also set the desired delay. I put 0.1 seconds on all frames except the last. He has a delay of 2 seconds.
Step 4. Saving to Gif - animation.
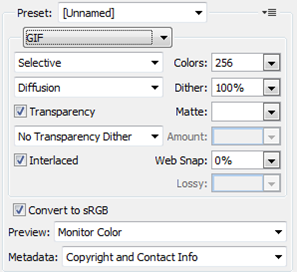
When the animation is ready we must save it. Choose File> Save for Web & Devices ... (Alt + Shift + Ctrl + S) . Select the format of the GIF file.
Conclusion
So, we created a stylish userbar. Then, based on it, we created a gif - animation. And all this means the great and mighty photoshop. Isn't it cool?
UPD: the logic and minus is complicated and confusing ...
Source: https://habr.com/ru/post/75034/
All Articles