Simultaneous use of multiple operating systems with colinux, Virtual PC and Desktops utility
Preamble:
Recently, I have to write a little code, and there is a need to test the results of its work under different platforms. Naturally, I use virtual machines.
Since, besides me, my laptop is also used by the wife, then the main OS on it is winxp. In principle, I don’t care what to work with, so let it be windows ...
Previously, when I used IceWM as my window manager, I liked the fact that I could use several “desktops” to launch various thematic applications in a separate place. Under windows there is also such an opportunity, but the utilities that I tried had some or other disadvantages, so sooner or later I had to refuse them ... In the end, I stopped at Desktops (from sysinternals), it is also not without flaws, but its stability work and small size outweighed all the "cons".
Purpose:
What we are trying to achieve:
- run on each of the "desktops" on a separate operating system
- make switching between them as convenient and fast as possible
')
We will need:
coLinux can be downloaded here (required for running the linux kernel under windows OS)
Virtual PC can be downloaded here (required to run windows under OS windows :)). You can use other virtual machines (at home I use VirtualBox , at work Virtual PC) it doesn’t matter, but the article will talk about Virtual PC.
the linux distribution (I’ll talk about Slackware 12.2 later, because I’m using it)
Putty can be downloaded here to access our virtual machine via ssh
Xming download here , you need to run graphical linux applications via X11 protocol.
Proper installation
Desktops
To begin with, we will install Desktops, everything is simple and clear with it - we download, unpack, run

It seemed to me that the most convenient way to switch between the “tables” as a hot key is to set the win-number.
Virtual PC
The installation process itself is also simple: download, run the installer, then install the desired operating system inside Virtual PC. There is only one nuance to which I wanted to pay attention ... In order for the win-number not to be intercepted by the guest system, it is necessary to adjust the keyboard parameters as shown in the screenshots.
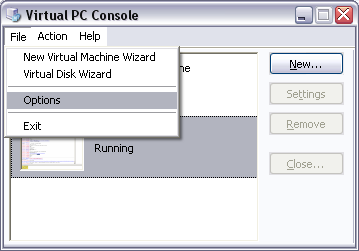
Virtual PC Console ... File \ Options menu item
Next, select the section Keyboard
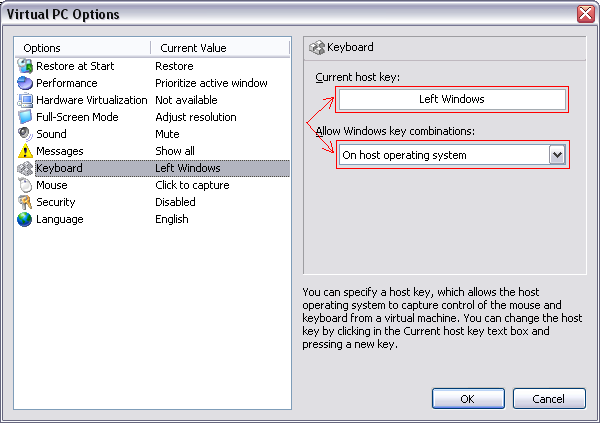
After installing these settings, we can easily switch from the guest system to a win-digit to the desired "desktop"
CoLinux installation
Moving on to a more complex topic - installing the linux distribution inside coLinux.
First you need to install coLinux and.
During the installation of coLinux, you will need to remove the checkbox Root Filesystem image (Download) , since we will download the image you need later. coLinux must be installed in c: \ colinux Next, you need an image of the Linux Slackware 12.2 distribution. You can take it from one of the working "mirrors" (http://slackware.com/getslack/), you need to download the dvd image and place it in the c: \ colinux \ linux \ directory by specifying the file name slack12.iso.
Next, you need to create empty files to connect them as disks.
c: \> fsutil.exe file createnew c: \ colinux \ linux \ hda.img 7000000000
c: \> fsutil.exe file createnew c: \ colinux \ linux \ hdb.img 3000000000
c: \> fsutil.exe file createnew c: \ colinux \ linux \ swap.img 300000000
Now you need to create a file with coLinux launch options in the c: \ colinux \ directory - to directly install Slackware install.conf
kernel = vmlinux
hda = c: \ coLinux \ linux \ hda.img
hde = c: \ coLinux \ linux \ swap.img
hdd = c: \ coLinux \ linux \ slack12.iso
root = / dev / ram load_ramdisk = 1 prompt_ramdisk = 0 ramdisk_size = 10000
initrd = initrd.img
mem = 256
For the subsequent installation of Slackware, during the first run of coLinux, you will need the initrd.img file, it is inside the downloaded distribution image. To extract it from there, you can use the 7zip or winrar archiver. It must be unpacked in the directory c: \ coLinux \ linux \
Slackware installation
After everything is prepared, it is necessary to start the linux installation. From the c: \ coLinux \ directory, execute the following command:
colinux-daemon.exe -t nt install .conf
You will be prompted to select a keyboard layout and enter the user name, you can press 2 times enter. Next, connect the disk with the linux distribution
mount / dev / hdd / floppy
We connect the swap section
mkswap / dev / hde
swapon / dev / hde
We format and connect the main partition to install linux.
mkfs.ext2 -j / dev / hda
to the question of Proceed anyway? (y, n) must answer y
mount / dev / hda / mnt
Next you need to install the necessary packages.
cd / floppy / slackware
installpkg -root / mnt ./a/*.tgz ./ap/*.tgz ./d/*.tgz ./f/*.tgz ./l/*.tgz ./n/*.tgz
After installing all the packages, you need to edit the file / mnt / etc / fstab so that when you next boot all partitions are connected correctly.
You can edit the file as follows.
nano / mnt / etc / fstab
inserting the following lines
  / dev / hda / ext3 ro, noatime 2 2
 / dev / hdb / home ext3 rw, noatime 2 2
 / dev / hdd / media / dvd iso9660 defaults 0 0
 / dev / hde swap swap defaults 0 0
 proc / proc proc defaults 0 0
 devpts / dev / pts devpts gid = 5, mode = 620 0 0
After saving the file, you must turn off the virtual machine with the command:
poweroff
Running coLinux as a service
Now you need to create a file with options for the standard run coLinux in the directory c: \ colinux \
slack.conf
kernel = vmlinux
hda = c: \ coLinux \ linux \ hda.img
hdb = c: \ coLinux \ linux \ hdb.img
hdd = c: \ coLinux \ linux \ slack12.iso
hde = c: \ coLinux \ linux \ swap.img
root = / dev / hda
ro
initrd = initrd.gz
mem = 128
cocon = 120x40
eth0 = tuntap
Next, run the installed Slackware for the first time.
colinux-daemon.exe -t nt slack .conf
If everything went well and the OS was loaded, you must put the following line at the end of the / etc / profile file.
export LANG = en_RU.UTF-8
so that we use UTF-8 as the locale.
You also need to configure the ip address of the guest system, in the /etc/rc.d/rc.inet1.conf file you need to set the IP address, mask and default gateway.
 IPADDR [0] = "192.168.0.2"
 NETMASK [0] = "255.255.255.0"
 GATEWAY = "192.168.0.1"
Reboot
reboot
and run the installed Slackware as a windows service
cd c: \ colinux
colinux-daemon.exe --install-service colinux slack .conf
net start colinux
If you managed to connect to the guest machine via ssh, then you can move on ...
Install X server Xming
Installing and configuring Xming is still pretty simple, but there are a number of not obvious points that I would like to dwell on ...
- The first moment is the X server startup options.
- Second - connect fonts
Now more ...
Connection fonts
If you, like me, want to see and be able to enter Russian text, then you will need to install Cyrillic fonts. It is quite simple to do this, just run in the font directory:
mkfontdir
mkfontscale
The above utilities can be taken from the cigwin kit, or you can simply copy the entire font directory onto the linux machine and execute these commands there.
Catalogs with fonts must be written in the file C: \ Program Files \ Xming \ font-dirs
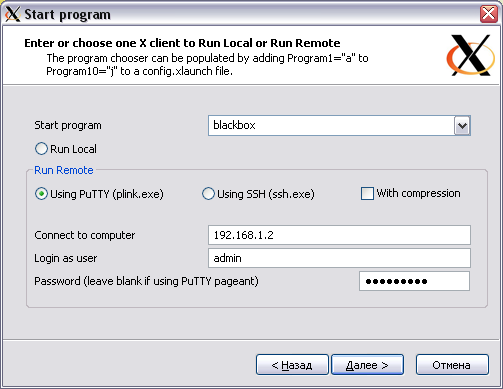
Creating an X Server Connection
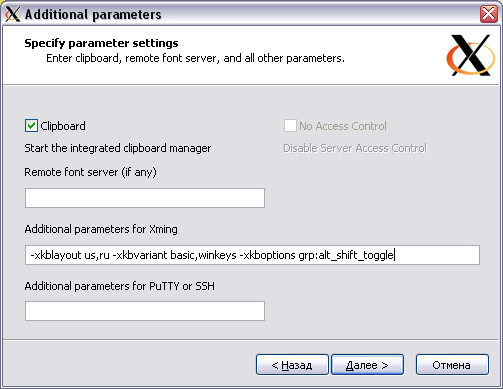
To specify which keyboard layouts will be used and how to switch between them, you must specify them as parameters.
If you need 2 keyboard layouts - Russian and English, and switching by Alt-Shift, then the options will be as follows:
-xkblayout us, ru -xkbvariant basic, winkeys -xkboptions grp: alt_shift_toggle
The screenshots show how to run the X server on a separate “desktop”.
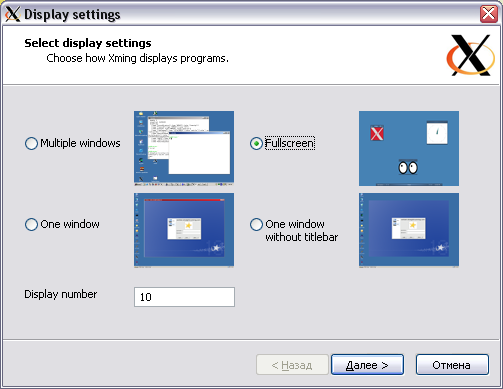
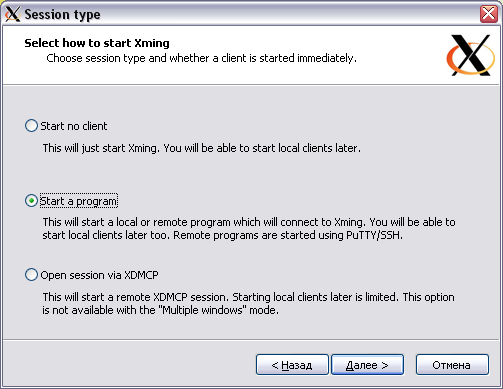
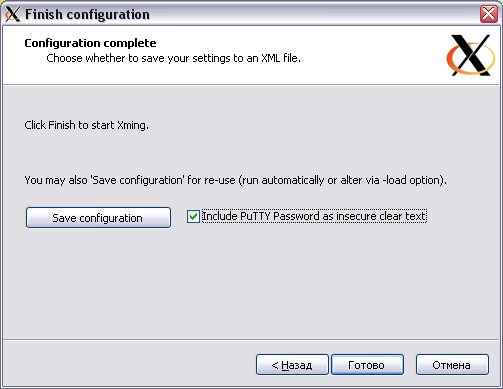
Save the Xming settings file and make a shortcut on the desktop to launch.
We connect all together ...
So we have 4 "desktops"
- on the first, we will run native applications
- on the second we will have a guest virtual OS windows (full screen for all inhuman experiments) deployed in full screen
- the third is a full-screen X-server with linux
After booting the machine, we switch to the second “desktop” (press win-2), launch Virtual PC in full screen. Then we switch to the third “desktop” (press win-3) and launch the connection label to lixux via Xming ...
Now, to switch from the windows environment to linux, just press the win-3 combination to get to the guest machine with windows, press win-2, to return to the main work, press win-1. In this case, everything works in parallel and you can return to the desired OS at any time.
This is how it looks from me:
(first and third "desktops")


PS:
How to set up putty as a tunnel for X11 can be read here is quite intelligibly and clearly stated ...UPD: instead of Desktops use VirtuaWin
Source: https://habr.com/ru/post/74480/
All Articles