WMI what is it and where to start?
First, what is WMI (Windows Management Instrumentation)? This is a technology that, using a single interface, allows you to manage components of both local and remote operating systems.
This material is intended for those who have heard something about WMI, but do not know where to start to pick it. And also on those who did not even suspect the existence of such a convenient tool.
I will not talk about how it works, how this technology works, if any interest arises - information can always be found in MSDN . My goal is to help provide a quick start for those who want to start using this technology.
')
What does applying WMI in practice? Ability to change various parameters of the operating system, manage shared resources, request information about installed devices, running processes, etc.
Who can use WMI? I think everyone. You can use the features of WMI not only from your programs in C #, C ++ and other programming languages, but also create your own scripts that automate the process of collecting information, changing the configuration of a local or remote machine.
For quick familiarization with WMI features, you can download the WMI Code Creator utility (size 122 KB, the utility itself and the source in C # in the archive) from the Microsoft website. This utility allows you to view WMI namespaces, the classes of each namespace, the properties and methods of each class. Plus it generates C #, Visual Basic .NET, Visual Basic Script code.

In order not to get stuck for a long time, I will give an example of obtaining information about the installed processor. In the list of Namespaces (namespace), select root \ CIMV2, in the list of Classes (classes) select Win32_Processor. In the Results list (it lists the class properties), select Name and click Execute Code. In the window that appears, we see the name (or names) of the installed processor.

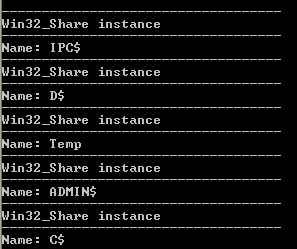
Another example - we will display a list of shared resources. This time, select the Win32_Share class, select Name in the property list, then Execute Code. Got a list of resources.
Let us now close access to some resource, in my case it is Temp. Go to the tab Execute a Method in the class list, select the same Win32_Share, select Delete in the Methods list (class methods), select the Temp folder, Execute Code, if everything was successful, then the Temp folder is no longer in the list of shared resources.

If you lack WMI capabilities, you can always create your own class. An example of creating such a class has already been published on Habré .
That's all, I wish you good luck in the development and application of this technology.
This material is intended for those who have heard something about WMI, but do not know where to start to pick it. And also on those who did not even suspect the existence of such a convenient tool.
I will not talk about how it works, how this technology works, if any interest arises - information can always be found in MSDN . My goal is to help provide a quick start for those who want to start using this technology.
')
What does applying WMI in practice? Ability to change various parameters of the operating system, manage shared resources, request information about installed devices, running processes, etc.
Who can use WMI? I think everyone. You can use the features of WMI not only from your programs in C #, C ++ and other programming languages, but also create your own scripts that automate the process of collecting information, changing the configuration of a local or remote machine.
For quick familiarization with WMI features, you can download the WMI Code Creator utility (size 122 KB, the utility itself and the source in C # in the archive) from the Microsoft website. This utility allows you to view WMI namespaces, the classes of each namespace, the properties and methods of each class. Plus it generates C #, Visual Basic .NET, Visual Basic Script code.
In order not to get stuck for a long time, I will give an example of obtaining information about the installed processor. In the list of Namespaces (namespace), select root \ CIMV2, in the list of Classes (classes) select Win32_Processor. In the Results list (it lists the class properties), select Name and click Execute Code. In the window that appears, we see the name (or names) of the installed processor.
Another example - we will display a list of shared resources. This time, select the Win32_Share class, select Name in the property list, then Execute Code. Got a list of resources.
Let us now close access to some resource, in my case it is Temp. Go to the tab Execute a Method in the class list, select the same Win32_Share, select Delete in the Methods list (class methods), select the Temp folder, Execute Code, if everything was successful, then the Temp folder is no longer in the list of shared resources.
If you lack WMI capabilities, you can always create your own class. An example of creating such a class has already been published on Habré .
That's all, I wish you good luck in the development and application of this technology.
Source: https://habr.com/ru/post/70806/
All Articles