Create an application - "Drum Set"
I think everyone is familiar with drum emulators. Make such an application is quite simple. In this article we will create Bickboxx - the real app from the App Store .
If you want to get an idea of what we do, download Bickboxx from the App Store (for free). Source code can be downloaded here . It can be freely downloaded, reported on problems found - up to creating your own versions with changes that you consider appropriate.
Note: it is not necessary to download the source code to work with the lesson. All screenshots are clickable.
')
Getting started.
Create a new project in Xcode based on View ( based ) and give it the name " Bickboxx ".

Download the zip archive http://a.theappleblog.com/downloads/BickboxxAssets.zip and unzip it. It has everything you need for the Bickboxx app — sounds, images, and icons. Drag all these files into the " Resources " folder.

To copy an object to the project folder, check the box " Copy items into destination group's folder (if needed) ". The settings should look like in the picture. Confirm with the " Add " button.

Add background in interface builder.
Double-click on the BickboxxViewController.xib file to open it in the IB editor. Drag the Image View object ( UIImageView ) from the Library library into the View window, getting a placeholder for the background.

Open the Attributes Inspector window. For the " Image " element, select the " Background.png " option from the list.

Creating a button in IB.
In the " View " window, drag the " Round Rect Button (UIButton) " item .

Go to the " Attributes Inspector " window. The button in the form of an unsympathetic white rectangle does not interest: from the " Type " drop-down menu, select the option " Custom ".

Below in the same window, set the state of the button to " Normal " (or " Default State Configuration " - depending on the version of Xcode ). This is how the button will look like in the idle state.

In the " Image " field, select the option " B Inactive.png " as the button image. Adjust the size of the button in the View window so that it is fully displayed.

Now change the state of the button to the option with highlight " Highlighted " (or Highlighted State Configuration depending on the version of Xcode ). This will look like a button when pressed.

For the image in the " Image " field, select " B Active.png ".
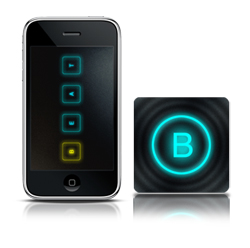
Drag another Round Rect Button ( UIButton ) into the View window and repeat all operations with the letters " E ", " A " and " T ". Now the " View " view should look like this:

While IB editor can be closed.
After completing " Build and Go ", make sure that everything works for now. When you touch the buttons, they should be highlighted.
Add a sound code .
We have an interface that does nothing. Need to fix it. The required sound structure (framework) is not added by default. Add the AudioToolbox framework yourself.
Hold down the < Control > key and click on the " Frameworks " folder on the left. Go to the menu " Add → Existing Frameworks ...".

In the folder " / System / Library / Frameworks " find " AudioToolbox.framework ".

Click on the OK button and add the object to the project.
Open " BickboxxViewController.h " and paste the following code into the file:
#import
#import

@ interface BickboxxViewController : UIViewController {
CFURLRef bNoteFileURLRef;
SystemSoundID bNoteFileObject;
CFURLRef eNoteFileURLRef;
SystemSoundID eNoteFileObject;
CFURLRef aNoteFileURLRef;
SystemSoundID aNoteFileObject;
CFURLRef tNoteFileURLRef;
SystemSoundID tNoteFileObject;
}

@property (readwrite) CFURLRef bNoteFileURLRef;
@property ( readonly ) SystemSoundID bNoteFileObject;
@property (readwrite) CFURLRef eNoteFileURLRef;
@property ( readonly ) SystemSoundID eNoteFileObject;
@property (readwrite) CFURLRef aNoteFileURLRef;
@property ( readonly ) SystemSoundID aNoteFileObject;
@property (readwrite) CFURLRef tNoteFileURLRef;
@property ( readonly ) SystemSoundID tNoteFileObject;

@end

* This source code was highlighted with Source Code Highlighter .
At the top, we refer to " AudioServices.h " from the previously imported " AudioToolbox " structure.
Below is the declaration of properties for the four sounds corresponding to the keys " B ", " E ", " A " and " T "
" bNoteFileURLRef " is a link to the file location for bNoteFileObject . This sound will play the " B " key.
There are also parameters for the sounds " E ", " A " and " T ".
BickboxxViewController.m file
Open " BickboxxViewController.m " - here you need to synthesize getters and setters for parameters.
To do this, after the " @implementation BickBoxxViewController " add the following code:
@synthesize bNoteFileURLRef, bNoteFileObject, eNoteFileURLRef,
eNoteFileObject, aNoteFileURLRef, aNoteFileObject,
tNoteFileURLRef, tNoteFileObject;

* This source code was highlighted with Source Code Highlighter .
Change the viewDidLoad method.
Find the method " viewDidLoad " - it is commented out. To activate the comment characters must be removed.
The method " viewDidLoad " is called after the creation of all components of the user interface. This is a good time for any startup code in the application. In our case, we will use it to bind the parameters to specific sounds.
First we get the main bundle for the application. It allows you to work with a folder hierarchy, organizing and arranging various types of resources for an application, including images, sounds, executable codes, and localized strings.
To call the main bundle of the application, after " [super viewDidLoad]; " add the following code:
// bundle
CFBundleRef mainBundle;
mainBundle = CFBundleGetMainBundle ();

* This source code was highlighted with Source Code Highlighter .
In order for the " B " button to acquire sound, you need a path to the designated audio file for playback. His name is " B.aifc ". The code below asks for a URL to play the found file. Deliver it immediately after the main bundle receiving code.
// ,
AudioServicesCreateSystemSound // URL
bNoteFileURLRef = CFBundleCopyResourceURL (
mainBundle,
CFSTR ( "B" ),
CFSTR ( "aifc" ),
NULL
);ID (bNoteFileURLRef, &bNoteFileObject);

* This source code was highlighted with Source Code Highlighter .
Please note that the system only supports files with extensions .wav , .aif and .caf .
Now, having a set of bNoteFileURLRef , you can bind a sound file to the sound object of the bNoteFileObject system. AudioServicesPlaySystemSound makes it easy to play short sound files.
After the code with the request for the URL of the sound file, add the following code:
// ,
AudioServicesCreateSystemSoundID (bNoteFileURLRef, &bNoteFileObject);

* This source code was highlighted with Source Code Highlighter .
Sound loading for button " B " is complete. It remains to download sounds for the buttons " E ", " A " and " T ".
Try to write the code for this part of the fragment (this is how the " viewDidLoad " method should look like upon completion of the work).
// viewDidLoad , nib-
- ( void )viewDidLoad {
[super viewDidLoad];

// bundle
CFBundleRef mainBundle;
mainBundle = CFBundleGetMainBundle ();

// URL
bNoteFileURLRef = CFBundleCopyResourceURL (
mainBundle,
CFSTR ( "B" ),
CFSTR ( "aifc" ),
NULL
);

//
AudioServicesCreateSystemSoundID (bNoteFileURLRef, &bNoteFileObject);

// URL
eNoteFileURLRef = CFBundleCopyResourceURL (
mainBundle,
CFSTR ( "E" ),
CFSTR ( "aifc" ),
NULL
);

//
AudioServicesCreateSystemSoundID (eNoteFileURLRef, &eNoteFileObject);

// URL
aNoteFileURLRef = CFBundleCopyResourceURL (
mainBundle,
CFSTR ( "A" ),
CFSTR ( "aifc" ),
NULL
);
//
AudioServicesCreateSystemSoundID (aNoteFileURLRef, &aNoteFileObject);

// URL
tNoteFileURLRef = CFBundleCopyResourceURL (
mainBundle,
CFSTR ( "T" ),
CFSTR ( "aifc" ),
NULL
);

//
AudioServicesCreateSystemSoundID (tNoteFileURLRef, &tNoteFileObject);
}

* This source code was highlighted with Source Code Highlighter .
Create your own IBActions.
In order for the BEAT buttons to do something, you need to link them to the IBActions functions. To begin, we declare the methods. Open " BickboxxViewController.h " and add the code below in front of the " @end " line.
- (IBAction)bSound:(id)sender;
- (IBAction)eSound:(id)sender;
- (IBAction)aSound:(id)sender;
- (IBAction)tSound:(id)sender;

* This source code was highlighted with Source Code Highlighter .
Now the BickboxxViewController.h controller should look like this:
#import <UIKit/UIKit.h>
#import <AudioToolbox/AudioServices.h>

@ interface BickBoxxViewController : UIViewController {
CFURLRef bNoteFileURLRef;
SystemSoundID bNoteFileObject;
CFURLRef eNoteFileURLRef;
SystemSoundID eNoteFileObject;
CFURLRef aNoteFileURLRef;
SystemSoundID aNoteFileObject;
CFURLRef tNoteFileURLRef;
SystemSoundID tNoteFileObject;
}

@property (readwrite) CFURLRef bNoteFileURLRef;
@property ( readonly ) SystemSoundID bNoteFileObject;
@property (readwrite) CFURLRef eNoteFileURLRef;
@property ( readonly ) SystemSoundID eNoteFileObject;
@property (readwrite) CFURLRef aNoteFileURLRef;
@property ( readonly ) SystemSoundID aNoteFileObject;
@property (readwrite) CFURLRef tNoteFileURLRef;
@property ( readonly ) SystemSoundID tNoteFileObject;

//
- (IBAction)bSound:(id)sender;
- (IBAction)eSound:(id)sender;
- (IBAction)aSound:(id)sender;
- (IBAction)tSound:(id)sender;

@end

* This source code was highlighted with Source Code Highlighter .
Close the file by opening " BickboxxViewController.m ". In order for IBAction methods to emit certain system sounds, by running the AudioServicesPlaySystemSound method, you must add an implementation.
To play the " B " sound, the implemented method should call " AudioServicesPlaySystemSound " and use the previously created " bNoteFileObject " object. After the synthesizing property of the code, add the following:
- (IBAction)bSound:(id)sender {
AudioServicesPlaySystemSound (self.bNoteFileObject);
}

* This source code was highlighted with Source Code Highlighter .
Similar implementations add for sounds " E ", " A " and " T ".
For example, here is the beginning of the file " BickboxxViewController.m ":
#import "BickBoxxViewController.h" </span>

@implementation BickBoxxViewController

@synthesize bNoteFileURLRef, bNoteFileObject, eNoteFileURLRef,
eNoteFileObject, aNoteFileURLRef, aNoteFileObject,
tNoteFileURLRef, tNoteFileObject;

- (IBAction)bSound:(id)sender {
AudioServicesPlaySystemSound (self.bNoteFileObject);
}

- (IBAction)eSound:(id)sender {
AudioServicesPlaySystemSound (self.eNoteFileObject);
}

- (IBAction)aSound:(id)sender {
AudioServicesPlaySystemSound (self.aNoteFileObject);
}

- (IBAction)tSound:(id)sender {
AudioServicesPlaySystemSound (self.tNoteFileObject);
}

* This source code was highlighted with Source Code Highlighter .
In the last code snippet, we put things in order to prevent memory leaks. At the bottom of the " BickboxxViewController.m " file, add the following lines to the " dealloc " method:
- ( void )dealloc {
[super dealloc];
AudioServicesDisposeSystemSoundID (self.bNoteFileObject);
AudioServicesDisposeSystemSoundID (self.eNoteFileObject);
AudioServicesDisposeSystemSoundID (self.aNoteFileObject);
AudioServicesDisposeSystemSoundID (self.tNoteFileObject);
CFRelease (bNoteFileURLRef);
CFRelease (eNoteFileURLRef);
CFRelease (aNoteFileURLRef);
CFRelease (tNoteFileURLRef);
}

* This source code was highlighted with Source Code Highlighter .
With coding finished. With the command " Build and Go " start the project and check if nothing exploded. While the buttons do not make any sounds - the code must be associated with the interface.
Creating links between buttons and interface in IB.
The code is ready - now you need to tie it to the buttons. To begin with, let's connect the " B " button with the " bsound " method To do this, open the file " BickboxxViewController.xib ".
To associate the " B " button with the " bsound " method, click on the " File's Owner " object while holding down the <Control> key.

The " bSound " element in " File's Owner " drag to the " B " button in the " View " window.

In the menu that opens, select " Touch Down ". By default, the action is performed when the finger is detached from the button. It does not suit us - the decks work on a different principle. The selected option will invoke the bSound IBAction method when the button is pressed.

Set similar links for the remaining buttons. After that, when you click on the " File's Owner " object while holding down the <Control> key, the picture will be next.

Done !!!
You did it! Run the application after compilation.
If you find errors, improve or debug the code, be sure to let me know.
And now let's see how it works:
Source: https://habr.com/ru/post/70800/
All Articles