Windows 7 and Sensor API

One of the coolest features in Windows 7 is the new Sensor (and Location) API. The API is completely native, but we can use it with the .NET Framework if we install the Windows API Code Pack 1.0 .
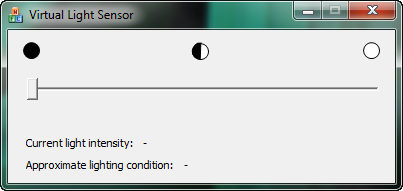
If we want to try testing the Sensor API, we can do it even without a real physical sensor. In the Windows 7 SDK (x86 and x64), you can find the Virtual Light Sensor, a simple application that simulates Ambient Sensor.
The screenshot shows what the program looks like.
')
1) We buy a sensor
If we want to test with a real sensor, you can purchase it on Freescale . Actually, that's how it looks:
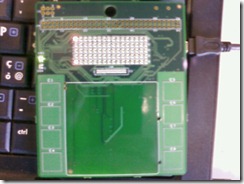
Freescale board has the following sensors:
- Light sensor
- 3D accelerometer
- Two touch strips
2) Firmware update
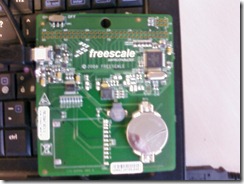
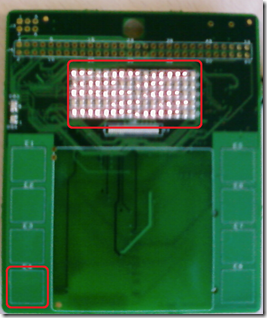
In order to use the device in Windows 7, we need to download the Windows 7 Sensor Development Kit and update the firmware using the instructions from the readme file. To upgrade, connect the device to the system. To do this, following the instructions, we need to touch the E4 button before the display shows "Press E4 to enter bootloader."
In the next image, I selected the display and the E4 button, so I need to touch the button quickly.
3) Test the sensor in Windows 7
If we want to test all sensors, we need to run a test program (SensorDevKitDiagnosticApp.exe) in the tools \ Diagnostic \ Binaries Tool directory with the Win 7 Development kit:

And so, I tested the sensor, but how to have fun next?
4) Install XNA Game Studio 3.0
With CodePlex, we can download some classes that can be used to extend one of the starter kit that comes with the XNA Game Studio. I will not show all the code, I will show only a minimal list of changes that should be done to control the machine using the accelerometer.
1. Install Microsoft XNA Game Studio 3.0 (62 MB)
2. Install Microsoft XNA Racing Game Starter Kit (127 MB)
3. Download the Windows 7 Sensor XNA Racing Game (inside we will find two classes and a dll file).
Now we can create a simple racing Game Project with Visual Studio 2008:
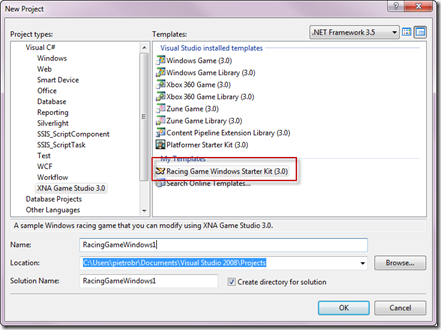
After that, we need to follow the instructions in the CodePlex example.
- add Windows7.SensorAndLocation.dll, which contains a wrapper for the native .NET API
- copy to the Shaders folder, PreScreenSkyCubeMapping.cs (this file is used to change the lighting and sky depending on the sensor readings)
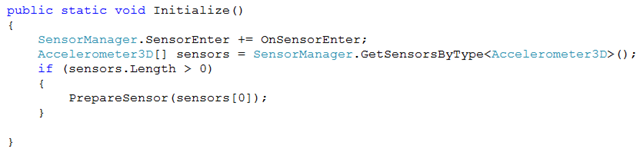
- In the GameLogic folder, replace Input.cs. This file contains the code that receives data from different devices: mouse, keyboard, accelerometer. We can look at the Initialize method, which initializes the sensor and provides acceleration along the X and Y axes, as shown in the code
The code gives three properties:
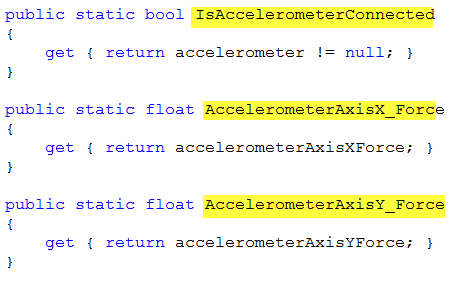
The first is used to check whether the device is connected, and the rest to return the accelerometer values. In my test, I saw a value from -1 to 1.
Now we have the values returned by the accelerometer, but how to use them in the game? First of all, we have to initialize the sensor so that the application knows what to use, then we have to control the acceleration / deceleration of the car, turning it right / left.
- Go to Graphics \ BaseGame.cs and at the end of the BaseGame constructor call Input.Initialize (), which should be initialized to the Accelerometer3D sensor.
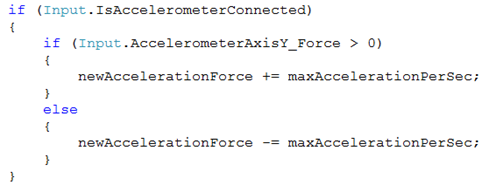
- Go to GameLogic \ CarPhysics.cs and in the Update method we can, for example, control the X axis for turning left and right

I have done some experiments to adjust the sensitivity, but you can change the value of 3.0f for yourself.
In order for the car to accelerate and go forward or backward, I added this code to the same method:
You can download my classes from an example.
5) Enjoy the Windows 7 Sensor API!
The moment has come when we can press F5 and plunge into the game getting the thrill of driving from the accelerometer.

6) For the curious
If you want to know more about this API, watch the video that inspired me.
Source: https://habr.com/ru/post/70691/
All Articles