Creating an installer using WiX. Part 3
This time we will create something more complicated than the installation package from the first article . Learn how to change installation steps and create your own installer dialogs.
Our new installer will include the following steps:
1. Greetings
')
2. Choosing an installation method
3. Selection of components for installation
4. Creating shortcuts
5. Everything is ready for installation
6. Installation process
7. Final dialogue
Two programs will be installed: Notepad and Calculator.
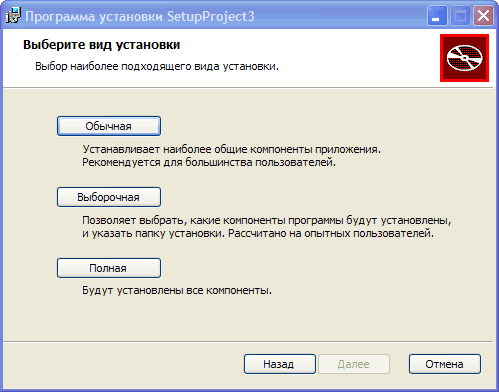
The installer will offer three types of installation: Normal , Custom , Complete . Let's set a condition: if the user chose a normal installation, the Calculator should not be installed, with a full one, both a notepad and a calculator should be installed, with a selective option that the user chose.
To begin with, we will create a new project and immediately add to it support for the Russian language and a link to WixUIExtension .
In the last article I indicated the need to include the file WixUI_ru-ru.wxl in the project, in fact there is no such need, since The file with Russian localization is already included in the current version of WiX. I did not watch, I confess.
This time we will use the WixUI_Mondo set as a set of dialog boxes. Add a link to this set at the end of the Product.wxs file in the < Product > section.
Next, we divide our project into several files. We put the description < Feature > in a separate file Features.wxs . We will also create separate files for the description of the installed Files.wxs files, shortcuts Shortcuts.wxs being created, and we will move the variables to the Variables.wxi file as described in the second article .
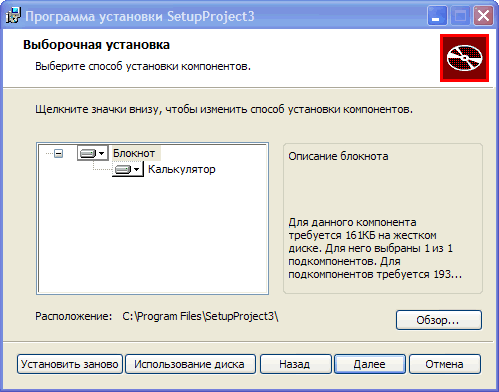
Now add the files to install: notepad and calculator. A notepad will be a mandatory element, a calculator is optional and will be part of the notepad component as shown in the screenshot. Selecting components to be installed.
Add the following code to the Files.wxs file:
We have created a description of two different components so that these components can be included in different options ( < Feature > ) of the installation. Add installation options, for this, add the code to the Features.wxs file:
As you can see, the installation option for FeatureCalc is included with FeatureNotepad, i.e. is dependent and, accordingly, is displayed as a child element in the component selection window for installation.
In the parameters of the < Feature > key, we see such parameters as Title and Description . These parameters are responsible for the name of the component in the component selection tree for installation and its description, which is displayed on the right side of the window when a component is selected. Another interesting point is the ConfigurableDirectory parameter - it sets the directory identifier, the path of which will change when you click the Browse button. In this case, this is the INSTALLLOCATION directory, i.e. the one in which our product will be installed. If you do not specify the value of the ConfigurableDirectory parameter, the user will not be able to change the installation path.
Add a link to the installation options in the Product.wxs file:
It remains to add shortcuts to the Start menu and you can build the first version of the package. To add shortcuts to the Shortcuts.wxs file, insert the code:
Description of labels added, now you need to add shortcuts to the appropriate installation options:
Let's try to collect our project and look at what happened. Options are selected, files are set, but this is not similar to what we planned at the very beginning. There is a license agreement window, which we decided to remove and there is no window for creating shortcuts.
Let's start making changes to the display order of the installation installation windows. To do this, you must either create your own set of dealer windows, or take it as a basis and make your own changes. To save time, download the archive with the WiX sources, unpack it, find the WiXUI_Mondo.wxs file (src \ ext \ UIExtension \ wixlib), rename it to WiXUI_Wizard.wxs . Next, open this file to find the line:
Made to ensure that during assembly we did not receive the error " Duplicate symbol 'WixUI: WixUI_Mondo' found. " Because element with the identifier WixUI_Mondo already exists in the WixUIExtension library the link to which we added to our project.
We include this file in our project. Change the link:
Remove the license agreement from the package. To do this, remove the following lines from the WixUI_Wizard.wxs file:
These lines defined actions when clicking the Next and Back buttons in the license agreement dialog.
Change the line:
This line set the action when you click the Next button in the welcome window. We changed the action and assigned the display of the installation type selection window (SetupTypeDlg) when clicking the Next button.
Row:
This line set the action when you click the Back button in the installation type selection window. We changed the action and set a return to the welcome window by pressing the Back button.
All we did was remove the mention of the window with the license agreement and "jumped" through it, overriding the reaction of the Back and Next buttons. The lines defining the reaction of the Back and Next buttons in the license agreement window could not be removed by redefining the actions of the Next and Back buttons in the welcome dialogs and choosing the installation method, we have already excluded the license dialog from the installation process.
If we now assemble and run the installation package, we will see the same as before, but already without the license agreement window.
Create your own shortcut creation dialog box. Add a new WixUI_Shortcuts.wxs file to the project in which we define the appearance of the new dialog box:
You can create dialogs in two ways: create them yourself by editing the code, or you can use a visual editor, such as Sharp Develop. I did so, taking the SetupTypeDlg.wxs dialog (src \ ext \ UIExtension \ wixlib) as a basis, deleted the excess, added the missing one.
Let's include our new dialogue in the installation process. A new dialog should be displayed following the selection of components for installation, or after the installation type selection dialog if the Normal or Full buttons are pressed. Open the WixUI_Wizard.wxs file and add the following:
Now it is necessary to redefine the response to button presses in the dialogs SetupTypeDlg , CustomizeDlg , VerifyReadyDlg . All together it will look like this (I do not quote unchanged lines):
We collect, we start, we see a new window. One problem, are checkboxes or not - a shortcut on the desktop is not created, in the Start menu is created anyway. Those. no reaction. And all because we tied nothing to these checkboxes. First, add two new properties to the Product.wxs file:
Our checkboxes have the same properties: Property = "SHORTCUT_DESKTOP" and Property = "SHORTCUT_PROGRAMMENU" , hence the connection. If we change the state of the checkboxes in the dialog box, the Property value will also change. Now you need to link the creation of labels and property values. This is done very simply. The condition is added to the component:
If the expression inside the < Condition > key is true, then the component will be installed.
All together looks like this:
Do not forget to add < Condition > for the ShortcutCalc component.
All that's left to do is add the creation of desktop shortcuts. Add a new directory to the Products.wxs file
Description of shortcuts in the Shortcuts.wxs file:
Add links to shortcuts in the Features.wxs file:
Almost done. It remains to fulfill one more condition, with a normal installation, only a notebook should be installed. To fulfill this condition, add < Condition > to < Feature > , which is responsible for installing the calculator.
The Level parameter when using < Condition > inside < Feature > is mandatory. It sets the Level itself </ Feature > if the condition is met. In this case, it is INSTALLLEVEL = 3, the value 3 is set to the property INSTALLLEVEL if the user has selected Normal installation. How did I know this? I looked at the sources for the SetupTypeDlg.wxs installation type selection dialog (by the way, there are a lot of interesting things there, by the way)
A value of 0 for the Level parameter means that the installation option will be disabled.
We collect, run, install.
Project sources can be downloaded here.
That's all. Next time I will talk about CustomActions , a very interesting thing that allows you to add any actions to the installation package.
Our new installer will include the following steps:
1. Greetings
')
2. Choosing an installation method
3. Selection of components for installation
4. Creating shortcuts
5. Everything is ready for installation
6. Installation process
7. Final dialogue
Two programs will be installed: Notepad and Calculator.
The installer will offer three types of installation: Normal , Custom , Complete . Let's set a condition: if the user chose a normal installation, the Calculator should not be installed, with a full one, both a notepad and a calculator should be installed, with a selective option that the user chose.
To begin with, we will create a new project and immediately add to it support for the Russian language and a link to WixUIExtension .
In the last article I indicated the need to include the file WixUI_ru-ru.wxl in the project, in fact there is no such need, since The file with Russian localization is already included in the current version of WiX. I did not watch, I confess.
This time we will use the WixUI_Mondo set as a set of dialog boxes. Add a link to this set at the end of the Product.wxs file in the < Product > section.
< Property Id ="WIXUI_INSTALLDIR" Value ="INSTALLLOCATION" ></ Property >
< UIRef Id ="WixUI_Mondo" />
Next, we divide our project into several files. We put the description < Feature > in a separate file Features.wxs . We will also create separate files for the description of the installed Files.wxs files, shortcuts Shortcuts.wxs being created, and we will move the variables to the Variables.wxi file as described in the second article .
Now add the files to install: notepad and calculator. A notepad will be a mandatory element, a calculator is optional and will be part of the notepad component as shown in the screenshot. Selecting components to be installed.
Add the following code to the Files.wxs file:
< DirectoryRef Id ="INSTALLLOCATION" FileSource ="C:\WINDOWS\system32\" DiskId ="1" >
< Component Id ="ComponentNotepad" Guid ="{7A8E49AD-DDE6-4f82-BC1D-389E2AF2B1CB}" >
< File Id ='Notepad' Name ='notepad.exe' />
</ Component >

< Component Id ="ComponentCalc" Guid ="{0564AAFC-0AC9-4b0b-8ED9-452147CCEFFA}" >
< File Id ='Calc' Name ='calc.exe' />
</ Component >
</ DirectoryRef >

* This source code was highlighted with Source Code Highlighter .
We have created a description of two different components so that these components can be included in different options ( < Feature > ) of the installation. Add installation options, for this, add the code to the Features.wxs file:
< Feature Id ="FeatureNotepad" Title ="" Description =" " Level ="1" ConfigurableDirectory ="INSTALLLOCATION" >
< ComponentRef Id ="ComponentNotepad" />

< Feature Id ="FeatureCalc" Title ="" Description =" " Level ="1" >
< ComponentRef Id ="ComponentCalc" />
</ Feature >
</ Feature >

* This source code was highlighted with Source Code Highlighter .
As you can see, the installation option for FeatureCalc is included with FeatureNotepad, i.e. is dependent and, accordingly, is displayed as a child element in the component selection window for installation.
In the parameters of the < Feature > key, we see such parameters as Title and Description . These parameters are responsible for the name of the component in the component selection tree for installation and its description, which is displayed on the right side of the window when a component is selected. Another interesting point is the ConfigurableDirectory parameter - it sets the directory identifier, the path of which will change when you click the Browse button. In this case, this is the INSTALLLOCATION directory, i.e. the one in which our product will be installed. If you do not specify the value of the ConfigurableDirectory parameter, the user will not be able to change the installation path.
Add a link to the installation options in the Product.wxs file:
< FeatureRef Id ="FeatureNotepad" />
It remains to add shortcuts to the Start menu and you can build the first version of the package. To add shortcuts to the Shortcuts.wxs file, insert the code:
< DirectoryRef Id ="ApplicationProgramsFolder" >
< Component Id ="ShortcutNotepad" Guid ="{29EB41BB-FCFA-4f71-B31A-9B265DA5C05D}" >
< Shortcut Id ="ShortcutNotepad"
Name =""
Description ="$(var.ProductName)"
Target ="[INSTALLLOCATION]Notepad.exe"
WorkingDirectory ="INSTALLLOCATION" />
< RemoveFolder Id ="ApplicationProgramsFolder" On ="uninstall" />
< RegistryValue Root ="HKCU"
Key ="Software\$(var.Manufacturer)\$(var.ProductName)"
Name ="installed"
Type ="integer"
Value ="1"
KeyPath ="yes" />
</ Component >

< Component Id ="ShortcutCalc" Guid ="{C050C54C-F1E9-4fb8-9179-666305ADF489}" >
< Shortcut Id ="ShortcutCalc"
Name =""
Description ="$(var.ProductName)"
Target ="[INSTALLLOCATION]Calc.exe"
WorkingDirectory ="INSTALLLOCATION" />
< RegistryValue Root ="HKCU"
Key ="Software\$(var.Manufacturer)\$(var.ProductName)"
Name ="installed"
Type ="integer"
Value ="1"
KeyPath ="yes" />
</ Component >
</ DirectoryRef >

* This source code was highlighted with Source Code Highlighter .
Description of labels added, now you need to add shortcuts to the appropriate installation options:
< Feature Id ="FeatureNotepad" Title ="" Description =" " Level ="1" ConfigurableDirectory ="INSTALLLOCATION" >
< ComponentRef Id ="ComponentNotepad" />
< ComponentRef Id ="ShortcutNotepad" />

< Feature Id ="FeatureCalc" Title ="" Description =" " Level ="1" >
< ComponentRef Id ="ComponentCalc" />
< ComponentRef Id ="ShortcutCalc" />
</ Feature >
</ Feature >

* This source code was highlighted with Source Code Highlighter .
Let's try to collect our project and look at what happened. Options are selected, files are set, but this is not similar to what we planned at the very beginning. There is a license agreement window, which we decided to remove and there is no window for creating shortcuts.
Let's start making changes to the display order of the installation installation windows. To do this, you must either create your own set of dealer windows, or take it as a basis and make your own changes. To save time, download the archive with the WiX sources, unpack it, find the WiXUI_Mondo.wxs file (src \ ext \ UIExtension \ wixlib), rename it to WiXUI_Wizard.wxs . Next, open this file to find the line:
< UI Id ="WixUI_Mondo" >< UI Id WixUI_Wizard >
Made to ensure that during assembly we did not receive the error " Duplicate symbol 'WixUI: WixUI_Mondo' found. " Because element with the identifier WixUI_Mondo already exists in the WixUIExtension library the link to which we added to our project.
We include this file in our project. Change the link:
on< UIRef Id ="WixUI_Mondo" />
< UIRef Id ="WixUI_Wizard" />
Remove the license agreement from the package. To do this, remove the following lines from the WixUI_Wizard.wxs file:
< Publish Dialog ="LicenseAgreementDlg" Control ="Back" Event ="NewDialog" Value ="WelcomeDlg" > 1 </ Publish >
< Publish Dialog ="LicenseAgreementDlg" Control ="Next" Event ="NewDialog" Value ="SetupTypeDlg" Order ="2" > LicenseAccepted = "1" </ Publish >
These lines defined actions when clicking the Next and Back buttons in the license agreement dialog.
Change the line:
on< Publish Dialog ="WelcomeDlg" Control ="Next" Event ="NewDialog" Value ="LicenseAgreementDlg" > 1 </ Publish >
< Publish Dialog ="WelcomeDlg" Control ="Next" Event ="NewDialog" Value ="SetupTypeDlg" > 1 </ Publish >This line set the action when you click the Next button in the welcome window. We changed the action and assigned the display of the installation type selection window (SetupTypeDlg) when clicking the Next button.
Row:
change to< Publish Dialog ="SetupTypeDlg" Control ="Back" Event ="NewDialog" Value ="LicenseAgreementDlg" > 1 </ Publish >
< Publish Dialog ="SetupTypeDlg" Control ="Back" Event ="WelcomeDlg" Value ="LicenseAgreementDlg" > 1 </ Publish >
This line set the action when you click the Back button in the installation type selection window. We changed the action and set a return to the welcome window by pressing the Back button.
All we did was remove the mention of the window with the license agreement and "jumped" through it, overriding the reaction of the Back and Next buttons. The lines defining the reaction of the Back and Next buttons in the license agreement window could not be removed by redefining the actions of the Next and Back buttons in the welcome dialogs and choosing the installation method, we have already excluded the license dialog from the installation process.
If we now assemble and run the installation package, we will see the same as before, but already without the license agreement window.
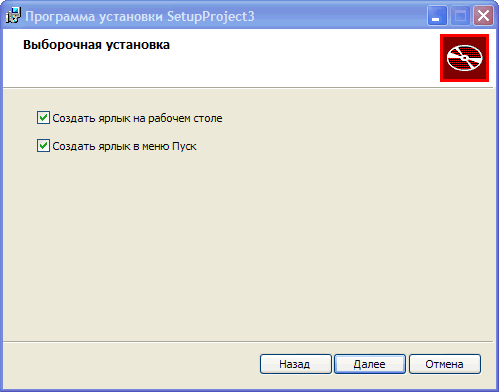
Create your own shortcut creation dialog box. Add a new WixUI_Shortcuts.wxs file to the project in which we define the appearance of the new dialog box:
<? xml version ="1.0" encoding ="UTF-8" ? >

< Wix xmlns ="http://schemas.microsoft.com/wix/2006/wi" >
< Fragment >
< UI >
< Dialog Id ="ShortcutsDlg" Width ="370" Height ="270" Title ="!(loc.WelcomeDlg_Title)" >
< Control Id ="Next" Type ="PushButton" X ="248" Y ="243" Width ="56" Height ="17" Default ="yes" Text ="!(loc.WixUINext)" />
< Control Id ="Back" Type ="PushButton" X ="192" Y ="243" Width ="56" Height ="17" Text ="!(loc.WixUIBack)" />
< Control Id ="Cancel" Type ="PushButton" X ="304" Y ="243" Width ="56" Height ="17" Cancel ="yes" Text ="!(loc.WixUICancel)" >
< Publish Event ="SpawnDialog" Value ="CancelDlg" > 1 </ Publish >
</ Control >

< Control Id ="ShortcutDesktop"
Type ="CheckBox"
Height ="18"
Width ="295"
X ="26" Y ="58"
Text =" "
Property ="SHORTCUT_DESKTOP"
CheckBoxValue ="1" />
< Control Id ="ShortcutProgramMenu"
Type ="CheckBox"
Height ="18"
Width ="295"
X ="26" Y ="79"
Text =" "
Property ="SHORTCUT_PROGRAMMENU"
CheckBoxValue ="1" />

< Control Id ="BannerBitmap" Type ="Bitmap" X ="0" Y ="0" Width ="370" Height ="44" TabSkip ="no" Text ="!(loc.CustomizeDlgBannerBitmap)" />
< Control Id ="BannerLine" Type ="Line" X ="0" Y ="44" Width ="370" Height ="2" />
< Control Id ="BottomLine" Type ="Line" X ="0" Y ="234" Width ="370" Height ="2" />
< Control Id ="Title" Type ="Text" X ="15" Y ="6" Width ="210" Height ="15" Transparent ="yes" NoPrefix ="yes" Text ="!(loc.CustomizeDlgTitle)" />
</ Dialog >
</ UI >
</ Fragment >
</ Wix >

* This source code was highlighted with Source Code Highlighter .
You can create dialogs in two ways: create them yourself by editing the code, or you can use a visual editor, such as Sharp Develop. I did so, taking the SetupTypeDlg.wxs dialog (src \ ext \ UIExtension \ wixlib) as a basis, deleted the excess, added the missing one.
Let's include our new dialogue in the installation process. A new dialog should be displayed following the selection of components for installation, or after the installation type selection dialog if the Normal or Full buttons are pressed. Open the WixUI_Wizard.wxs file and add the following:
< Publish Dialog ="ShortcutsDlg" Control ="Back" Event ="NewDialog" Value ="CustomizeDlg" > 1 </ Publish >
< Publish Dialog ="ShortcutsDlg" Control ="Next" Event ="NewDialog" Value ="VerifyReadyDlg" > 1 </ Publish >

* This source code was highlighted with Source Code Highlighter .
Now it is necessary to redefine the response to button presses in the dialogs SetupTypeDlg , CustomizeDlg , VerifyReadyDlg . All together it will look like this (I do not quote unchanged lines):
<!-- -->
< Publish Dialog ="SetupTypeDlg" Control ="TypicalButton" Event ="NewDialog" Value ="ShortcutsDlg" > 1 </ Publish >
<!-- -->
< Publish Dialog ="SetupTypeDlg" Control ="CompleteButton" Event ="NewDialog" Value ="ShortcutsDlg" > 1 </ Publish >

< Publish Dialog ="CustomizeDlg" Control ="Next" Event ="NewDialog" Value ="ShortcutsDlg" > 1 </ Publish >

<!-- -->
< Publish Dialog ="ShortcutsDlg" Control ="Back" Event ="NewDialog" Value ="CustomizeDlg" Order ="1" >
WixUI_InstallMode = "InstallCustom"
</ Publish >
<!-- -->
< Publish Dialog ="ShortcutsDlg" Control ="Back" Event ="NewDialog" Value ="SetupTypeDlg" Order ="2" >
WixUI_InstallMode = "InstallTypical" OR WixUI_InstallMode = "InstallComplete"
</ Publish >

< Publish Dialog ="VerifyReadyDlg" Control ="Back" Event ="NewDialog" Value ="ShortcutsDlg" > 1 </ Publish >
< Publish Dialog ="VerifyReadyDlg" Control ="Back" Event ="NewDialog" Value ="CustomizeDlg" Order ="1" >
WixUI_InstallMode = "Change"
</ Publish >
< Publish Dialog ="VerifyReadyDlg" Control ="Back" Event ="NewDialog" Value ="MaintenanceTypeDlg" Order ="2" >
WixUI_InstallMode = "Repair" OR WixUI_InstallMode = "Remove"
</ Publish >

* This source code was highlighted with Source Code Highlighter .
We collect, we start, we see a new window. One problem, are checkboxes or not - a shortcut on the desktop is not created, in the Start menu is created anyway. Those. no reaction. And all because we tied nothing to these checkboxes. First, add two new properties to the Product.wxs file:
< Property Id ="SHORTCUT_PROGRAMMENU" > 1 </ Property >
< Property Id ="SHORTCUT_DESKTOP" > 1 </ Property >
Our checkboxes have the same properties: Property = "SHORTCUT_DESKTOP" and Property = "SHORTCUT_PROGRAMMENU" , hence the connection. If we change the state of the checkboxes in the dialog box, the Property value will also change. Now you need to link the creation of labels and property values. This is done very simply. The condition is added to the component:
< Condition > SHORTCUT_PROGRAMMENU </ Condition >
If the expression inside the < Condition > key is true, then the component will be installed.
All together looks like this:
< Component Id ="ShortcutNotepad" Guid ="{29EB41BB-FCFA-4f71-B31A-9B265DA5C05D}" >
< Shortcut Id ="ShortcutNotepad"
Name =""
Description ="$(var.ProductName)"
Target ="[INSTALLLOCATION]Notepad.exe"
WorkingDirectory ="INSTALLLOCATION" />
< RemoveFolder Id ="ApplicationProgramsFolder" On ="uninstall" />
< RegistryValue Root ="HKCU" Key ="Software\$(var.Manufacturer)\$(var.ProductName)" Name ="installed" Type ="integer" Value ="1" KeyPath ="yes" />
< Condition > SHORTCUT_PROGRAMMENU </ Condition >
</ Component >

* This source code was highlighted with Source Code Highlighter .
Do not forget to add < Condition > for the ShortcutCalc component.
All that's left to do is add the creation of desktop shortcuts. Add a new directory to the Products.wxs file
< Directory Id ="DesktopFolder" Name ="Desktop" />
Description of shortcuts in the Shortcuts.wxs file:
< DirectoryRef Id ="DesktopFolder" >
< Component Id ="DesktopShortcutNotepad" Guid ="{9746557B-59B1-46de-B369-5F454A946698}" >
< RegistryKey Root ="HKCU" Key ="YourAppKey\PossibleSubKey" Action ="createAndRemoveOnUninstall" >
< RegistryValue Name ="AnyValueName" Value ="1" Type ="integer" KeyPath ="yes" />
</ RegistryKey >
< Shortcut Id ="DesktopShortcut" Directory ="DesktopFolder" Name ="" Target ="[INSTALLLOCATION]Notepad.exe" />
< Condition > SHORTCUT_DESKTOP </ Condition >
</ Component >

< Component Id ="DesktopShortcutCalc" Guid ="{B4908FF0-96C6-4f12-8E64-BC366E1147E1}" >
< RegistryKey Root ="HKCU" Key ="YourAppKey\PossibleSubKey" Action ="createAndRemoveOnUninstall" >
< RegistryValue Name ="AnyValueName" Value ="1" Type ="integer" KeyPath ="yes" />
</ RegistryKey >
< Shortcut Id ="DesktopShortcut" Directory ="DesktopFolder" Name ="" Target ="[INSTALLLOCATION]Calc.exe" />
< Condition > SHORTCUT_DESKTOP </ Condition >
</ Component >
</ DirectoryRef >

* This source code was highlighted with Source Code Highlighter .
Add links to shortcuts in the Features.wxs file:
< Feature Id ="FeatureNotepad" Title ="" Description =" " Level ="1" ConfigurableDirectory ="INSTALLLOCATION" >
< ComponentRef Id ="ComponentNotepad" />
< ComponentRef Id ="ShortcutNotepad" />
< ComponentRef Id ="DesktopShortcutNotepad" />

< Feature Id ="FeatureCalc" Title ="" Description =" " Level ="1" >
< ComponentRef Id ="ComponentCalc" />
< ComponentRef Id ="ShortcutCalc" />
< ComponentRef Id ="DesktopShortcutCalc" />
</ Feature >
</ Feature >

* This source code was highlighted with Source Code Highlighter .
Almost done. It remains to fulfill one more condition, with a normal installation, only a notebook should be installed. To fulfill this condition, add < Condition > to < Feature > , which is responsible for installing the calculator.
< Condition Level ="0" > INSTALLLEVEL=3 </ Condition >
The Level parameter when using < Condition > inside < Feature > is mandatory. It sets the Level itself </ Feature > if the condition is met. In this case, it is INSTALLLEVEL = 3, the value 3 is set to the property INSTALLLEVEL if the user has selected Normal installation. How did I know this? I looked at the sources for the SetupTypeDlg.wxs installation type selection dialog (by the way, there are a lot of interesting things there, by the way)
< Publish Event ="SetInstallLevel" Value ="3" > 1 </ Publish >
A value of 0 for the Level parameter means that the installation option will be disabled.
We collect, run, install.
Project sources can be downloaded here.
That's all. Next time I will talk about CustomActions , a very interesting thing that allows you to add any actions to the installation package.
Source: https://habr.com/ru/post/70616/
All Articles