Budget petabytes: How to build a cheap cloud storage. part 2
Continued. Start see here
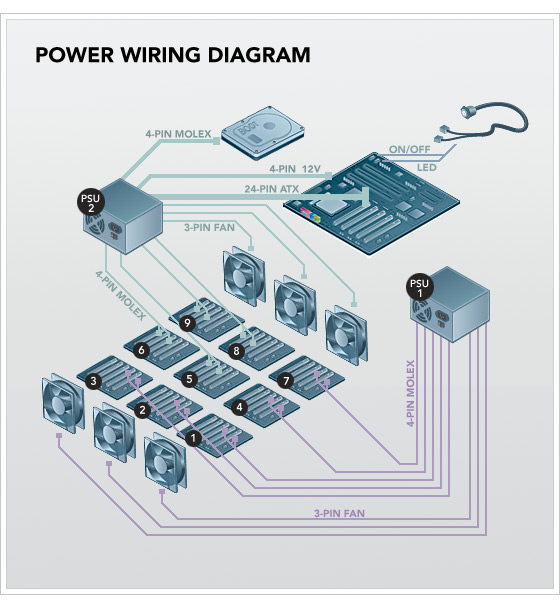
The power distribution layout of the Backblaze storage container is shown below. Power supplies (PSUs) provide most of their power at 2 different voltages: 5V and 12V. We use 2 PSUs in the container, since 45 drives require a lot of 5V-power, while powerful ATX PSUs transfer most of their power through the 12V bus. This is no coincidence: 1500W and more powerful ATX PSUs are designed for powerful 3D video cards that need extra power over a 12V bus. We could prefer 1 server power supply, but 2 ATX power supplies are cheaper.

')
BP1 feeds 3 front fans and breeder panels for ports 1, 2, 3, 4 and 7. BP2 feeds everything else. (For a detailed list of special connectors on each power supply unit, see Appendix A). To power the port multiplier panels, the power cables go from the power supply unit through 4 holes in the separating metal plate on which the fans are held in the center of the case (near the base of the fans) and then to the bottom side of the 9 panels. Each panel of port multipliers on the bottom side has 2 male pins. Hard drives require the most power at the initial spin-up of drives, so if you turn on both power supplies at the same time, there will be a large (14 amp) peak of 120V power from the outlet. We recommend that you first turn on the BP1, wait until the disks spin up (and the power consumption drops to reasonable values), and then turn on the BP2. Fully included, the entire container will consume approximately 4.8 amps when idle and up to 5.6 amps with high loads.
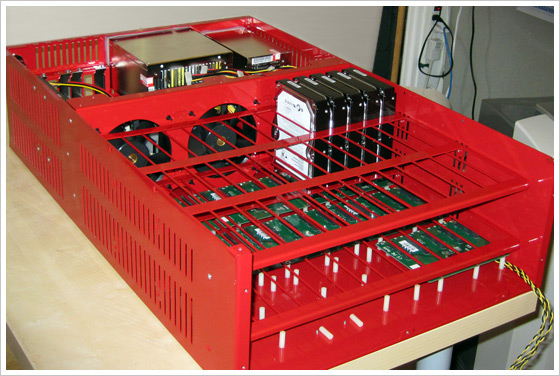
Below is a photo of a partially assembled storage container Backblaze (click on the photo to enlarge). The metal case below has screws facing upwards, to which we attach nylon gaskets (small white things in the photo below). Nylon helps dampen vibration, and this is a critical aspect of server design. The boards shown above the nylon pads are a few of the 9 breeder panels of the SATA ports, which have 1 SATA connector on the bottom, and you can insert 5 hard drives vertically into the top of the boards. All power and SATA cables go under the port breeder panels. One of the panels in the photo below is completely filled with hard drives to show the placement.

A note about the vibrations of the disks: the disks vibrate too much if you leave them standing as shown in the photo above, so we wind the “anti-vibration sleeve” (almost rubber band) around the hard disk, between the red metal grille and the disks. It holds the disc tightly in rubber. We also put a large (40 cm x 42 cm x 3 mm) piece of porous material along the top of the hard drives, after all 45 are inserted into the case. After that, the cap is screwed on top of the porous material to secure the discs. In the future, we will devote a whole blog posting to vibrations.
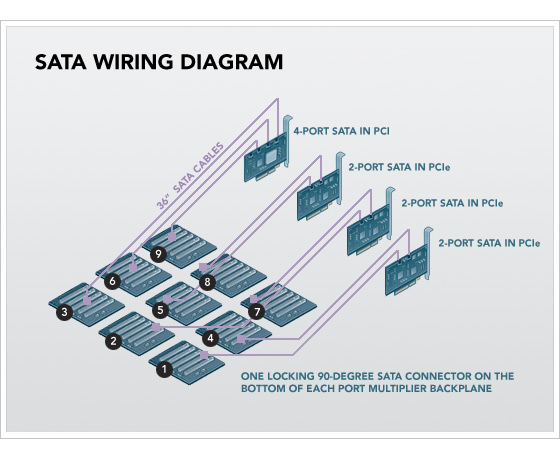
Below is the wiring diagram for SATA cables.

4 SATA boards are inserted into the Intel motherboard: 3 dual-port SYBA boards and 1 four-port Addonics board. 9 SATA cables are connected to the top of the SATA boards and come in tandem with the power cables. All 9 SATA cables have a length of 91 cm and use L-shaped connectors with snaps on the side of the port multiplier panels and straight connectors without snaps on the SATA side.
A note about SATA chipsets: each of the port multiplier boards contains a Silicon Image SiI3726 chip so that 5 drives can be attached to 1 SATA port. Each of the SYBA 2-port PCIe SATA boards contains Silicon Image SiI3132, and the Addonics 4-port PCI cards contain a Silicon Image SiI3124 chip. We use only 3 of the 4 available ports on the Addonics boards, since we only have 9 port breeder panels. We do not use SATA ports on the motherboard, because, despite Intel's statements about supporting port multipliers in their ICH10 Southbridge, we noticed strange results in our performance tests. Silicon Image was a pioneer in port breeder technology, and their chips work best together.
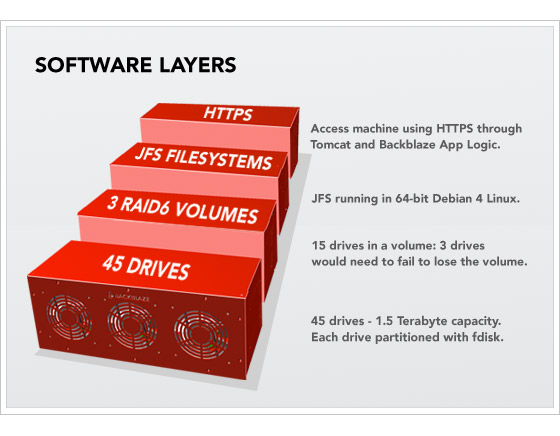
The Backblaze Storage Container is not a complete building block until it loads and is online. Containers work on 64-bit Debian 4 Linux and the JFS file system, and they are self-contained devices, all of which are accessed and accessed via HTTPS. Below you can see a diagram of the layers.

Starting from the bottom, there are 45 hard drives available through SATA controllers. Then we use the fdisk utility in Linux to create 1 partition per disk. Above this, we combine 15 hard drives in 1 RAID6 volume with 2 parity disks (out of 15). RAID6 is created by the mdadm utility. Above this is the JFS file system, and the only access we allow for this fully self-sufficient storage building block is through HTTPS based on a special level of Backblaze program logic in Apache Tomcat 5.5. Taking all this into account, the formatted (available) space is 87% of the raw capacity of hard drives. One of the most important aspects here is that any read / write data to the Backblaze storage container occurs only via HTTPS. There is no iSCSI, neither NFS, nor SQL, nor Fiber Channel. None of these technologies scale so cheaply and reliably, cannot reach these sizes, and is not managed as easily as standalone containers, each with its own IP address, waiting for requests over HTTPS.
We are extremely pleased with the reliability and excellent performance of the containers, and the Backblaze storage container is a completely self-contained storage server. But the logic of where to save data and how to encrypt it, index it, and eliminate duplication is at a higher level (beyond the scope of this posting). When you manage a data center with thousands of hard drives, processors, motherboards and power supplies, you will have hardware failures - this is incontrovertible. Backblaze storage containers are the building blocks on which a larger system can be built that does not allow a single point of failure. Each container in itself is only a large piece of raw storage at a low price; he himself is not yet the "solution."
The first step to building a cheap cloud storage is to have a cheap storage, and above we have shown how to create your own. If all you need is cheap storage, then that is enough. If you need to build a cloud, then you still have to work.
Building a cloud includes not only installing a large amount of hardware, but, importantly, deploying software to manage the hardware. In Backblaze, we have developed programs that eliminate duplication and “cut” data into blocks; encrypt and transmit for backup; reassemble, decode, re-create duplicate blocks and pack data for recovery; Finally, they monitor and manage the entire cloud storage system. This process is our own technology that we have been developing for years.
You can own your own system for this process and embed the Backblaze storage container design, or maybe you are just looking for an inexpensive storage that will not be part of the cloud. In both cases, you can freely use the storage container design described above. If you do this, we would appreciate a link to Backblaze and welcome any insights, although this is not necessary. Please note that since we do not sell the design or the storage containers themselves, we do not provide any support or guarantees.
In the following series: in a few weeks we will talk about iPhone vibration sensors, design of containers like Swiss cheese, why electricity costs more traffic, and more about the design of a large cloud storage.
The design of the storage container Backblaze would not have been possible without a huge amount of help (which was usually asked bluntly) of incredibly intelligent and generous people who answered our questions, worked with us and gave key clarifications at critical moments. First, we thank Chris Robertson for the inspiration to build our own repository and for his early work on prototypes; Kurt Schaefer for advice on metal processing and the concept of "furniture" for printed circuit boards; Dominic Giampaolo of Apple Computer for his tips on hard drives, vibration and certifications; Stuart Cheshire from Apple Computer and Nick Tingle from Alcatel-Lucent for tips on low-level networks; Aaron Emigh (EVP & GM, Core Technology) at Six Apart for his help with the original design; Gary Orenstein for clarifying the reliability of disks and the storage industry as a whole; Jonathan Beck for invaluable advice on vibrations, fans, cooling and housing design; Steve Smith (Senior Design Manager), Imran Pasha (Director of Software Engineering), and Alex Chervet (Director of Strategic Marketing) from Silicon Image, who helped us debug problems with the SATA protocol and loaned 10 different SATA boards for tests; James Lee from Chyang Fun Industries in Taiwan for developing SATA boards to simplify our design; Western Digital's Wes Slimick, Richard Crockett, Don Shields and Robert Knowles for their help in debugging Western Digital disc logs; Christa Carey, Jennifer Hurd and Shirley Evely from Protocase for offering hundreds of small improvements in 3-D hull design; Chester Yeung from Central Computer for locally supplied parts quickly and permanently when it really mattered; Mason Lee from Zippy for tips on power supplies and special cables; as well as Angela Lai for knowing all the right people and presenting them properly.
Finally, we thank thousands of engineers who worked for millions of hours for free so that we could get container components that are either cheap or completely free, such as an Intel processor, Gigabit Ethernet, amazingly dense hard disks, Linux, Tomcat, JFS, etc. We realize that we are standing on the shoulders of giants.
From the translator: Appendix A is in the form of a neat table, which I cannot reproduce using Habr's tools. In addition, to translate into Russian "760 Watt Power Supply", "Qty", "Price", "Total" and "SATA II Cable" is, in my opinion, already overkill. Therefore, please see the original application at the end of the original English posting.
Connecting the Wires: How to Assemble the Backblaze Storage Container
The power distribution layout of the Backblaze storage container is shown below. Power supplies (PSUs) provide most of their power at 2 different voltages: 5V and 12V. We use 2 PSUs in the container, since 45 drives require a lot of 5V-power, while powerful ATX PSUs transfer most of their power through the 12V bus. This is no coincidence: 1500W and more powerful ATX PSUs are designed for powerful 3D video cards that need extra power over a 12V bus. We could prefer 1 server power supply, but 2 ATX power supplies are cheaper.

')
BP1 feeds 3 front fans and breeder panels for ports 1, 2, 3, 4 and 7. BP2 feeds everything else. (For a detailed list of special connectors on each power supply unit, see Appendix A). To power the port multiplier panels, the power cables go from the power supply unit through 4 holes in the separating metal plate on which the fans are held in the center of the case (near the base of the fans) and then to the bottom side of the 9 panels. Each panel of port multipliers on the bottom side has 2 male pins. Hard drives require the most power at the initial spin-up of drives, so if you turn on both power supplies at the same time, there will be a large (14 amp) peak of 120V power from the outlet. We recommend that you first turn on the BP1, wait until the disks spin up (and the power consumption drops to reasonable values), and then turn on the BP2. Fully included, the entire container will consume approximately 4.8 amps when idle and up to 5.6 amps with high loads.
Below is a photo of a partially assembled storage container Backblaze (click on the photo to enlarge). The metal case below has screws facing upwards, to which we attach nylon gaskets (small white things in the photo below). Nylon helps dampen vibration, and this is a critical aspect of server design. The boards shown above the nylon pads are a few of the 9 breeder panels of the SATA ports, which have 1 SATA connector on the bottom, and you can insert 5 hard drives vertically into the top of the boards. All power and SATA cables go under the port breeder panels. One of the panels in the photo below is completely filled with hard drives to show the placement.

A note about the vibrations of the disks: the disks vibrate too much if you leave them standing as shown in the photo above, so we wind the “anti-vibration sleeve” (almost rubber band) around the hard disk, between the red metal grille and the disks. It holds the disc tightly in rubber. We also put a large (40 cm x 42 cm x 3 mm) piece of porous material along the top of the hard drives, after all 45 are inserted into the case. After that, the cap is screwed on top of the porous material to secure the discs. In the future, we will devote a whole blog posting to vibrations.
Below is the wiring diagram for SATA cables.

4 SATA boards are inserted into the Intel motherboard: 3 dual-port SYBA boards and 1 four-port Addonics board. 9 SATA cables are connected to the top of the SATA boards and come in tandem with the power cables. All 9 SATA cables have a length of 91 cm and use L-shaped connectors with snaps on the side of the port multiplier panels and straight connectors without snaps on the SATA side.
A note about SATA chipsets: each of the port multiplier boards contains a Silicon Image SiI3726 chip so that 5 drives can be attached to 1 SATA port. Each of the SYBA 2-port PCIe SATA boards contains Silicon Image SiI3132, and the Addonics 4-port PCI cards contain a Silicon Image SiI3124 chip. We use only 3 of the 4 available ports on the Addonics boards, since we only have 9 port breeder panels. We do not use SATA ports on the motherboard, because, despite Intel's statements about supporting port multipliers in their ICH10 Southbridge, we noticed strange results in our performance tests. Silicon Image was a pioneer in port breeder technology, and their chips work best together.
Storage container Backblaze runs on free software
The Backblaze Storage Container is not a complete building block until it loads and is online. Containers work on 64-bit Debian 4 Linux and the JFS file system, and they are self-contained devices, all of which are accessed and accessed via HTTPS. Below you can see a diagram of the layers.

Starting from the bottom, there are 45 hard drives available through SATA controllers. Then we use the fdisk utility in Linux to create 1 partition per disk. Above this, we combine 15 hard drives in 1 RAID6 volume with 2 parity disks (out of 15). RAID6 is created by the mdadm utility. Above this is the JFS file system, and the only access we allow for this fully self-sufficient storage building block is through HTTPS based on a special level of Backblaze program logic in Apache Tomcat 5.5. Taking all this into account, the formatted (available) space is 87% of the raw capacity of hard drives. One of the most important aspects here is that any read / write data to the Backblaze storage container occurs only via HTTPS. There is no iSCSI, neither NFS, nor SQL, nor Fiber Channel. None of these technologies scale so cheaply and reliably, cannot reach these sizes, and is not managed as easily as standalone containers, each with its own IP address, waiting for requests over HTTPS.
Backblaze Storage Container - Building Block
We are extremely pleased with the reliability and excellent performance of the containers, and the Backblaze storage container is a completely self-contained storage server. But the logic of where to save data and how to encrypt it, index it, and eliminate duplication is at a higher level (beyond the scope of this posting). When you manage a data center with thousands of hard drives, processors, motherboards and power supplies, you will have hardware failures - this is incontrovertible. Backblaze storage containers are the building blocks on which a larger system can be built that does not allow a single point of failure. Each container in itself is only a large piece of raw storage at a low price; he himself is not yet the "solution."
Cloud storage: the next step
The first step to building a cheap cloud storage is to have a cheap storage, and above we have shown how to create your own. If all you need is cheap storage, then that is enough. If you need to build a cloud, then you still have to work.
Building a cloud includes not only installing a large amount of hardware, but, importantly, deploying software to manage the hardware. In Backblaze, we have developed programs that eliminate duplication and “cut” data into blocks; encrypt and transmit for backup; reassemble, decode, re-create duplicate blocks and pack data for recovery; Finally, they monitor and manage the entire cloud storage system. This process is our own technology that we have been developing for years.
You can own your own system for this process and embed the Backblaze storage container design, or maybe you are just looking for an inexpensive storage that will not be part of the cloud. In both cases, you can freely use the storage container design described above. If you do this, we would appreciate a link to Backblaze and welcome any insights, although this is not necessary. Please note that since we do not sell the design or the storage containers themselves, we do not provide any support or guarantees.
In the following series: in a few weeks we will talk about iPhone vibration sensors, design of containers like Swiss cheese, why electricity costs more traffic, and more about the design of a large cloud storage.
Thanks We stood on the shoulders of giants.
The design of the storage container Backblaze would not have been possible without a huge amount of help (which was usually asked bluntly) of incredibly intelligent and generous people who answered our questions, worked with us and gave key clarifications at critical moments. First, we thank Chris Robertson for the inspiration to build our own repository and for his early work on prototypes; Kurt Schaefer for advice on metal processing and the concept of "furniture" for printed circuit boards; Dominic Giampaolo of Apple Computer for his tips on hard drives, vibration and certifications; Stuart Cheshire from Apple Computer and Nick Tingle from Alcatel-Lucent for tips on low-level networks; Aaron Emigh (EVP & GM, Core Technology) at Six Apart for his help with the original design; Gary Orenstein for clarifying the reliability of disks and the storage industry as a whole; Jonathan Beck for invaluable advice on vibrations, fans, cooling and housing design; Steve Smith (Senior Design Manager), Imran Pasha (Director of Software Engineering), and Alex Chervet (Director of Strategic Marketing) from Silicon Image, who helped us debug problems with the SATA protocol and loaned 10 different SATA boards for tests; James Lee from Chyang Fun Industries in Taiwan for developing SATA boards to simplify our design; Western Digital's Wes Slimick, Richard Crockett, Don Shields and Robert Knowles for their help in debugging Western Digital disc logs; Christa Carey, Jennifer Hurd and Shirley Evely from Protocase for offering hundreds of small improvements in 3-D hull design; Chester Yeung from Central Computer for locally supplied parts quickly and permanently when it really mattered; Mason Lee from Zippy for tips on power supplies and special cables; as well as Angela Lai for knowing all the right people and presenting them properly.
Finally, we thank thousands of engineers who worked for millions of hours for free so that we could get container components that are either cheap or completely free, such as an Intel processor, Gigabit Ethernet, amazingly dense hard disks, Linux, Tomcat, JFS, etc. We realize that we are standing on the shoulders of giants.
Appendix A. A detailed list of components for a Backblaze storage container.
From the translator: Appendix A is in the form of a neat table, which I cannot reproduce using Habr's tools. In addition, to translate into Russian "760 Watt Power Supply", "Qty", "Price", "Total" and "SATA II Cable" is, in my opinion, already overkill. Therefore, please see the original application at the end of the original English posting.
Source: https://habr.com/ru/post/68854/
All Articles