Integrating Twitter into iPhone Applications
If you are a developer (most likely, given the fact of reading this article), then, in all likelihood, you already have or should appear on Twitter . Recently, this social network has become so popular that it would be foolish not to integrate Twitter in one way or another into your own iPhone applications.
Making applications more socially oriented with Twitter can be done in different ways. For example, by providing an automatic connection to the network when a certain object is in the game or a victory over a character. In this case, all friends will learn about the achievements of the user, and you like this move will add popularity. By the way, how about creating your own Twitter client (just don’t expect to sell my lesson in the App Store ).
Twitter offers an elementary user interface through which it is easy and simple to interact with the network. In my personal blog, I just publish a series of articles on creating a Twitter client for Mac , the code from which we will partially use .
Before starting, I want to dwell on one more thing: the creation of the interface and the establishment of links with the specifiers " IBOutlet " I will consider very quickly. If something is incomprehensible, it is better to start with simpler lessons.
')
The lesson will be basic: I will show you how to update your own status on Twitter , as well as create an application that works exclusively in landscape orientation - two birds with one stone. Let's start ....

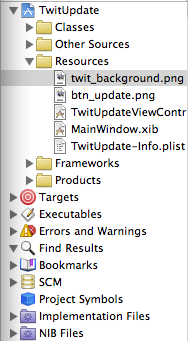
1. Think of a name for the project pozakovyriste (for my, I managed a banal TwitUpdate ). First, create the " IBOutlet " and " IBAction " specifiers. Then we load the images for the lesson and drag them into the " Resources " folder in XCode .


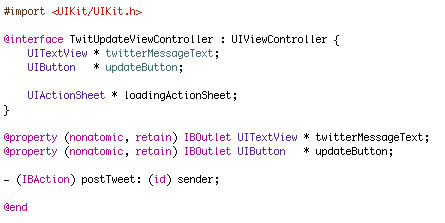
Open the file " TwitUpdateViewController.h " and add the code below:

If desired, variables for " UIButton " can be omitted (I left them in case of experiments with the button). Everything is quite simple: the status in Twitter is entered in the "U ITextView ". To publish status information, call IBAction . Do not forget to synthesize the properties in the file " TwitUpdateViewController.m " or you will be explained with the compiler. Another point presented here is the " UIActionSheet ". When you post a message, it will play the role of the " Loading " screen (Loading ...).
The next step is to open the " TwitUpdateViewController.xib " file.
Those who do not know how to translate Interface Builder into landscape mode, I hasten to reassure - everything is very simple, though not obvious (I personally puzzled all day). You just need to find a small arrow (see photo below) in the upper right corner of the view. Click on it - and it will go into landscape mode.

Now that the interface is in landscape mode, let's get rid of the status bar. By clicking on the view, in the attribute inspector window from the drop-down list for the " Status Bar " element select " None " - get a little more free space on the screen.
Drag the " UIImageView " object onto the view and drag it to full screen. Specify for its attribute " Image " the value " twit_background.png " - and enjoy the beauty of the interface that I personally created! Now we have to add " UITextView ".
With the " UITextView " highlighted , drag the object onto the view and drag it to fit the circle with the message (do not forget to delete the text lorem ipsum inside).
The last element of the interface is the update button. Drag the " UIButton " object onto the view . In the attributes of the button, specify the type " Custom ", and as the image select " btn_update.png ". Note: drag the button already with the updated image. The final interface will look like this:

Connect the twitterMessageText object associated with the " File's Owner " with the " UITextView " and the " updateButton " object with the user button. Do not forget to link the " TouchUpInside " method related to " UIButton " with the " postTweet IBAction ". As a result, when clicking on " File's owner ", the link properties should look like this:

Click to enlarge
Close the IB editor.
We will interact with Twitter through the query " NSMutableURL " and " NSURLConnection ". At this stage, you have two choices to choose from: upload the files below and add them to the working draft, or go here and read about how to create them yourself (recommended version). The fact is that I have already described in detail all the steps in the lesson published in my blog.
If the task is to work out a lesson and move on, download the file, unpack the archive and drag files into the project. To publish the updated status to Twitter , you will have to add code to the files. Open TwitterRequest.h and update the following code:

We added a boolean value that indicates the presence or absence of an HTTP POST request (Twitter uses both POST and GET ). A string corresponding to the POST request is provided. In our case, the value is set to “status = foo” (foo - status update).
A method signature has also been added to update the status. It accepts " NSString " - status text. An explanation of the remaining variables can be found in my lesson at brandontreb.com . Now open " TwitterRequest.m " and add the following code:

We start with the " status_update " method. With some exceptions, it is very similar to the friends_timeline method. First, set " isPost = YES ". Then request body = " status =% @ ", where % @ is the updated status.
Moving on to more complex code. In the request method of our class, you need to add code for HTTP POST (and not GET ). This is how we will tell Twitter the new status. The first step is to set up " HTTPMethod " to request a POST publication. The next step is to configure the " Content-Type " field to inform the network about the type of data being sent. After that, the request body is sent - real data that Twitter will see. The final step is transferring information about the amount of data (in bytes). If all this is not clear, I recommend to get acquainted with additional information on POST and GET .
Uh-f ... We figured it out. Go to the final part of the implementation of the method " postTweet ".
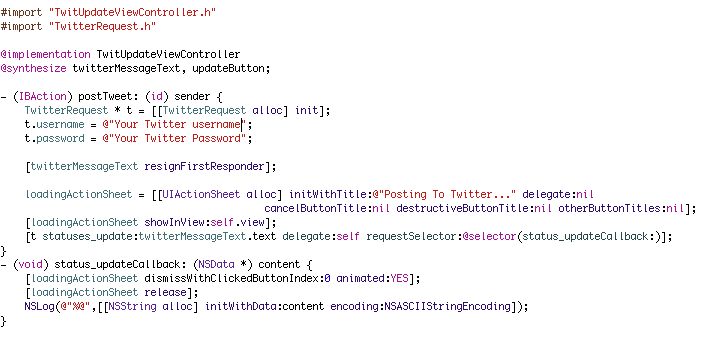
Open the file " TwitterUpdateViewController.m " and add the following code:

Everything is simpler here, since the TwitterRequest class takes the hardest part of the work. Just in case, I remind you that the " postTweet " method is called when you click the " Update " button. Here, first of all, create a new object " TwitterRequest ", set up fields with a username and password. Please note: you need to enter your username and password. Now call the " resignFirstResponder " method on the " UITextView " (to hide the keyboard).
To keep the user up to date with what is happening, let's display a simple list of actions without buttons - with the words " Posting to Twitter ... ". And finally, let's call the " statuses_update " method in the TwitterRequest class.
Now it's up to the Twitter request class, which magically calls the previously specified external call method (" status_updateCallback ") and sends it the data returned by the Twitter network. After that, we immediately release the list of actions, and then output the response from Twitter to the terminal.
The response received from Twitter needs to be analyzed and displayed on the screen or otherwise processed, but this is a topic for another lesson. I will only note that when you enter the wrong username or password, the application will hang on the text " Posting to Twitter ". To solve the problem, refer to the error return method (and again the link to the lesson ).
In the last part of the lesson we will have to transfer the application to landscape mode, as well as hide the status panel. Open the file " TwitUpdate-Info.plist ". Right-click on the table, select " Add Row ". In the " Initial interface orientation " field, set the value to " Landscape " (right or left). Right-click again and check the " Status bar is not hidden " checkbox as shown below:

The file " TwitUpdateViewConroller.m " reacts to the turns of the interface. Uncomment the following method in " TwitUpdateViewConroller.m " and edit as follows:

After that, the performance will be rotated with the iPhone . I hope the lesson was useful - I am waiting for Twitter to integrate into your own applications.
The source code for the lesson can be downloaded here .
Making applications more socially oriented with Twitter can be done in different ways. For example, by providing an automatic connection to the network when a certain object is in the game or a victory over a character. In this case, all friends will learn about the achievements of the user, and you like this move will add popularity. By the way, how about creating your own Twitter client (just don’t expect to sell my lesson in the App Store ).
Twitter offers an elementary user interface through which it is easy and simple to interact with the network. In my personal blog, I just publish a series of articles on creating a Twitter client for Mac , the code from which we will partially use .
Before starting, I want to dwell on one more thing: the creation of the interface and the establishment of links with the specifiers " IBOutlet " I will consider very quickly. If something is incomprehensible, it is better to start with simpler lessons.
')
The lesson will be basic: I will show you how to update your own status on Twitter , as well as create an application that works exclusively in landscape orientation - two birds with one stone. Let's start ....
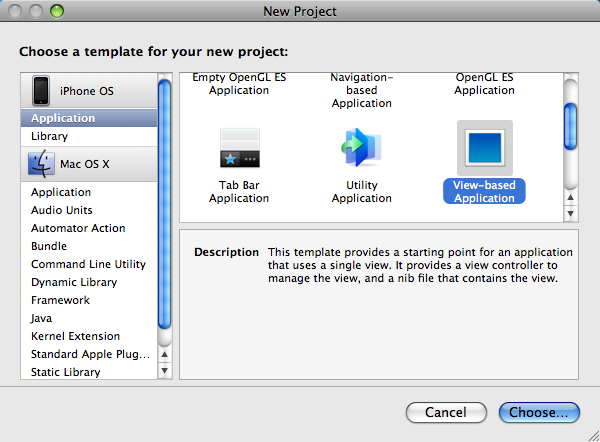
1. Create an application based on the view

1. Think of a name for the project pozakovyriste (for my, I managed a banal TwitUpdate ). First, create the " IBOutlet " and " IBAction " specifiers. Then we load the images for the lesson and drag them into the " Resources " folder in XCode .


2. Set up the “IBOutlet” and “IBAction” qualifiers
Open the file " TwitUpdateViewController.h " and add the code below:

If desired, variables for " UIButton " can be omitted (I left them in case of experiments with the button). Everything is quite simple: the status in Twitter is entered in the "U ITextView ". To publish status information, call IBAction . Do not forget to synthesize the properties in the file " TwitUpdateViewController.m " or you will be explained with the compiler. Another point presented here is the " UIActionSheet ". When you post a message, it will play the role of the " Loading " screen (Loading ...).
3. Create an interface
The next step is to open the " TwitUpdateViewController.xib " file.
Those who do not know how to translate Interface Builder into landscape mode, I hasten to reassure - everything is very simple, though not obvious (I personally puzzled all day). You just need to find a small arrow (see photo below) in the upper right corner of the view. Click on it - and it will go into landscape mode.

Now that the interface is in landscape mode, let's get rid of the status bar. By clicking on the view, in the attribute inspector window from the drop-down list for the " Status Bar " element select " None " - get a little more free space on the screen.
Drag the " UIImageView " object onto the view and drag it to full screen. Specify for its attribute " Image " the value " twit_background.png " - and enjoy the beauty of the interface that I personally created! Now we have to add " UITextView ".
With the " UITextView " highlighted , drag the object onto the view and drag it to fit the circle with the message (do not forget to delete the text lorem ipsum inside).
The last element of the interface is the update button. Drag the " UIButton " object onto the view . In the attributes of the button, specify the type " Custom ", and as the image select " btn_update.png ". Note: drag the button already with the updated image. The final interface will look like this:

Connect the twitterMessageText object associated with the " File's Owner " with the " UITextView " and the " updateButton " object with the user button. Do not forget to link the " TouchUpInside " method related to " UIButton " with the " postTweet IBAction ". As a result, when clicking on " File's owner ", the link properties should look like this:

Click to enlarge
Close the IB editor.
4. Creating a request class for Twitter
We will interact with Twitter through the query " NSMutableURL " and " NSURLConnection ". At this stage, you have two choices to choose from: upload the files below and add them to the working draft, or go here and read about how to create them yourself (recommended version). The fact is that I have already described in detail all the steps in the lesson published in my blog.
If the task is to work out a lesson and move on, download the file, unpack the archive and drag files into the project. To publish the updated status to Twitter , you will have to add code to the files. Open TwitterRequest.h and update the following code:

We added a boolean value that indicates the presence or absence of an HTTP POST request (Twitter uses both POST and GET ). A string corresponding to the POST request is provided. In our case, the value is set to “status = foo” (foo - status update).
A method signature has also been added to update the status. It accepts " NSString " - status text. An explanation of the remaining variables can be found in my lesson at brandontreb.com . Now open " TwitterRequest.m " and add the following code:

We start with the " status_update " method. With some exceptions, it is very similar to the friends_timeline method. First, set " isPost = YES ". Then request body = " status =% @ ", where % @ is the updated status.
Moving on to more complex code. In the request method of our class, you need to add code for HTTP POST (and not GET ). This is how we will tell Twitter the new status. The first step is to set up " HTTPMethod " to request a POST publication. The next step is to configure the " Content-Type " field to inform the network about the type of data being sent. After that, the request body is sent - real data that Twitter will see. The final step is transferring information about the amount of data (in bytes). If all this is not clear, I recommend to get acquainted with additional information on POST and GET .
Uh-f ... We figured it out. Go to the final part of the implementation of the method " postTweet ".
5. Method "postTweet"
Open the file " TwitterUpdateViewController.m " and add the following code:

Everything is simpler here, since the TwitterRequest class takes the hardest part of the work. Just in case, I remind you that the " postTweet " method is called when you click the " Update " button. Here, first of all, create a new object " TwitterRequest ", set up fields with a username and password. Please note: you need to enter your username and password. Now call the " resignFirstResponder " method on the " UITextView " (to hide the keyboard).
To keep the user up to date with what is happening, let's display a simple list of actions without buttons - with the words " Posting to Twitter ... ". And finally, let's call the " statuses_update " method in the TwitterRequest class.
Now it's up to the Twitter request class, which magically calls the previously specified external call method (" status_updateCallback ") and sends it the data returned by the Twitter network. After that, we immediately release the list of actions, and then output the response from Twitter to the terminal.
The response received from Twitter needs to be analyzed and displayed on the screen or otherwise processed, but this is a topic for another lesson. I will only note that when you enter the wrong username or password, the application will hang on the text " Posting to Twitter ". To solve the problem, refer to the error return method (and again the link to the lesson ).
6. Run the application in landscape mode.
In the last part of the lesson we will have to transfer the application to landscape mode, as well as hide the status panel. Open the file " TwitUpdate-Info.plist ". Right-click on the table, select " Add Row ". In the " Initial interface orientation " field, set the value to " Landscape " (right or left). Right-click again and check the " Status bar is not hidden " checkbox as shown below:

The file " TwitUpdateViewConroller.m " reacts to the turns of the interface. Uncomment the following method in " TwitUpdateViewConroller.m " and edit as follows:

After that, the performance will be rotated with the iPhone . I hope the lesson was useful - I am waiting for Twitter to integrate into your own applications.
The source code for the lesson can be downloaded here .
Source: https://habr.com/ru/post/68769/
All Articles