Static libraries in the iPhone SDK
Recently I faced the need to create a static library (static library) in the iPhone SDK. I found that this process is poorly documented, so I offer you a step by step guide to creating and using static libraries in the iPhone SDK.
To describe the process of creating a static library, I used the materials of the article “Building static libraries with the iPhone SDK” and some personal experience.
Starting point: a finished project in which part of the functionality you want to bring into a separate library.
')
1) In your Xcode project in the "Targets" section, right-click to add a new target:

In the window that opens, select the Static Library:

We set a library name, for example TestStaticLib .
2) Transfer the existing .m files to our library. No need to add .h files.

3) Delete the files that we transferred to the library from our project:

4) Add a link to the library in the “General” tab of the properties of our application:

Note: If we change something in the source code of the library, you must first recompile it, and then the application itself. Manual recompiling the library is not necessary if you add the library not to Linked Libraries, but to Direct Dependencies.
5) In the Build tab in the Linking section, add the "-ObjC" flag to "Other Linker Flags" . This is only necessary when your static library defines Objective-C classes that your application will use:

Note: the "-ObjC" flag is not particularly important as long as there is nothing Objective-C specific in the library, but it is worth adding to the library, for example, categories for some class - a run-time exception occurs immediately. The reason is the absence of the -ObjC flag for the linker. This is described in more detail here .
6) Compile the library.
7) Compile the application.
General remarks:
1. After the library has been compiled, the source code can be removed from it.
2. If the library and the application that uses it are compiled for different targets (for example, the library is release for the simulator, the application is debug for the device), then you will surely get a compilation error. In such cases, you need to use several variants of the library or compile for identical targets.
3. As a result of compiling the library, we get a file with the extension .a - this is our static library.
one). Create a new application, for example LinkingLibraryDemo:

2). Add our * .a library (Add-> Existing Files-> Navigate to the file -> Check “Copy items into destination group's folder (if needed)” checkbox):

3). Go to Targets, double click - the Target Info window opens. On the General tab in the Linked Libraries section, you will see the link library.

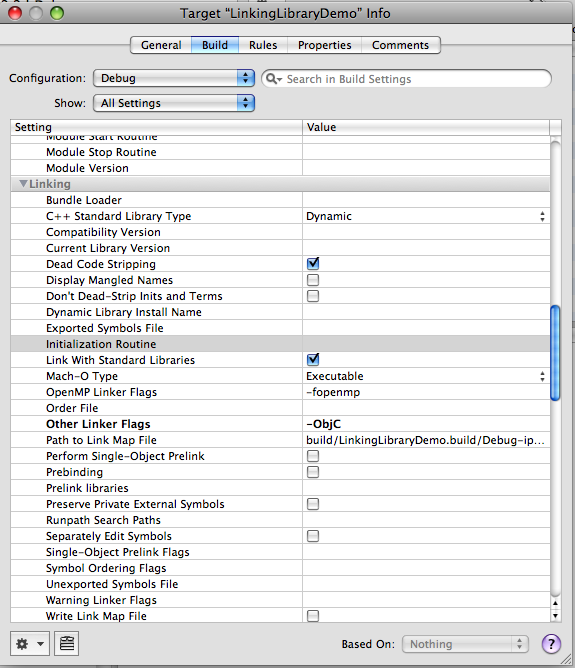
four). In the Build tab in the Linking section, you need to add the "–ObjC" flag to the Other Linker Flags .
five). Add all the necessary * .h files to the project.
After these actions you can use the library.
PS C at first glance it may seem that everything is very simple, but I had to tinker for a long time in order to understand the nuances of working with static libraries. I hope someone this article will help save time.
Thanks for attention!
Creating a static library
To describe the process of creating a static library, I used the materials of the article “Building static libraries with the iPhone SDK” and some personal experience.
Starting point: a finished project in which part of the functionality you want to bring into a separate library.
')
1) In your Xcode project in the "Targets" section, right-click to add a new target:
In the window that opens, select the Static Library:
We set a library name, for example TestStaticLib .
2) Transfer the existing .m files to our library. No need to add .h files.
3) Delete the files that we transferred to the library from our project:
4) Add a link to the library in the “General” tab of the properties of our application:
Note: If we change something in the source code of the library, you must first recompile it, and then the application itself. Manual recompiling the library is not necessary if you add the library not to Linked Libraries, but to Direct Dependencies.
5) In the Build tab in the Linking section, add the "-ObjC" flag to "Other Linker Flags" . This is only necessary when your static library defines Objective-C classes that your application will use:
Note: the "-ObjC" flag is not particularly important as long as there is nothing Objective-C specific in the library, but it is worth adding to the library, for example, categories for some class - a run-time exception occurs immediately. The reason is the absence of the -ObjC flag for the linker. This is described in more detail here .
6) Compile the library.
7) Compile the application.
General remarks:
1. After the library has been compiled, the source code can be removed from it.
2. If the library and the application that uses it are compiled for different targets (for example, the library is release for the simulator, the application is debug for the device), then you will surely get a compilation error. In such cases, you need to use several variants of the library or compile for identical targets.
3. As a result of compiling the library, we get a file with the extension .a - this is our static library.
Using the library in a new application
one). Create a new application, for example LinkingLibraryDemo:
2). Add our * .a library (Add-> Existing Files-> Navigate to the file -> Check “Copy items into destination group's folder (if needed)” checkbox):
3). Go to Targets, double click - the Target Info window opens. On the General tab in the Linked Libraries section, you will see the link library.
four). In the Build tab in the Linking section, you need to add the "–ObjC" flag to the Other Linker Flags .
five). Add all the necessary * .h files to the project.
After these actions you can use the library.
PS C at first glance it may seem that everything is very simple, but I had to tinker for a long time in order to understand the nuances of working with static libraries. I hope someone this article will help save time.
Thanks for attention!
Source: https://habr.com/ru/post/66627/
All Articles