Installing a Google Wave server (FedOne) on a local Windows machine
 I wanted to try the Google Wave Federation Prototype Server (FedOne) and I decided to install it on my laptop running Windows XP SP2.
What for? Well, I already had the experience of comfortable website development on my “local Internet” ( Denwer package includes Apache, PHP, MySQl, etc.). Why not work in the same way with a local wave server, I thought?
Said and done, that's what I did. It took about three hours to do everything, and most of this time was fussing about installing additional software.
The installation procedure of the wave server is described in detail with pictures. There is also a Russian translation of this instruction (made by Ivo Dimitrov aka Darwin).
But installing under Windows has some features that I want to write about.
')
Details - under the cut.
ps If Wave is interested, come to our group “Google Wave Russia” .
A. Required software
I must say that to install the wave server I needed to download:
a1. source for FedOne.
They can be viewed and obtained here .
a1.1. Mercurial
Since the sources are stored in the Mercurial source control system, I had to install the TortoiseHg client program for Windows to download them.
Currently it is version 0.8.1. - TortoiseHg-0.8.1-hg-1.3.1.exe (14.4Mb)
After installation, the TortoiseHg submenu appears in the context menu of Windows Explorer. Create a folder on your disk, place the cursor on it, click the right mouse button and declare this folder as a local repository (repository) of source codes. Then sync it with the FedOne online code repository - in the Repository Settings, select the online code.google.com/p/wave-protocol/source and upload the files. And finally, make a working copy of these codes. To do this, select Clone Repository, specify in which folder to put the source code.
a2. Openfire
This is a real-time, cross-platform, XMPP (Jabber) protocol based, interoperability server.
For Windows, there is currently version 3.6.4 .
There are two options for downloading, I chose the one in which Java RE is included (openfire_3_6_4.exe, 20.9Mb). But you can probably download a more compact (7.49Mb) archive without JRE (and install Java separately in the next step).
a3. Openssl
We need it to create certificates for our server. I took the Windows version of OpenSSL . Namely, the Light version (weighs 1Mb, there is also a 7-megabyte version for software developers, but for our purposes it is now superfluous).
a3.1.Visual C ++ 2008 Redistributables
When installing, it required installing Visual C ++ 2008 Redistributables, I had to download and install this package (1.7Mb) as well. To do this, go to the server Microsoft .
I note that after installing the VCR and rebooting the system, the OpenSSL installer still cursed and assured that VCR was not installed in the system and it would not work without it. But after clicking "OK" everything is fine and set to work.
a4. Java
JavaRE6 was on my system along with Eclipse (possibly updated when installing OpenFire). But when building Ant source codes, the tools.jar file was also required (about 13Mb). He, as it turned out, comes with a package for developers JavaJDK. Well, we will put also JavaJDK.
a4.1. Java jdk
The currently available version of Java6 Update14 (75Mb) is available for download . (You can take it here ).
a5. Java Ant utility to build
I downloaded version 1.7.1. (10Mb).
I had to tinker with Ant for the reason that he, as I wrote above, needed tools.jar. In addition, I work in Windows under the account "Vadim" written in Cyrillic. Accordingly, the directories for this Windows account does with Cyrillic (Russian) names. Ant at the assembly considered these ways erroneous and did not want to collect the project in any way.
I solved this problem by installing the "correct" paths (without the "crocodile") in the variables ANT_HOME, JAVA_HOME, etc. By the way, in the docks it is recommended to install such a string in config.sys to work with long paths: shell = c: \ command.com c: \ / p / e: 32768
Variables in Windows can be set as follows: right-click on the “My Computer” icon, select “Properties”. Advanced tab, Environment Variables button.
B. So now the actual installation of the wave server.
The whole process is divided into four stages:
b1. setting up and running an XMPP OpenFire server
b2. OpenSSL certificate generation
b3. setting wave extension for OpenFire, i.e. actually setting up your copy of the FedOne server and building it
b4. launch server and client to it
Let's go this way:
b1. Installing and configuring the OpenFire server
Setting up OpenFire is probably the easiest part of installing a server. Run the installer and follow the instructions. In English or in Russian .
Therefore, I will not repeat, but for our case there are two subtleties - a) specify " localhost " as the domain of your XMPP server, b) remember the name of the subdomain used by your FedOne (I called it " wave ") and the secret word (shared secret) to him (in my example - " foobar "). We will need this when compiling and running the server.
b2. Certificate Generation
In English described here .
Everything is elementary, Watson. Go to C: \ OpenSSL \ bin \ and run openssl.exe with parameters (see below). It will be necessary to answer a few questions - country code, city name, etc. and get a total of 2 files.
You can make such a genss.bat file:
openssl genrsa 1024 | openssl pkcs8 -topk8 -nocrypt -out %1.key
openssl req -new -x509 -nodes -sha1 -days 365 -key %1.key -out %1.cert
and run it like this: genssl.bat wave, where wave is the name for the generated key and certificate files (wave.cert and wave.key).
We put the generated files in the directory with the source of the wave server.
b3. Compiling server and client
Just go to the server source folder and say: "ant". (You can run the test beforehand - “ant test”).
If you have correctly specified variables and paths, then after compilation you will receive 2 files (fedone-0.2.jar and fedone-client-0.2.jar) in the folder / dist
b4. Run your server and client to it
An exciting moment. :) Make a 2 bat file to run the server run-server.bat and to run the client run-client.bat.
run-server.bat:
java -jar dist/fedone-0.2.jar --client_frontend_hostname=127.0.0.1 --client_frontend_port=9876 --xmpp_component_name=wave --xmpp_server_hostname=localhost --xmpp_server_ip=localhost --xmpp_server_port=5275 --xmpp_server_secret "foobar" --xmpp_server_ping="" --certificate_private_key=wave.key --certificate_files=wave.cert --certificate_domain=localhost --waveserver_disable_verification=trueps A few explanations: “localhost” (our local domain), “wave” (extension name for OpenFire) and “foobar” (secret word) came in handy.
run-client.bat:
java -jar dist/fedone-client-0.2.jar %1@localhost 127.0.0.1 9876Client launch: run-client.bat username, for example: run-client.bat vadbars
So, is everything ready? He said, "Let's go!"
Time. Launch OpenFire. In the tray - a yellow light bulb.
Two. Run the run-server. Dosovsky window with the launch protocol. Look in the messages that the server found OpenFire and connected to it. You can see the same in the admin of the OpenFire (section "Extentions").
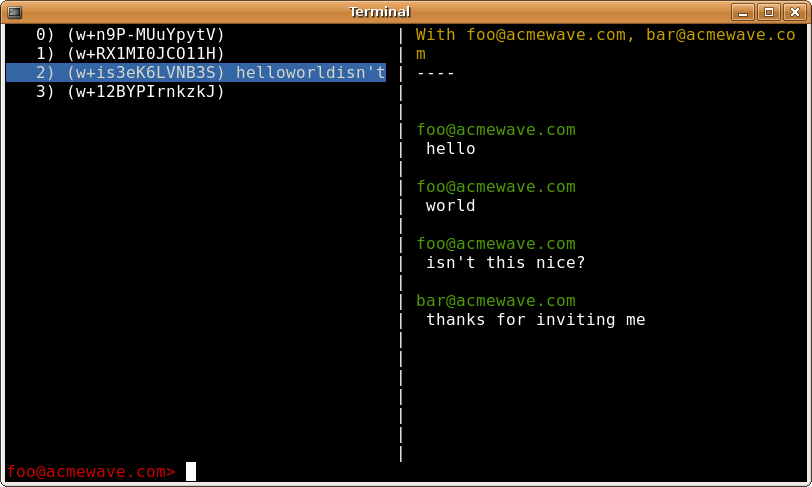
Three. Run the run-client. Also black and white dosovsky window with some obscure icons. And what were you waiting for? :)
You can admire the screenshots . Well, here's one for example at the beginning of this text (in Windows, all this looks even less glamorous, since there is no color, and instead there are text-control codes for the Unix-console, they look like arrows and numbers).
C. Working with waves on your server and with your client
At the moment (August 2009) FedOne supports only a few commands (yes, as long as there is no GUI!):
/ connect user @ domain server port Connect to server: port as a user @ domain member
/ open entry open Open the wave that you have in the Inbox. You must specify the number of the wave (from 0). For example: / open 1
/ new Create and open a new wave
/ add participantId Add a participant to the wave
/ remove participantId Remove a participant from the wave (hehe, this is not yet in the Gogoole Wave Sandbox client! Our server is cooler. :)
/ quit shut down client
Voila Now you can drive a wave by running several clients with different participants, and then go on to explore the source code of FedOne to make something of your own. For example, some kind of gui interface to it. Good luck!
If Wave is interested - come to our group “Google Wave Russia” .
Source: https://habr.com/ru/post/65984/
All Articles