Installing Google Wave Server (Prototype)
Introduction
Installing the source code of Google Wave Federation Prototype Server
The source code of the Wave Federation Prototype Server is supplied as a Java application, which corresponds to XEP-0114, and is a Jabber Component Protocol (component of the Jabber protocol). In the example below, we will show how to install the Wave Federation Prototype Server as a plugin for an Openfire XMPP server, but it should also work with any XEP-0114 compatible server.

To run a prototype server, you must first install an Openfire server. This Openfire server instruction describes the steps for a Debian (Ubuntu) system and if you have any problems or questions regarding the installation, then contact the Openfire community on their website.
Preliminary information
Openfire and Wave Federation Prototype Server are Java-developed, so you need to make sure you have Java installed on your machine. Although WFPS should work on any system with Java 6, this instruction describes the steps only for Debian (Ubuntu) systems.
')
Mac osx
For Mac OSX, install Java 6 from http://developer.apple.com/java/download/ .
After installing Java, you need to create environment variables:
$ export JAVA_HOME=/System/Library/Frameworks/JavaVM.framework/Versions/1.6.0/Home
$ export PATH=$JAVA_HOME/bin:$PATH
Now go to the Openfire website and download the Mac OSX version of Openfire.
Debian / Ubuntu
Install Java 6:
$ apt-get install sun-java6-jre sun-java6-fontsNow download and install the Openfire server:
$ wget www.igniterealtime.org/downloadServlet?filename=openfire/openfire_3.6.4_all.deb
$ sudo dpkg -i openfire_3.6.4_all.deb
$ sudo /etc/init.d/openfire restart
Openfire configuration (all platforms)
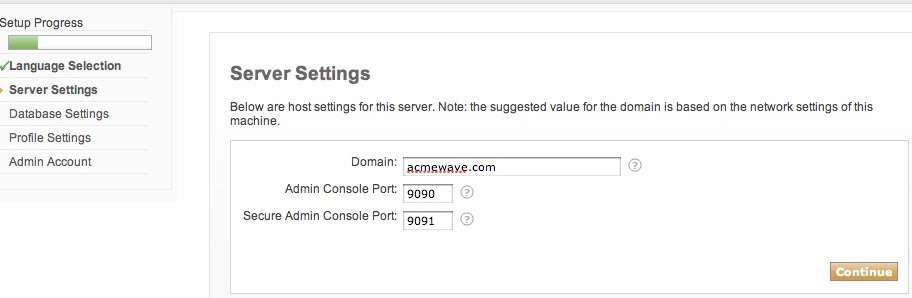
After installing the Openfire server, go to http: // localhost: 9090 in your browser. Replace the domain with yours if you are installing on a non-local computer. The entire installation process will occur through the wizard and we will set the default values for simplicity.

Openfire Wave Plugin Configuration
Restart the server after setting is completed. On Debian / Ubuntu, this is done like this:
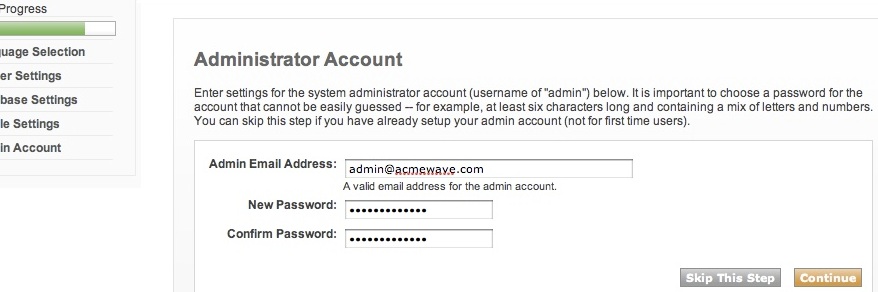
$ sudo /etc/init.d/openfire/restartAfter restarting the server, log in to Openfire as 'admin' and the password you specified.
Then go to Server -> Server Settings -> External Components.
Enable external add-ons on port 5275 and select a secret word to share this component. Click Save. Now add 'wave' as a trust component. To do this, write the subdomain 'wave' and write again the secret word that you wrote before. The port number and secret word are used to connect the Wave add-on.

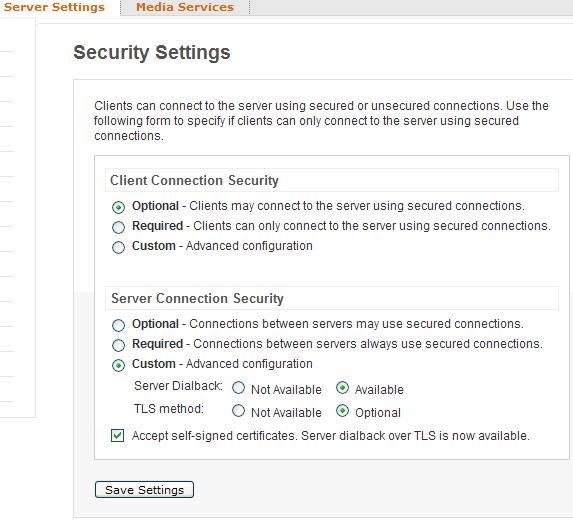
Now we go to Server -> Server Settings -> Security Settings. For “Server Connection Security”, select “Custom” and enable “Server Dialback”. Also check that the “Accept self-signed certificates” box is checked.
Protection
The following changes are optional, but if you need good protection, this will be good practice.
Go to Server -> Server Settings -> Registration and Login. Turn off "Inband Account Registration". Turn off "Change Password". Turn off "Anonymous Login"
Turn on the compression in “Compression Settings”
Turn off the proxy in the “File Transfer Settings”
Installing the Wave add-on
Now download Federation Prototype Server and extract all the content. You can download from the project page or from Yandex.Disk .
To run the extension, you will need some of the parameters that you used to configure your Openfire server. This is the port number, the secret word, the server name and, finally, the name of the component, which we have is 'wave'.
Wave server requires a number of certificates used for signing. For more information, see the Wiki page.
Edit the run-server.sh script with the correct settings. Explanation of arguments:
client_frontend_hostname ip to which the client will connect
client_frontend_port port to which the client will connect
xmpp_server_hostname XMPP server host (for example gogola.org)
xmpp_component_name is an XMPP component of the Wave server. In our case, "wave"
xmpp_server_ip Address of the XMPP server, where we have a wave component
xmpp_server_port The port of the XMPP server, where again, our component
xmpp_server_secret secretly lovo component
xmpp_server_ping Ping server after connecting? If empty, it will not ping
certificate_domain The domain of the certificate that we used to create it
certificate_files certificate file. (yfghbvth username.cert)
certificate_private_key Certificate private key (PKCS # 8-PEM) (for example, username.key)
waveserver_disable_verification Check certificate? true - yes, flase - no
After you edit the server script, you will need to compile the server and run it:
$ ant dist
$ run-server.sh
Client launch
Edit the run-client.sh script (see the parameters inside the script), then run it:
$ run-client.sh usernamePS Please do not strictly judge for grammatical errors, as well as for translation errors. I'm still learning =)
Cross-post blog Development for Google Wave
Google Wave Russia Group
Source: https://habr.com/ru/post/65964/
All Articles