Principles of iPhone Software Development Using an Accelerometer
The article describes the principles of operation of the iPhone accelerometer, shows examples of applications that use an accelerometer as the main component, and advised on the use of an accelerometer. It also shows how to use the accelerometer in web applications. Some of the materials were taken from the article " Scrolling with an accelerometer ."
Turn to Wikipedia :
Apple is not the first company to incorporate an accelerometer into a mobile phone, but the first to succeed.
Before moving on to the technical part, we will look at ready-made applications that use an accelerometer.
')
With iBeer you can drink virtual beer:
iBoobs is a program that did not pass the censorship department at Apple.
An overview of other programs can be viewed at the links below.
The acceleration sensor inside the iPhone uses three elements: a silicon body, a set of silicon springs and an electric current. Silicon springs determine the position of the silicon body using an electric current. When the iPhone is rotated, an electric current oscillating through the silicon springs occurs. The acceleration sensor captures these vibrations and tells the iPhone about the necessary changes in the picture on the display.
iPhone uses the MEMS motion sensor 3-axis - ± 2g / ± 8g smart digital output piccolo accelerometer , the specification for which can be downloaded from here .
At rest, when the device does not move, the magnitude of the measured acceleration is equal to the force of gravity and is taken as a unit. The ratio of the magnitudes of the projections of this force on the coordinate axes gives us the angles of rotation of the device in space. If the iPhone is in motion, then the amount of acceleration with which the device accelerates can be calculated by means of additional transformations based on the values of the projections.
Note that this is the acceleration, not the speed of the device. That is, if your iPhone starts to fall to the ground, then the projections of the magnitude of the acceleration will take the value 0 on all axes - your iPhone will be in weightlessness :) And if you rise with due acceleration on the elevator up, the value of gravity will increase for the time of acceleration.
Just want to note that the coordinates X, Y, Z do not show the coordinates (position) of the device in space, as one would assume. In fact, they mean the following:

Coordinate Axis iPhone Accelerometer
For the case of an arbitrary orientation of the iPhone, the data on the magnitude of the acceleration are distributed along the axes according to the projection of the acceleration vector.

Calculate the vector for an arbitrary position iPhone
All the necessary information is accumulated by an object of the UIAcceleration class, which returns data on all axes, as well as a time marker, allowing to determine the relative measurement time of the specified
quantities It is impossible to directly approach the data of this class, this information can only be obtained through the delegate UIAccelerometerDelegate , which provides for the implementation of a single method
accelerometer: didAccelerate : to which the object of class UIAcceleration is returned . Delegate assignment and initialization of accelerometer: didAccelerate: method calls is done using the UIAccelerometer class.
In order to connect the accelerometer, it is necessary to write the following code in the applicationDidFinishLaunching method:
The setUpdateInterval method sets the refresh rate for data, kUpdateFrequency is a factor that indicates how often you need to receive data.
For example, in the case of #define kUpdateFrequency 60.0 we get 60 “polls” per second.
In addition, the UIAccelerometerDelegate protocol must be specified in the header file of your delegate’s class:
Accelerometer processing logic needs to be added to the didAccelerate method in the delegate class:
Remarks:
Accelerometer setting:
To stop getting values, call the following code:
Geometrically, you can show the operation of the accelerometer as follows:
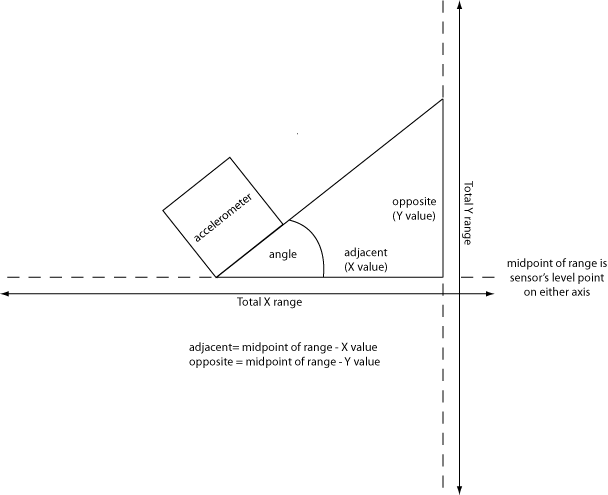
The figure shows that the angle can be calculated using the arctangent function, i.e.
float angle = atan2 (y, -x);
The position of the accelerometer can be viewed in the figure:

Using information about the angle of rotation, you can change the orientation of the screen:
Download the sample application here .
Let’s take as a reference point the position of our device in space, at which the angle between the back wall and the ground is 45 degrees. In this case, the projection of gravity on the Y-axis will be -0.7. If we deflect the device a little closer to the vertical position, then we assume that when we reach an angle of 30 degrees from the vertical, we should turn the list to the end. Conversely, when the angle is 30 degrees or less from the horizontal position, we must turn the list to the top.
In the first case, the absolute value of the projection of gravity on the Y axis, directed along the vehicle, will be equal to 0.86. Those who did not understand where this value came from, recall the geometry and the calculation of the projection on the axis of coordinates of a vector of unit length. In the second case, the same value is 0.5. To implement scrolling, we'll use the scrollToRowAtIndexPath method: atScrollPosition: animated: of the UITableView class.
Basically, two filters are used - high-pass ( high-pass ) and low-pass ( low-pass ). These filters can be used to filter out the effects of “jitter”,
slow corners, etc.
The low-pass filter is used to find the orientation of the device, the high-frequency filter is used to determine the shaking.
The simplest low-pass filter implements the following code:
The simplest high-frequency filter implements the following code:
Excellent program for the study of the operation of the accelerometer - shows the change in values in three coordinates. You can download from the official Apple site.
In normal mode it displays exactly the information that it receives. You can also use filters that will cut off ordinary turns, and only respond to shaking (which, in general, is necessary in real applications).

iBells (link to appstore) is an entertainment program that responds to the user's actions and plays the sound of bells.
Being the developers of this program, we needed to solve such problems:
Correct response to shaking can be achieved using a high-pass filter:
kFilteringFactor is the coefficient for “silencing” the reaction to random fluctuations. This parameter must be selected individually depending on the requirements.
The interval is measured simply:
The lastPlayedTime variable fixes the time of the last playback, minTimeDelta is the minimum interval after which a music file can be played.
Recently, I found another way to identify shaking:
A new onorientationchange method has been added to Safari that works when the position changes by 90%. Below is the javascript code with which you can change the position (orientation) of a web page.
Examples of the web page can be found here and here .
For obvious reasons, testing applications in the simulator is not possible. For this you need to use a real device.
Under the link you can see (and download here), as all the same, you can transfer data to the simulator. But, since it still uses the actual device, practical
there is no use for it. Just for fun.
PS The author of the article is Alexander Krakovetsky ( sashaeve ),please give him an invite, thanks to Speakus for an invite.
What is an accelerometer?
Turn to Wikipedia :
Accelerometer (from lat. Accelero - accelerating and μετρέω - measuring) - a device that measures the projection of apparent acceleration. The apparent acceleration is the resultant force of a non-gravitational nature, acting on the mass and related to the magnitude of this mass. The accelerometer can be used both for measuring the projections of absolute linear acceleration, and for indirect measurements of the projection of gravitational acceleration. The last property is used to create inclinometers. Accelerometers are part of the inertial navigation systems, where the measurements obtained with their help integrate, obtaining the inertial speed and coordinates of the carrier. Electronic accelerometers are often embedded in mobile devices (in particular, in telephones) and are used as pedometers, sensors for determining position in space, automatic display rotation, and other purposes. In game consoles, accelerometers are used to control without using buttons — by turning in space, shaking, etc.
Apple is not the first company to incorporate an accelerometer into a mobile phone, but the first to succeed.
How can I use an accelerometer?
Before moving on to the technical part, we will look at ready-made applications that use an accelerometer.
')
Some basic examples:
With iBeer you can drink virtual beer:
iBoobs is a program that did not pass the censorship department at Apple.
An overview of other programs can be viewed at the links below.
A bit of theory
The acceleration sensor inside the iPhone uses three elements: a silicon body, a set of silicon springs and an electric current. Silicon springs determine the position of the silicon body using an electric current. When the iPhone is rotated, an electric current oscillating through the silicon springs occurs. The acceleration sensor captures these vibrations and tells the iPhone about the necessary changes in the picture on the display.
iPhone uses the MEMS motion sensor 3-axis - ± 2g / ± 8g smart digital output piccolo accelerometer , the specification for which can be downloaded from here .
At rest, when the device does not move, the magnitude of the measured acceleration is equal to the force of gravity and is taken as a unit. The ratio of the magnitudes of the projections of this force on the coordinate axes gives us the angles of rotation of the device in space. If the iPhone is in motion, then the amount of acceleration with which the device accelerates can be calculated by means of additional transformations based on the values of the projections.
Note that this is the acceleration, not the speed of the device. That is, if your iPhone starts to fall to the ground, then the projections of the magnitude of the acceleration will take the value 0 on all axes - your iPhone will be in weightlessness :) And if you rise with due acceleration on the elevator up, the value of gravity will increase for the time of acceleration.
Accelerometer interface
Some facts:
- is part of uikit framework
- provides information on three axes
- you can configure the refresh rate of the data (approximately 10-100 Hz)
Classes:
- UIAccelerometer
- UIAcceleration
Protocol:
- UIAccelerometerDelegate
Coordinate axes
Just want to note that the coordinates X, Y, Z do not show the coordinates (position) of the device in space, as one would assume. In fact, they mean the following:
- the X coordinate (Roll) shows information about turning the device left or right;
- the Y (Pitch) coordinate gives us the following information: The iPhone is in vertical
position (-1), lies in the horizontal plane (0) or is in
upright, only upside down (+1); - the Z coordinate (Face up / face down) shows what position the device is in: face up (-1,
with zero values on other axes), in the vertical position (0) or
face down (+1).
Coordinate Axis iPhone Accelerometer
For the case of an arbitrary orientation of the iPhone, the data on the magnitude of the acceleration are distributed along the axes according to the projection of the acceleration vector.
Calculate the vector for an arbitrary position iPhone
We connect the accelerometer to the project
All the necessary information is accumulated by an object of the UIAcceleration class, which returns data on all axes, as well as a time marker, allowing to determine the relative measurement time of the specified
quantities It is impossible to directly approach the data of this class, this information can only be obtained through the delegate UIAccelerometerDelegate , which provides for the implementation of a single method
accelerometer: didAccelerate : to which the object of class UIAcceleration is returned . Delegate assignment and initialization of accelerometer: didAccelerate: method calls is done using the UIAccelerometer class.
In order to connect the accelerometer, it is necessary to write the following code in the applicationDidFinishLaunching method:
  [[UIAccelerometer sharedAccelerometer] setUpdateInterval: 1.0 / kUpdateFrequency];
 [[UIAccelerometer sharedAccelerometer] setDelegate: self];
The setUpdateInterval method sets the refresh rate for data, kUpdateFrequency is a factor that indicates how often you need to receive data.
For example, in the case of #define kUpdateFrequency 60.0 we get 60 “polls” per second.
In addition, the UIAccelerometerDelegate protocol must be specified in the header file of your delegate’s class:
  @interface AppDelegate: NSObject <UIApplicationDelegate>
 @interface accelerometerAppDelegate: NSObject <UIApplicationDelegate, UIAccelerometerDelegate>
Accelerometer processing logic needs to be added to the didAccelerate method in the delegate class:
  - (void) accelerometer: (UIAccelerometer *) accelerometer didAccelerate: (UIAcceleration *) acceleration
 {
     // Get the event data
     UIAccelerometValue x, y, z;

     x = acceleration.x;
     y = acceleration.y;
     z = acceleration.z;
 }
Remarks:
- you can declare only one delegate for the application
- data arrives asynchronously to the main thread
Accelerometer setting:
- The frequency range is 10-100 Hz.
- Recommended frequency for games: 30-60 Hz, for determining orientation - 10-30 Hz.
To stop getting values, call the following code:
 - (void) disableAccelerometerEvents
 {
 UIAccelerometer * acc = [UIAccelerometer sharedAccelerometer];
 acc.delegate = nil;
 }
Tilt angle
Geometrically, you can show the operation of the accelerometer as follows:
The figure shows that the angle can be calculated using the arctangent function, i.e.
float angle = atan2 (y, -x);
The position of the accelerometer can be viewed in the figure:
Using information about the angle of rotation, you can change the orientation of the screen:
  - (void) accelerometer: (UIAccelerometer *) accelerometer didAccelerate: (UIAcceleration *) acceleration
 {
	 // Get the current device angle
	 float xx = - [acceleration x];
	 float yy = [acceleration y];
	 float angle = atan2 (yy, xx);

	 // Add 1.5 to the viewer.
	 [interfaceOrientationLabel setTransform: CGAffineTransformMakeRotation (angle + 1.5)];

	 // Read my blog.  It should be obvious that you
	 // could fire a custom shouldAutorotateToInterfaceOrientation-event here.
	 if (angle> = -2.25 && angle <= -0.75)
	 {
		 if (deviceOrientation! = UIInterfaceOrientationPortrait)
		 {
			 deviceOrientation = UIInterfaceOrientationPortrait;
			 [interfaceOrientationLabel setText: @ "UIInterfaceOrientationPortrait"];
		 }
	 }
	 else if (angle> = -0.75 && angle <= 0.75)
	 {
		 if (deviceOrientation! = UIInterfaceOrientationLandscapeRight)
		 {
			 deviceOrientation = UIInterfaceOrientationLandscapeRight;
			 [interfaceOrientationLabel setText: @ "UIInterfaceOrientationLandscapeRight"];
		 }
	 }
	 else if (angle> = 0.75 && angle <= 2.25)
	 {
		 if (deviceOrientation! = UIInterfaceOrientationPortraitUpsideDown)
		 {
			 deviceOrientation = UIInterfaceOrientationPortraitUpsideDown;
			 [interfaceOrientationLabel setText: @ "UIInterfaceOrientationPortraitUpsideDown"];
		 }
	 }
	 else if (angle <= -2.25 || angle> = 2.25)
	 {
		 if (deviceOrientation! = UIInterfaceOrientationLandscapeLeft)
		 {
			 deviceOrientation = UIInterfaceOrientationLandscapeLeft;
			 [interfaceOrientationLabel setText: @ "UIInterfaceOrientationLandscapeLeft"];
		 }
	 }
 }
Download the sample application here .
Example 1: Scrolling with an accelerometer
Let’s take as a reference point the position of our device in space, at which the angle between the back wall and the ground is 45 degrees. In this case, the projection of gravity on the Y-axis will be -0.7. If we deflect the device a little closer to the vertical position, then we assume that when we reach an angle of 30 degrees from the vertical, we should turn the list to the end. Conversely, when the angle is 30 degrees or less from the horizontal position, we must turn the list to the top.
In the first case, the absolute value of the projection of gravity on the Y axis, directed along the vehicle, will be equal to 0.86. Those who did not understand where this value came from, recall the geometry and the calculation of the projection on the axis of coordinates of a vector of unit length. In the second case, the same value is 0.5. To implement scrolling, we'll use the scrollToRowAtIndexPath method: atScrollPosition: animated: of the UITableView class.
  - (void) accelerometer: (UIAccelerometer *) accelerometer
                       didAccelerate: (UIAcceleration *) acceleration
 {
   double absY = fabs (acceleration.y);

   if (absY <= 0.5) {
     // Scroll to the top of the list
     [viewController.tableView
          scrollToRowAtIndexPath: [NSIndexPath indexPathForRow: 0 inSection: 0]
          atScrollPosition: UITableViewScrollPositionTop
          animated: YES];
     }
     else if (absY> = 0.86)
     {
       // Scroll to end of list
       [viewController.tableView
          scrollToRowAtIndexPath: [NSIndexPath indexPathForRow: ([list count] - 1) inSection: 0]
          atScrollPosition: UITableViewScrollPositionBottom
          animated: YES];
     }
 }
Filters
Basically, two filters are used - high-pass ( high-pass ) and low-pass ( low-pass ). These filters can be used to filter out the effects of “jitter”,
slow corners, etc.
The low-pass filter is used to find the orientation of the device, the high-frequency filter is used to determine the shaking.
The simplest low-pass filter implements the following code:
  #define FILTERFACTOR 0.1
 value = (newAcceleration * FILTERFACTOR) + (previousValue * (1.0 - FILTERFACTOR));
 previousValue = value;
The simplest high-frequency filter implements the following code:
  #define FILTERFACTOR 0.1
 value = newAcceleration - (newAcceleration * FILTERFACTOR) + (previousValue * (1.0 - FILTERFACTOR));
 previousValue = value;
Example 2. AccelerometrGraph
Excellent program for the study of the operation of the accelerometer - shows the change in values in three coordinates. You can download from the official Apple site.
In normal mode it displays exactly the information that it receives. You can also use filters that will cut off ordinary turns, and only respond to shaking (which, in general, is necessary in real applications).
Example 3. iBells
iBells (link to appstore) is an entertainment program that responds to the user's actions and plays the sound of bells.
Being the developers of this program, we needed to solve such problems:
- Correct response to user actions, i.e. exactly at the moment when the user shakes the device;
- implementation of the minimum delay during which the music file should not be played (this is necessary in order to exclude very frequent triggers).
Correct response to shaking can be achieved using a high-pass filter:
  - (void) accelerateWithX: (float) x Y: (float) y Z: (float) z
 {
     // Use double filtering for passed coords
     acceleration [0] = x * kFilteringFactor + acceleration [0] * (1.0 - kFilteringFactor);
     x = x acceleration [0];

     acceleration [1] = y * kFilteringFactor + acceleration [1] * (1.0 - kFilteringFactor);
     y = y - acceleration [1];

     acceleration [2] = z * kFilteringFactor + acceleration [2] * (1.0 - kFilteringFactor);
     z = z - acceleration [2];
 }
kFilteringFactor is the coefficient for “silencing” the reaction to random fluctuations. This parameter must be selected individually depending on the requirements.
The interval is measured simply:
  NSDate * now = [NSDate date];
     NSTimeInterval interval = [now timeIntervalSinceDate: self.lastPlayedTime];

     // Check playback time condition
     if (interval> minTimeDelta)
     {
         [self play];
     }
The lastPlayedTime variable fixes the time of the last playback, minTimeDelta is the minimum interval after which a music file can be played.
Recently, I found another way to identify shaking:
  // it is a shake.
 // "Strong enough" means "greater than a client-supplied threshold" in G's.
 static BOOL L0AccelerationIsShaking (UIAcceleration * last, UIAcceleration * current, double threshold) {
         double
                 deltaX = fabs (last.x - current.x),
                 deltaY = fabs (last.y - current.y),
                 deltaZ = fabs (last.z - current.z);

         return
                 (deltaX> threshold && deltaY> threshold) ||
                 (deltaX> threshold && deltaZ> threshold) ||
                 (deltaY> threshold && deltaZ> threshold);
 }

 @interface L0AppDelegate: NSObject {
         BOOL histeresisExcited;
         UIAcceleration * lastAcceleration;
 }

 @property (retain) UIAcceleration * lastAcceleration;

 @end

 @implementation L0AppDelegate

 - (void) applicationDidFinishLaunching: (UIApplication *) application {
         [UIAccelerometer sharedAccelerometer] .delegate = self;
 }

 - (void) accelerometer: (UIAccelerometer *) accelerometer didAccelerate: (UIAcceleration *) acceleration {

         if (self.lastAcceleration) {
                 if (! histeresisExcited && L0AccelerationIsShaking (self.lastAcceleration, acceleration, 0.7)) {
                         histeresisExcited = YES;

                         / * SHAKE DETECTED.  DO HERE WHAT YOU WANT.  * /

                 } else if (histeresisExcited &&! L0AccelerationIsShaking (self.lastAcceleration, acceleration, 0.2)) {
                         histeresisExcited = NO;
                 }
         }

         self.lastAcceleration = acceleration;
 }

 // and proper @synthesize and -dealloc boilerplate code

 @end
Using the accelerometer in web applications
A new onorientationchange method has been added to Safari that works when the position changes by 90%. Below is the javascript code with which you can change the position (orientation) of a web page.
  function updateOrientation () {
     / *
         iphone in portrait mode
         landscape mode with the screen turned to the left
         with the screen turned to the right.
     * /
     var orientation = window.orientation;

     switch (orientation)
     {
         case 0:
             / *
                 If in portrait mode, sets the body's class attribute to portrait.
                 Consequently, all the style definitions of the body [class = "portrait"]
                 declaration in the iPhoneOrientation.css file will be selected and used
                 to style "Handling iPhone or iPod touch Orientation Events".
             * /
             document.body.setAttribute ("class", "portrait");

             / *
                 Add a descriptive message on "Handling iPhone or iPod touch Orientation Events"
             * /
             document.getElementById ("currentOrientation"). innerHTML
                 = "Now in portrait orientation (Home button on the bottom).";
             break;

         case 90:
             / *
                 If in landscape mode with the screen turned to the left,
                 sets the body's class attribute to landscapeLeft.
                 In this case, all style definitions matching the body [class = "landscapeLeft"]
                 declaration in the iPhoneOrientation.css file will be
                 selected and used to style "Handling iPhone or iPod touch Orientation Events".
             * /
             document.body.setAttribute ("class", "landscapeLeft");
             document.getElementById ("currentOrientation"). innerHTML
                 = "Now in landscape orientation and turned to the left (Home button to the right).";
             break;

         case -90:
             / *
                 If in landscape mode with the screen turned to the right,
                 sets the body's class attribute to landscapeRight.
                 Here, all style definitions matching the body [class = "landscapeRight"]
                 declaration in the iPhoneOrientation.css file will be selected and used
                 to style "Handling iPhone or iPod touch Orientation Events".
             * /
             document.body.setAttribute ("class", "landscapeRight");
             break;
     }

 window.onorientationchange = updateOrientation;

 <div id = "currentOrientation" style = "font-size: 40px;">
           Now in portrait orientation (Home button on the bottom). </ Div>
Examples of the web page can be found here and here .
Accelerometer and Simulator
For obvious reasons, testing applications in the simulator is not possible. For this you need to use a real device.
Under the link you can see (and download here), as all the same, you can transfer data to the simulator. But, since it still uses the actual device, practical
there is no use for it. Just for fun.
Links and additional materials
- 100+ iPhone Games That Use the Accelerometer
- Top 12 iPhone Accelerometer Apps
- 10 Creative Ways to Use the Accelerometer on the iPhone
- Control without navigation keys? Or iPhone Accelerometer
- iPhone Coding: Using the Accelerometer
- UIAcceleration Class Reference
- UIAccelerometer Class Reference
- UIDevice Class Reference
- AccelerometerGraph
- Bubblelevel
- iBells on the AppStore
PS The author of the article is Alexander Krakovetsky ( sashaeve ),
Source: https://habr.com/ru/post/65148/
All Articles