How to draw repaintable icons
For example, we want to draw a repaintable folder icon. Take your favorite vector editor and draw.

How to make this picture can be repainted? The secret is that the picture consists of two raster files - translucent highlights / shadows above and a color substrate below. It turns out that the color base "shines through" through a translucent mask. Here is what the mask should look like:
')

But how to draw such a mask? Very simple. We need to take a color base, and then draw the highlights and shadows from above.

Lightening mask (shown on a black background for clarity), dimming mask, color substrate
In the lightening mask, only white color with different transparency is used, and in the darkening mask only black is used. The color of the substrate does not matter - choose any, it will change anyway. If you draw several icons, it is better to choose a single “test” color.
Why do we need light and dark layers at the same time? We do not know what color the user will choose, and the icon should always look good. Here, for example, we drew only the lightening layer, and the user took and selected white color for the substrate. Catastrophe! It will turn out flat absolutely white icon. The same story, but on the contrary, with black. And if there are dark and light layers, then the result is not bad:

Icons with absolutely white and black substrates
It is better, of course, to choose almost white (light gray) and almost black (dark gray) - then the icon will be more voluminous and cute. But even with extreme values it turns out quite well.
Since the darkening and lightning layers are in the same file, there is a danger that your icon will look dirty - white is superimposed on black and gray is obtained, which does not miss the “color” color of the substrate. This should be taken into account when drawing and to avoid multiple overlapping layers. Here is the order of the layers of icon for Icon:
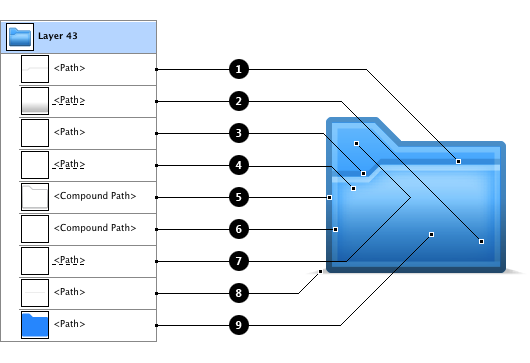
- The shadow of the half folder. In the light layers through the mask is made a "hole" in the shape of this shadow. (Color black, opacity 10%)
- Lower darkening bulk layer. It must always be higher than the stroke and overlap it. Then the stroke becomes darker to the bottom. (Black, 40%)
- Glare on the half of the folder. (White, 40%)
- Brightening surround layer. Blur the edges (feather 3 pt). (White, 65%)
- Stroke icons. A very important thing that ensures that any color will have a stroke. (Gray, 50%)
- Light stroke around the perimeter. Makes the icon more clear and lively. (White, 25%)
- Top light volume layer. When paired with a blackout, the icons are “illuminated” from above. (White, 40%)
- Icon shadow (Black, 25%)
- Color substrate. (Any color, 100%)
If this little boring scheme is not enough for you, then you can download the source in AI format .
Next you need to remove the substrate from the icon (put it next) and rasterize the vector file in Photoshop. We received the same magic pictures that the secret Ikazy mechanism glues into a single file by simple addition.
Source: https://habr.com/ru/post/62348/
All Articles