How to tie your design to the store Simpla

In this post I want to show you the process of creating a new design for the Simpla online store script .
In the root of the file structure of the store you will find the design folder. This folder contains the so-called design themes. By default, you are given the primitive theme “default” (/ design / default /). We will take it as a basis for creating your theme.
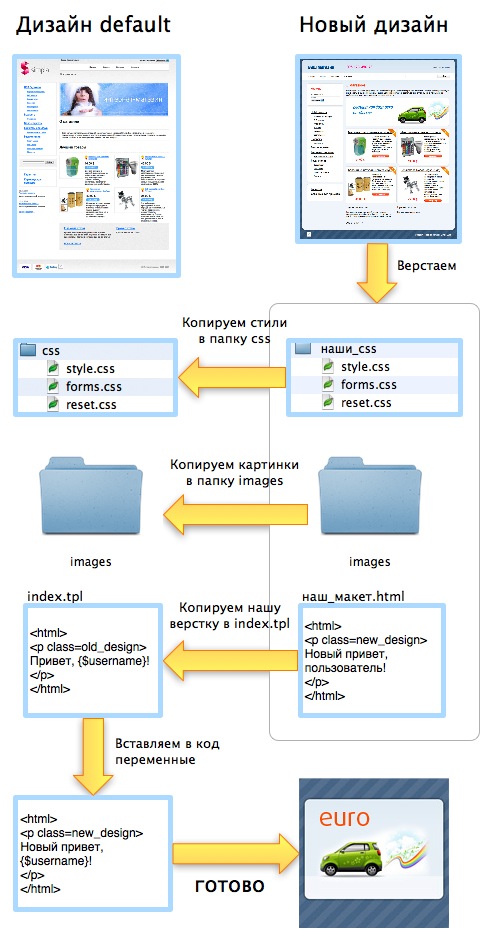
The whole process of creating a theme can be presented in this form:
')
Now consider the process in more detail.
Layout Design
It is desirable that the design layout corresponds to the following structure:
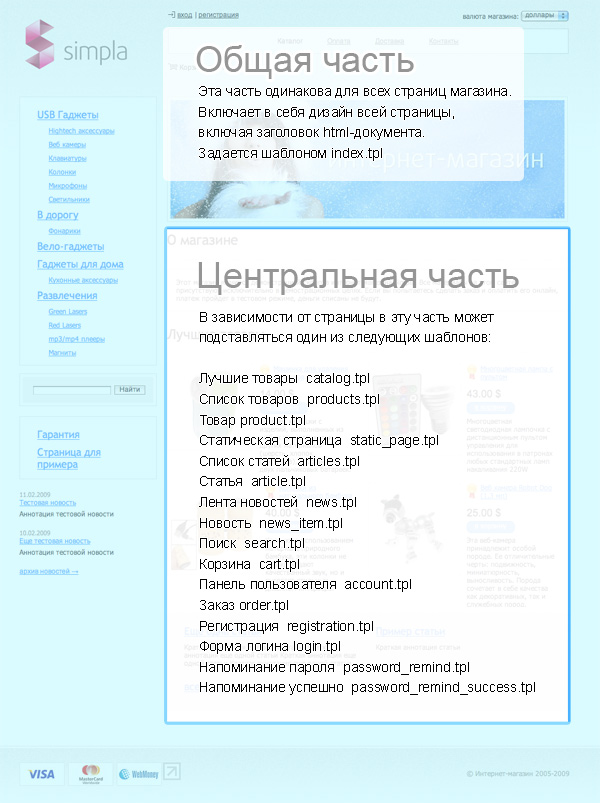
That is, the store design should consist of two parts - a common part for all pages, and a central part, which varies depending on the current page.
Layout
There are no special requirements for the layout of the layout. It can be tabular, marvelous, and maybe even a wap-version of the store. Make up the way you like.
CSS
The style files that you use in your design should be in the css folder, then they will be available for editing through the store's control panel.
In the visual text editor in the control panel, your styles are automatically connected from the /css/style.css file. This ensures the same text display when editing and on the website. Keep this in mind.
Pictures
In the images folder, you simply add all the pictures for your design.
But there is one special picture that is used when displaying your theme in the control panel when selecting a theme:

This image should be called thumbnail.jpg and have a size of 150x150px.
Smarty templates
The following files must be present in the design theme:
In fact, almost the entire appearance of the store is defined by the index.tpl template, in the center of which the templates of the central unit are connected, depending on the selected section of the site.
Just copy all our html in the index.tpl file.
After we have copied our html-code into index.tpl, it is necessary to replace the designer “fish” with the corresponding variables:
We form meta tags
In order for each page of the store to display the necessary meta tags, you need to use the variables $ title, $ keywords, $ description. Like this:
< title > {$title|escape} </ title >
< meta name ="description" content ="{$description|escape}" />
< meta name ="keywords" content ="{$keywords|escape}" />
Since mod_rewrite is used in the engine, you need to add the following line in before any access to the resources:
< base href ="http://{$root_url}/" >Display the menu of the product catalog
Since the nesting of the directory is unlimited - this menu is rendered into a separate recursive template. Just connect it:
{include file=categories.tpl categories=$categories}Display the site menu
Where we should have a site menu, we write something like the following:
{ foreach from =$sections item=s}
<a tooltip= 'section' section_id= '{$s->section_id}' href= 'sections/{$s->url}' >{$s->name|escape}</a>
{/ foreach }
Display currency selection
To do this, insert the following form into the template:
<form name=currency method=post>
<p> :
< select tooltip=currency name= "currency_id" onchange= "window.document.currency.submit();" >
{ foreach from =$currencies item=c}
<option value = "{$c->currency_id}" { if $c->currency_id==$currency->currency_id}selected{/ if }>
{$c->name|escape}
</option>
{/ foreach }
</ select >
</p>
</form>
We form the user's basket
{ if $cart_products_num}
<a href= "cart/" >e</a> {$cart_products_num}
{$cart_total_price*$currency->rate_from/$currency->rate_to|string_format: "%.2f" } {$currency->sign|escape}
{ else }

{/ if }
Create a search form
< form name = search method = get action ="index.php" onsubmit ="window.location='search/'+this.keyword.value; return false;" >
< input type = hidden name = module value = Search >
< input type ="text" name = keyword value ="{$keyword|escape}" />< input type ="submit" value ="" />
</ form >
Connect the "happiness admin"
To ensure that when you hover the cursor on various site objects, the administrator has pop-up menu of actions on objects, include the following code in your template:
{if $smarty.session.admin == 'admin'}
< script src ="js/admintooltip/php/admintooltip.php" language ="JavaScript" type ="text/javascript" ></ script >
< link href ="js/admintooltip/css/admintooltip.css" rel ="stylesheet" type ="text/css" />
{/if}
Next, for those objects over which the menu should pop up, you need to add two parameters: tooltip and object_id. For example, for menu sections:
<span tooltip= 'section' section_id= '{$s->section_id}' >{$s->name|escape}</span>And, most importantly, display the main part of the page.
The script forms the central part of the page from the corresponding templates, and in the index.tpl we simply insert the variable {$ content}. Something like this:
< div id ="main_content" >
{$content}
</ div >


* This source code was highlighted with Source Code Highlighter .
That's all, the new design is bolted. If the design layout requires it, you can change the rest of the templates that define the central part. Each template describes the variables that it uses, so the changes will not be difficult.
Of course, in here I have described far from all the possibilities regarding design changes. But I hope that this will be enough impetus for you to try it yourself in practice.
PS I invite you to participate in the creation of templates that would be happy to buy owners simpla.
Source: https://habr.com/ru/post/61265/
All Articles