Zend_Dojo: First Steps

Zend_Dojo is a tool imposed by the authors of the framework. So let's try, if they really ask for it ...
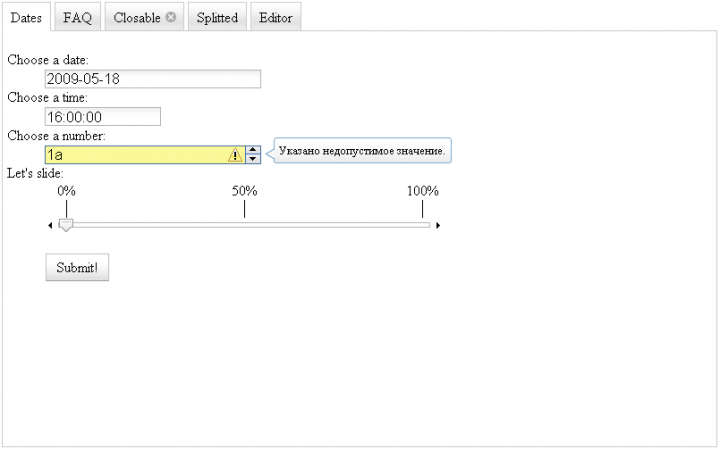
I'll start with the mean-spirited - tease the result of the work done:
')

Looks attractive. It will not be so difficult to reproduce this creation, even if your knowledge of Dojo / Dijit leaves much to be desired - you will understand without much difficulty (although it is better to look towards the manuals - " Dojo for beginners ";)).
To begin with - initialization - I’ll give you a piece of the Bootstrap.php file in which we will include the Dojo helpers:
<? php
class Bootstrap extends Zend_Application_Bootstrap_Bootstrap
{
protected function _initView ( )
{
$ view = new Zend_View ( ) ;
$ view -> addHelperPath ( 'Zend / Dojo / View / Helper /' , 'Zend_Dojo_View_Helper' ) ;
// or
Zend_Dojo :: enableView ( $ view ) ;
return $ view ;
}
}
Step two is to connect the Dojo library. This happiness should be included in the <head> tag of your HTML document. To do this, it will be enough to slightly modify “layout.phtml” (or “index.phtml” if you are not using layouts):
<? php echo $ this -> doctype ( ) ?>
<html>
<head>
<title> Dojo Demo </ title>
<meta http-equiv = "Content-Type" content = "text / html; charset = utf-8">
<? php
// My own stylesheet
echo $ this -> headLink ( ) -> setStylesheet ( '/css/my.css' ) ;
// Check if dojo library is needed
if ( $ this -> dojo ( ) -> isEnabled ( ) ) :
// Include dojo library
$ this -> dojo ( ) -> setLocalPath ( '/js/dojo/dojo.js' )
// Use dojo theme tundra
-> addStyleSheetModule ( 'dijit.themes.tundra' ) ;
// Echo out the dojo <script> tags
echo $ this -> dojo ( ) ;
endif ; ?>
</ head>
<! - Set body class to "tundra" (requeried) ->
<body class = "tundra">
<? php echo $ this -> layout ( ) -> content ?>
</ body>
</ html>
Now our application is ready to use Dojo. Let's move on to the view scripts — the first line in the “index.phtml” file is the inclusion of Dojo:
$ this -> dojo ( ) -> enable ( ) ;
If this is not done, Dojo will not be included in the layout.phtml file.
Everything is ready, you can start - create a TabContainer - for this we will use the appropriate ViewHelper:
echo $ this -> tabContainer ( $ id , $ content , $ params , $ attribs ) ;
It seems to be a normal helper, but we still need to call the captureStart () and captureEnd () methods to enter the data:
<? php
$ this -> dojo ( ) -> enable ( ) ;
// Container with tabs
$ this -> tabContainer ( ) -> captureStart ( 'tab1' , array ( ) , array ( 'style' => 'width: 800px; height: 500px;' ) ) ;
// Our content
echo $ this -> tabContainer ( ) -> captureEnd ( 'tab1' ) ;
So we add content to the container. In a similar way we add bookmarks to our container:
<? php
$ this -> dojo ( ) -> enable ( ) ;
// Container with tabs
$ this -> tabContainer ( ) -> captureStart ( 'tab1' , array ( ) , array ( 'style' => 'width: 800px; height: 500px;' ) ) ;
// Tab "Dates"
$ this -> contentPane ( ) -> captureStart ( 'pane1' , array ( ) , array ( 'title' => 'Dates' ) ) ;
echo $ this -> form1 ;
echo $ this -> contentPane ( ) -> captureEnd ( 'pane1' ) ;
// Tab "FAQ"
$ this -> contentPane ( ) -> captureStart ( 'pane2' , array ( ) , array ( 'title' => 'FAQ' ) ) ;
?>
<h1> FAQ </ h1>
<dl> <dt> Question 1? </ dt> <dd> This is my answer 1! </ dd> </ dl>
<dl> <dt> Question 2? </ dt> <dd> Good question, next one. </ dd> </ dl>
<dl> <dt> Question 3? </ dt> <dd> Ok, that's enough! </ dd> </ dl>
<? php
echo $ this -> contentPane ( ) -> captureEnd ( 'pane2' ) ;
// Tab "Closable" (in the settings we set closable = true)
$ this -> contentPane ( ) -> captureStart ( 'pane3' , array ( ) , array ( 'title' => 'Closable' , 'closable' => true ) ) ;
echo 'You can close me!' ;
echo $ this -> contentPane ( ) -> captureEnd ( 'pane3' ) ;
// Tab "Splitted" with a separator
$ this -> contentPane ( ) -> captureStart ( 'pane4' , array ( ) , array ( 'title' => 'Splitted' ) ) ;
$ this -> splitContainer ( ) -> captureStart ( 'split1' , array ( ) , array ( 'style' => 'width: 250px; height: 250px;' ) ) ;
$ this -> contentPane ( ) -> captureStart ( 'splitpane1' , array ( ) , array ( ) ) ;
echo 'Hey, I am on the left side!' ;
echo $ this -> contentPane ( ) -> captureEnd ( 'splitpane1' ) ;
$ this -> contentPane ( ) -> captureStart ( 'splitpane2' , array ( ) , array ( ) ) ;
echo 'Cool!' ;
echo $ this -> contentPane ( ) -> captureEnd ( 'splitpane2' ) ;
echo $ this -> splitContainer ( ) -> captureEnd ( 'split1' ) ;
echo $ this -> contentPane ( ) -> captureEnd ( 'pane4' ) ;
// Tab "Editor" with WYSIWYG editor
$ this -> contentPane ( ) -> captureStart ( 'pane5' , array ( ) , array ( 'title' => 'Editor' ) ) ;
echo $ this -> editor ( 'foo' ) ;
echo $ this -> contentPane ( ) -> captureEnd ( 'pane5' ) ;
echo $ this -> tabContainer ( ) -> captureEnd ( 'tab1' ) ;
As you can see, each tab in our container is a new ContentPane . ContentPane can be used in any container (except AccordionContainer ). For more information, see the ZF documentation .
In the first tab, we display the form, which is an object of type Zend_Dojo_Form (see the listing of IndexController / IndexAction):
public function indexAction ( )
{
$ form1 = new Zend_Dojo_Form ( ) ;
$ form1 -> setMethod ( 'post' ) -> setAction ( "/" ) ;
$ form1 -> addElement ( 'DateTextBox' , 'date1' , array (
'label' => 'Choose a date:' ,
'datePattern' => 'yyyy-MM-dd' ,
'validators' => array ( 'Date' ) ,
'required' => true
) )
-> addElement ( 'TimeTextBox' , 'time1' , array (
'label' => 'Choose a time:' ,
'timePattern' => 'HH: mm: ss' ,
) )
-> addElement ( 'NumberSpinner' , 'number1' , array (
'label' => 'Choose a number:' ,
'value' => 0 ,
'smallDelta' => 1 ,
'min' => 0 ,
'max' => 30 ,
'defaultTimeout' => 100 ,
'timeoutChangeRate' => 100 ,
) )
-> addElement ( 'HorizontalSlider' , 'slide1' , array (
'label' => 'Let \' s slide: ' ,
'minimum' => 0 ,
'maximum' => 25 ,
'discreteValues' => 10 ,
'style' => 'width: 450px;' ,
'topDecorationDijit' => 'HorizontalRuleLabels' ,
'topDecorationLabels' => array ( ' 0% ' , '50%' , '100%' ) ,
'topDecorationParams' => array ( 'style' => 'padding-bottom: 20px;' ) ,
) )
-> addElement ( 'SubmitButton' , 'submit' , array (
'label' => 'Submit!'
) )
$ this -> view -> form1 = $ form1 ;
}
It’s so easy using the Dojo widgets (Dijits) to create forms. The process is almost identical to working with Zend_Form, you can see only a slight difference in the naming of elements (for example, “SubmitButton” and “submit”), and the parameters for setting up a little more.
This is only the first step in exploring Zend_Dojo , if you want to learn more - stay tuned ;)
This article is only a free translation of " My Very First Steps with Zend_Dojo "
Source: https://habr.com/ru/post/60472/
All Articles