Implementing FSM
The article describes the miniature Java library developed by the author, which allows for the short and clear definition of finite automata. The library, let's call it AkerFSM, is available in Google Code .
In the first part of the article the prerequisites and requirements for the library are formulated. The second part provides an abstract example of using the library. The third part deals with the important points of the device of the library itself. The fourth part is devoted to the consideration of a simplified real-life example in which the behavior of one of the controllers in a GWT application is defined using a finite state machine.
There are various ways to implement a finite state machine. Until the creation of the proposed library, I considered the most successful the method by which the switch statement is used, which makes the selection according to the current state number. An example of the code can be found here , and the approach itself, appearing under the names "SWITCH-technology" and "Automated programming", is described in detail in the articles on the mentioned website Shalyto and Tukkel.
For all its simplicity, the implementation of the switch operator does not at all fit into the object-oriented paradigm and because of this does not allow full use of the capabilities of modern languages. Therefore, I set out to create an implementation that meets the following requirements:
Looking ahead, I note that the result exceeded the original formulation of the problem (for more details, see the end of the article).
As a first example, consider an abstract window with a screen form. The window can be opened or closed. If the window is open, the form data can be saved. Before the first window display, its initialization is required.
First, we declare our automaton and define the set of its states:
')
Now we define the automaton itself and the method that will create it:
To use the automaton, it remains to create its object and call the handleEvent () method for event handling, passing the event as a parameter:

Thus, the proposed implementation allows describing automata as clearly and concisely as in the case of the switch operator — several lines of code are required to determine the state, and the entire definition of the automaton is placed in a single block. The use of standard formatting of sources, as in the case of the switch operator, slightly worsens the picture, but here we must choose. If your environment allows you to disable automatic formatting for a given piece of text - then you are lucky.
The main classes of the library are State and FSM, the purpose of which is obvious. Both classes can easily be extended, as will be demonstrated below.
Classes are declared as follows:


Generic STATES sets the enum, which stores many states of the machine. The generic EVENT sets the class for the events processed by the automaton. In a real application, EVENT will indicate the base event class used in your event mechanism. In the examples in question, String is used to simplify.
The three methods of the State class: enter (), handleEvent () and exit (), are designed to override when creating specific states. enter is called when the state machine enters the state in question, handleEvent when processing an event, and exit, respectively, when the state machine leaves the state in question. These methods implement the Template Method pattern, so when they are overridden, the super call is optional.
Together with the State class, when determining an automaton, its descendant, the SuperState class (State and SuperState together implement an analog of the Composite pattern) can be used. The purpose of SuperState is the implementation of a common behavior for a group of states, such as a group transition.
The State.toString () method returns the name and sequence number of the state (long live the enum!) The FSM.toString () and SuperState.toString () methods are defined in the same way.
The behavior of the FSM class when calling the handleEvent () method is as follows:
In addition, the FSM implements 14 events for which you can assign handlers, overriding either specific event handler methods or a method called when any of the events occur. An example of using event handlers are the MonitoredFSM and LoggedFSM classes.
The best way to understand the behavior of library classes in more detail is to run the JUnit tests bundled with the library in the debugger. These tests were specially written in such a way as to be an example of the use of the library and an illustration of the logic of its work.
Now consider an example more close to real life. Create a GWT application that, when a button is clicked, displays some form on the screen. When a form is displayed, it is necessary to load data from the server in two stages — first, the form configuration is loaded, and then the data is loaded for display on the form. The form can be closed by pressing a button. The loading process can be interrupted by the user. During the download process, a progress indicator should be displayed with the name of the operation being performed.
The machine will have five states:

In addition to normal states, we also define two group states. The first will include the LOADCONFIG and LOADDATA states and serve to handle the “RPCFailure” event. The second will include the LOADCONFIG, LOADDATA and SHOW states and serve to handle the “HideEvent” event.
It remains to implement the progress bar. This can be done in a very elegant and versatile way, which is suitable not only for our abstract application, but also for most similar tasks.
First, instead of using the FSM, we use the class MonitoredFSM, which implements the Observer pattern. This will allow us to connect our automaton state change event handler (another way is to override the onAfterSwitchState () method of the FSM class).
Secondly, let's generate the class ProgressState from the class State. It will differ from the ancestor by the presence of the state description specified in the constructor.
Third, we define the callback for our instance of the MonitoredFSM class as follows:
Each time you switch to the ProgressState state, this callback will display a progress indicator, which will contain a description of the current state, the number of the current state and the total number of states. When you switch to the normal state, the progress indicator will disappear.
As you can see, I was slightly shying with the displayed numbers of the current state and the total number of states (“2/5” and “3/5” would be displayed, while from the user's point of view it would be more logical to output “1/2” and "2/2"). I will not describe possible solutions to this problem, just to say that the EnumSet class and its static methods can be useful.
Putting it all together, we get the following definition of an automaton (in the LOADCONFIG and LOADDATA states, different ways of handling external influences are illustrated):

Button event handlers will have the following form:

RPC request handlers will have the following form:
As follows from the last two code fragments, we have dealt with the task of accurately implementing the asynchronous part of the GWT application in one fell swoop, creating a simple and universal pattern for this. Moreover, this pattern is identical for both RPC request handlers and ordinary event handlers.
Source code for the library is available in Google Code . The library itself and JUnit tests are located in the trunk / fsm folder, and the GWT application as an example is located in the trunk / gwt_fsm folder.
The AkerFSM library supports all features of automaton programming:
In addition to supporting the listed automata-programming capabilities, the AkerFSM library has two principal advantages:
Due to these advantages, many advantages and opportunities for expansion arise. Here are some of them.
Summing up, it can be argued that the AkerFSM library significantly exceeds the implementations described in the book by Polkarpova, Shalyto “Automated Programming” .
Ps. I'm sure that with Groovy or Ruby you can make a similar implementation even more beautiful.
In the first part of the article the prerequisites and requirements for the library are formulated. The second part provides an abstract example of using the library. The third part deals with the important points of the device of the library itself. The fourth part is devoted to the consideration of a simplified real-life example in which the behavior of one of the controllers in a GWT application is defined using a finite state machine.
Prerequisites
There are various ways to implement a finite state machine. Until the creation of the proposed library, I considered the most successful the method by which the switch statement is used, which makes the selection according to the current state number. An example of the code can be found here , and the approach itself, appearing under the names "SWITCH-technology" and "Automated programming", is described in detail in the articles on the mentioned website Shalyto and Tukkel.
For all its simplicity, the implementation of the switch operator does not at all fit into the object-oriented paradigm and because of this does not allow full use of the capabilities of modern languages. Therefore, I set out to create an implementation that meets the following requirements:
- the automaton is also given visually and concisely, as when using the switch operator
- implementation is object oriented
- the implementation supports all the features of automaton programming
Looking ahead, I note that the result exceeded the original formulation of the problem (for more details, see the end of the article).
Abstract example
As a first example, consider an abstract window with a screen form. The window can be opened or closed. If the window is open, the form data can be saved. Before the first window display, its initialization is required.
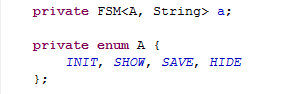
First, we declare our automaton and define the set of its states:
')
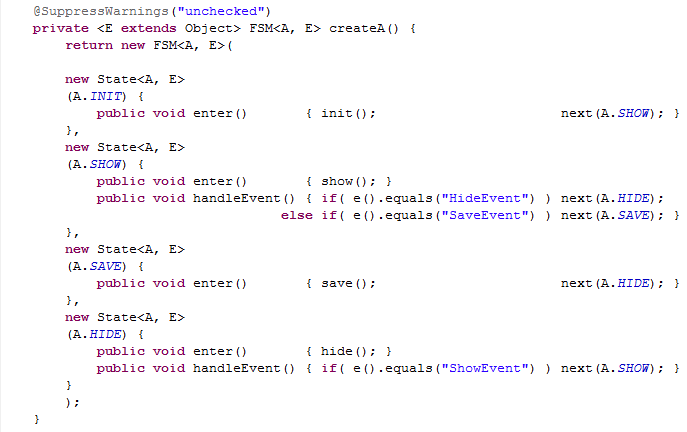
Now we define the automaton itself and the method that will create it:
To use the automaton, it remains to create its object and call the handleEvent () method for event handling, passing the event as a parameter:
Thus, the proposed implementation allows describing automata as clearly and concisely as in the case of the switch operator — several lines of code are required to determine the state, and the entire definition of the automaton is placed in a single block. The use of standard formatting of sources, as in the case of the switch operator, slightly worsens the picture, but here we must choose. If your environment allows you to disable automatic formatting for a given piece of text - then you are lucky.
| Bonus | Using enum makes the definition of an automaton much more intuitive than encoding states with sequence numbers or constants. By the way, you can use Cyrillic in constant names in enum |
Features of the library device
The main classes of the library are State and FSM, the purpose of which is obvious. Both classes can easily be extended, as will be demonstrated below.
Classes are declared as follows:
Generic STATES sets the enum, which stores many states of the machine. The generic EVENT sets the class for the events processed by the automaton. In a real application, EVENT will indicate the base event class used in your event mechanism. In the examples in question, String is used to simplify.
The three methods of the State class: enter (), handleEvent () and exit (), are designed to override when creating specific states. enter is called when the state machine enters the state in question, handleEvent when processing an event, and exit, respectively, when the state machine leaves the state in question. These methods implement the Template Method pattern, so when they are overridden, the super call is optional.
Together with the State class, when determining an automaton, its descendant, the SuperState class (State and SuperState together implement an analog of the Composite pattern) can be used. The purpose of SuperState is the implementation of a common behavior for a group of states, such as a group transition.
The State.toString () method returns the name and sequence number of the state (long live the enum!) The FSM.toString () and SuperState.toString () methods are defined in the same way.
The behavior of the FSM class when calling the handleEvent () method is as follows:
- call the handleEvent () of the current state and current state groups
- determine the next state (group transitions take precedence over normal ones)
- call exit () of the current state and all group states that will be left during the transition
- call enter () of the new state and all group states that we fall into during the transition
- perform transitions until the result of determining the next state is null
In addition, the FSM implements 14 events for which you can assign handlers, overriding either specific event handler methods or a method called when any of the events occur. An example of using event handlers are the MonitoredFSM and LoggedFSM classes.
The best way to understand the behavior of library classes in more detail is to run the JUnit tests bundled with the library in the debugger. These tests were specially written in such a way as to be an example of the use of the library and an illustration of the logic of its work.
| Bonus | Library source code compiled normally by GWT |
Real life example
Now consider an example more close to real life. Create a GWT application that, when a button is clicked, displays some form on the screen. When a form is displayed, it is necessary to load data from the server in two stages — first, the form configuration is loaded, and then the data is loaded for display on the form. The form can be closed by pressing a button. The loading process can be interrupted by the user. During the download process, a progress indicator should be displayed with the name of the operation being performed.
The machine will have five states:
In addition to normal states, we also define two group states. The first will include the LOADCONFIG and LOADDATA states and serve to handle the “RPCFailure” event. The second will include the LOADCONFIG, LOADDATA and SHOW states and serve to handle the “HideEvent” event.
It remains to implement the progress bar. This can be done in a very elegant and versatile way, which is suitable not only for our abstract application, but also for most similar tasks.
First, instead of using the FSM, we use the class MonitoredFSM, which implements the Observer pattern. This will allow us to connect our automaton state change event handler (another way is to override the onAfterSwitchState () method of the FSM class).
Secondly, let's generate the class ProgressState from the class State. It will differ from the ancestor by the presence of the state description specified in the constructor.
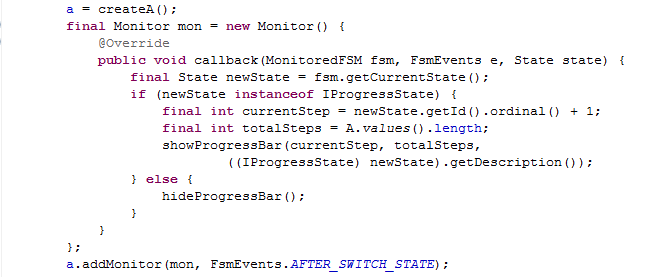
Third, we define the callback for our instance of the MonitoredFSM class as follows:
Each time you switch to the ProgressState state, this callback will display a progress indicator, which will contain a description of the current state, the number of the current state and the total number of states. When you switch to the normal state, the progress indicator will disappear.
As you can see, I was slightly shying with the displayed numbers of the current state and the total number of states (“2/5” and “3/5” would be displayed, while from the user's point of view it would be more logical to output “1/2” and "2/2"). I will not describe possible solutions to this problem, just to say that the EnumSet class and its static methods can be useful.
Putting it all together, we get the following definition of an automaton (in the LOADCONFIG and LOADDATA states, different ways of handling external influences are illustrated):
Button event handlers will have the following form:
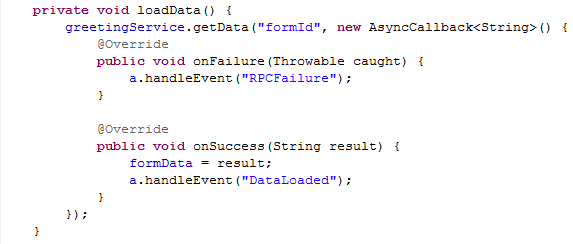
RPC request handlers will have the following form:
As follows from the last two code fragments, we have dealt with the task of accurately implementing the asynchronous part of the GWT application in one fell swoop, creating a simple and universal pattern for this. Moreover, this pattern is identical for both RPC request handlers and ordinary event handlers.
Source code for the library is available in Google Code . The library itself and JUnit tests are located in the trunk / fsm folder, and the GWT application as an example is located in the trunk / gwt_fsm folder.
findings
The AkerFSM library supports all features of automaton programming:
- explicitly isolating and encoding finite state machine states
- a visual and concise definition of a finite automaton that looks like a switch statement
- support of machines of different types (Miles, Mura, mixed)
- support of event and computing machines (and with the ability to mix these two models in one machine)
- support for nested machines
- group transition support
- logging capability in terms of a finite state machine
In addition to supporting the listed automata-programming capabilities, the AkerFSM library has two principal advantages:
- Business logic is separated from the process code. Indeed, the logic of a particular automaton (business logic) is set separately from the code that implements the model of the finite automaton itself. The implementation of the model can be redefined and expanded regardless of the specific automata, “decorating” the business logic with the required technological operations.
- The library is object-oriented, while the base classes of the library are made easily extensible.
Due to these advantages, many advantages and opportunities for expansion arise. Here are some of them.
- Ability in one code block to determine actions performed when checking transition conditions, when entering a state and when exiting it.
- Unlike the above-mentioned publications on automata programming, in which the “group transition” is present only as an element of graphic notation, and is not supported in any way, the AkerFSM library fully implements the concept of “group state”. For a group state, as well as for a normal one, it is possible to define transition conditions, as well as actions that are performed upon entering and leaving a group state.
- The transition from the state machine model to the Petri network model is carried out by a simple extension of the FSM class.
- It is also easy to create a model of an automaton that can store conversion history.
- Implementing the Strategy pattern in conjunction with the FSM class allows you to separate the automaton from the class it controls. This, in particular, makes it possible to conduct a JUnit testing machine, completely isolating it from the rest of the application.
- The State class (together with the FSM class) implements the State pattern. The simplest way to use it in this role requires only defining an interface with operations specific to your task and implementing this interface in the required number of State class descendants. Although the “Gang of Four” in the description of the State pattern writes that the definition of transition logic within specific states introduces “implementation dependencies between subclasses,” the AkerFSM library architecture is devoid of this disadvantage. In our case, the logic of transitions between states is determined by the state machine and is recorded in specific classes of states, but there is no dependence between them.
- An extension of the FSM class is possible, which allows changing the definition of the automaton during execution (add, delete, and replace states).
Summing up, it can be argued that the AkerFSM library significantly exceeds the implementations described in the book by Polkarpova, Shalyto “Automated Programming” .
Ps. I'm sure that with Groovy or Ruby you can make a similar implementation even more beautiful.
Source: https://habr.com/ru/post/60342/
All Articles