Filter Forge: Turning photos into watercolor painting (lesson)
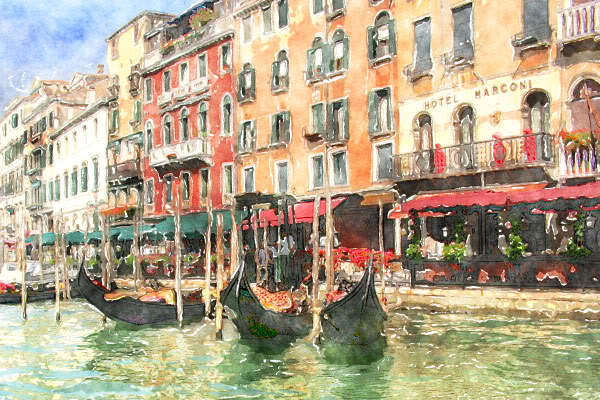
In this tutorial, I will show you how to make a watercolor drawing out of an ordinary photo - quickly and simply. I will use: Adobe Photoshop, Filter Forge plugin and photo. The result is this picture:
Launch Photoshop. Then press Ctrl + O and open the image, which we will modify. I used a photo taken in Venice with an inexpensive Canon camera.
')

Add saturation: Image> Adjustments> Hue / Saturation (Ctrl + U). This step is optional. If your image does not require correction, you can skip this step.

Now let's apply the Watercolor Painting filter to our image. Launch the Filter Forge plugin (Filter> Filter Forge).
If you do not have Filter Forge plug-in, download it on the official developer site http://www.filterforge.com/download/ and install the program on your computer.
Then go to the filter page http://www.filterforge.com/filters/7227.html and click the “Open in Filter Forge” button. It will start and the filter download will start (26.3 KB).

So, we downloaded the desired filter. Let's try to choose the most suitable parameters for our picture. To begin with, I try to apply the presets made by the filter's author (the Presets tab) - double-clicking on the thumbnail applies the effect to our image. I found something suitable, but I also want to twist the parameters. I switch to the Settings tab and start moving the sliders.
There is another great thing - Randomizer and button Next Variant. You can simply press this button until you get a suitable combination. But I did not wait for luck and stopped at these:

Click the Apply button and our picture turns into a kind of watercolor drawing.
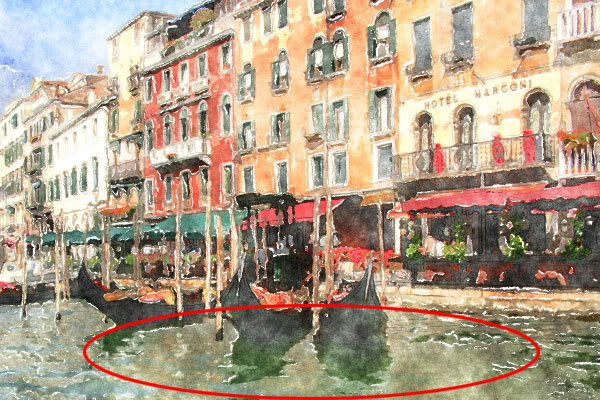
Now carefully look at the result. I can say that I do not like the "dirty" stains on the water in the area of reflections of boats. I suppose some correction of our image will be required here.
Undo last action (use filter) - Ctrl + Z. And we proceed to the color correction of our image. Switch to the Quick Mask Mode (Q) and paint over the area with a soft brush that will remain unchanged. In our case, this is all but water.

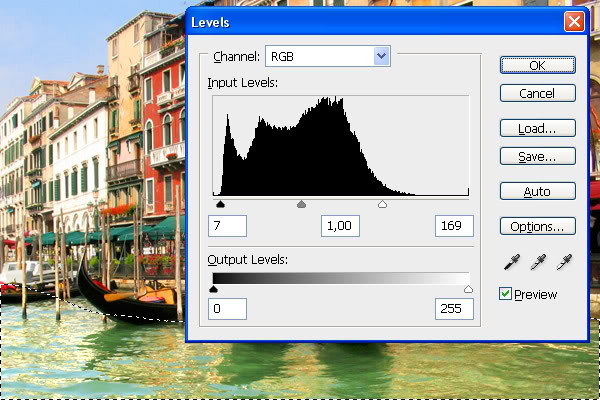
Switch to normal edit mode Edit in Standard Mode (Q). And invert the selection Select> Inverse (Ctrl + Shift + I). Then open the Image> Adjustments> Level dialog (Ctrl + L) and move the sliders in such a way as to get a more contrast image. Usually this is achieved by shifting the extreme slider to the middle.
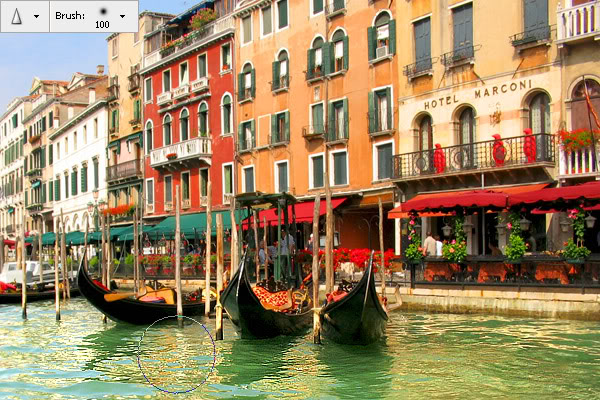
Well, in order to be completely good, we will walk on the water of a large-diameter Sharpen Tool ® with soft edges.
Now run the Filter Forge plugin. And again apply the Watercolor Painting filter.
And here is the result:
Step 1. Open the original image.
Launch Photoshop. Then press Ctrl + O and open the image, which we will modify. I used a photo taken in Venice with an inexpensive Canon camera.
')
Step 2. Add color saturation
Add saturation: Image> Adjustments> Hue / Saturation (Ctrl + U). This step is optional. If your image does not require correction, you can skip this step.
Step 3. Apply the “Watercolor Painting” filter
Now let's apply the Watercolor Painting filter to our image. Launch the Filter Forge plugin (Filter> Filter Forge).
If you do not have Filter Forge plug-in, download it on the official developer site http://www.filterforge.com/download/ and install the program on your computer.
Then go to the filter page http://www.filterforge.com/filters/7227.html and click the “Open in Filter Forge” button. It will start and the filter download will start (26.3 KB).
Step 4. Selection of filter parameters
So, we downloaded the desired filter. Let's try to choose the most suitable parameters for our picture. To begin with, I try to apply the presets made by the filter's author (the Presets tab) - double-clicking on the thumbnail applies the effect to our image. I found something suitable, but I also want to twist the parameters. I switch to the Settings tab and start moving the sliders.
There is another great thing - Randomizer and button Next Variant. You can simply press this button until you get a suitable combination. But I did not wait for luck and stopped at these:
Click the Apply button and our picture turns into a kind of watercolor drawing.
Step 5. We look at the intermediate result
Now carefully look at the result. I can say that I do not like the "dirty" stains on the water in the area of reflections of boats. I suppose some correction of our image will be required here.
Step 6. Making a mask
Undo last action (use filter) - Ctrl + Z. And we proceed to the color correction of our image. Switch to the Quick Mask Mode (Q) and paint over the area with a soft brush that will remain unchanged. In our case, this is all but water.
Step 7. Add contrast
Switch to normal edit mode Edit in Standard Mode (Q). And invert the selection Select> Inverse (Ctrl + Shift + I). Then open the Image> Adjustments> Level dialog (Ctrl + L) and move the sliders in such a way as to get a more contrast image. Usually this is achieved by shifting the extreme slider to the middle.
Step 8. Add sharpness
Well, in order to be completely good, we will walk on the water of a large-diameter Sharpen Tool ® with soft edges.
Step 9. Result
Now run the Filter Forge plugin. And again apply the Watercolor Painting filter.
And here is the result:
Source: https://habr.com/ru/post/59981/
All Articles