Svn merge for dummies
Simple words and with a large number of images on the example of Eclipse tells how to make svn merge. The article will be useful to those who have the implementation of merging branches has not yet become an everyday part of the work.
The article is designed to use the following software:
Consider the example of the life of a regular branch, in which you, as one of the developers, perform the task assigned to you.
At the beginning, only the main part of the code (trunk, hereafter “trunk”) is present in the repository, the current revision of which is r10. The state of trunk T1 corresponds to the version of the code at the time of the branch creation (branch, hereinafter referred to as the “branch”).
You create your own branch, which begins with revision r11. Next, parallel work begins on the code, during which you make the volume of changes B1 in your branch. At the same time, other developers are making the amount of T2 changes to the trunk.
Then you include in your thread the latest changes made in the trunk. The state of your branch is currently T1 + B1, so you are only interested in the changes that occurred in the trunk from the moment you created your branch. These changes (T2) are uniquely determined by the numbers of the initial and final revision, in our case it is r10 and r12. You are merging changes made in a trunk between 10 and 12 revisions with the current version of your branch and, if necessary, correcting errors, commit the result of the merge to your branch (revision r14).

Now you have all the latest changes from the trunk, and the status of your branch is T1 + B1 + T2.
Further development continues, and you make changes to your branch B2 changes, while other developers make the volume of changes T3 in the trunk.
You re-include the latest changes from the trunk in your thread. The status of your branch is T1 + B1 + T2 + B2, so you only need the amount of changes T3. When performing a merge, you set the final revision of the previous merge (r12) as the initial revision. Thus, you are merging changes made in a trunk between 12 and 15 revisions with the current version of your branch and, if you need to correct errors, commit the result of the merge to your branch (revision r17).
Assume that you have now solved the task assigned and it is time to implement the changes you have made to the trunk. The operation should not be very difficult due to the fact that you regularly brought your branch in line with the trunk and promptly solved the problems that arise. The state of your branch is now equal to T1 + B1 + T2 + B2 + T3 (plus the corrections B1 'and B2' that you made during the merge process). The trunk state is now T1 + T2 + T3. Therefore, you are merging changes made in your branch between 11 and 17 revisions with the current version of the trunk and, if necessary, correcting errors, commit the new version of the trunk (r18).
After that, it is recommended to delete your branch and, continuing your work, create a new branch.
Next, on a specific example, consider the merge process.
Consider the following situation. There is a set of test_area projects in which there is a test_project project:

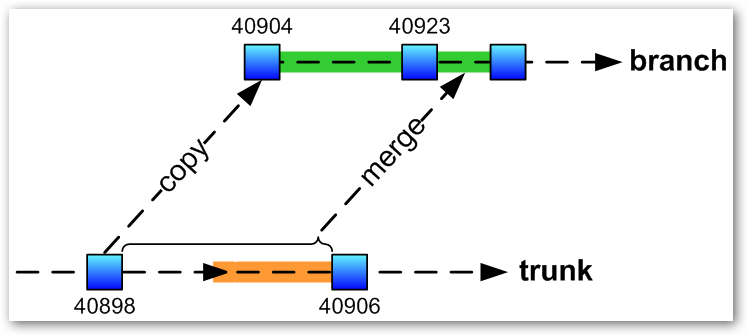
A branch was created from revision 40898 of the trunk, the initial revision of which became 40904. After that, changes were made to the trunk (revision 40906) and to the brunch (revision 40923). Next, we consider the process of merging branch with a trunk using the example of including the latest trunk changes into the branch.
There are three files in the project: ChangedByMe.java, ChangedByOther.java, and Conflicted.java.
You have changed the file ChangedByMe.java in your branch, adding the substring
Switching to the trunk, you (or someone else) changed the files ChangedByOther.java and Conflicted.java in the same way, adding the substring
At this step, you should perform the following operations for your branch:

Be sure to ensure that your project targets the correct branch:

Merging is most conveniently performed in the “Team Synchronizing” perspective. Switch to this perspective and open the following views: “Synchronize”, “History”, “Console”, “SVN Repositories”, “Project Explorer”.
')
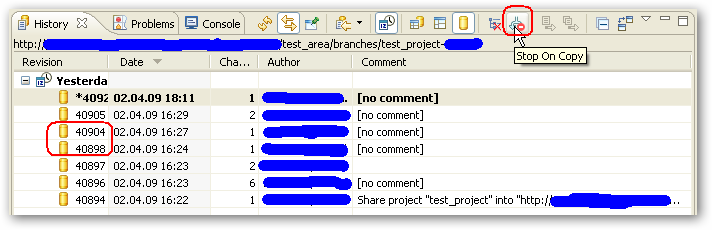
As the initial revision for the first merge, you should take the revision of the trunk from which the branch was created. In our case, this is 40898. You can determine this number by studying the history of the root folder of your branch and using the “Stop On Copy” button.
For greater clarity, it is recommended when creating a branch to write a comment like:
You should take the latest trunk revision, 40906, as the final revision. This number can be seen in the “SVN Repositories” form or in the URL dialog of the Merge dialog.
On subsequent merges, the initial trunk revision specified in the previous merge should be taken as the initial trunk revision. In order not to forget its number, when you commit the results of the merge, you should record a comment of the following form:
Make the “Console” view visible.
In the “Project Explorer” form, we press the right button on our project and select Team-> Merge. Move the Merge dialog so that the console is visible.
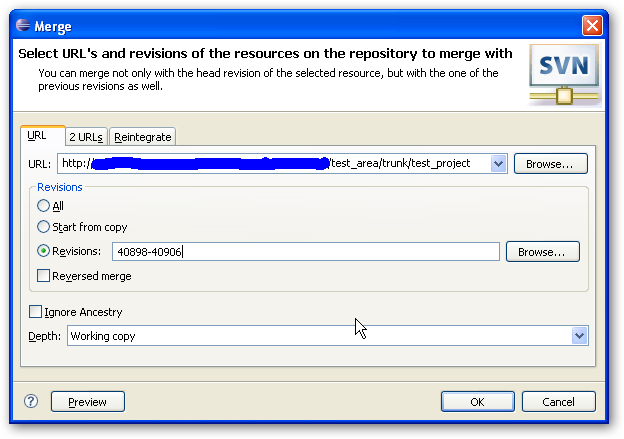
In the URL, choose the path to the trunk: ... / test_area / trunk / test_project
In Revisions we ask: 40898-40906
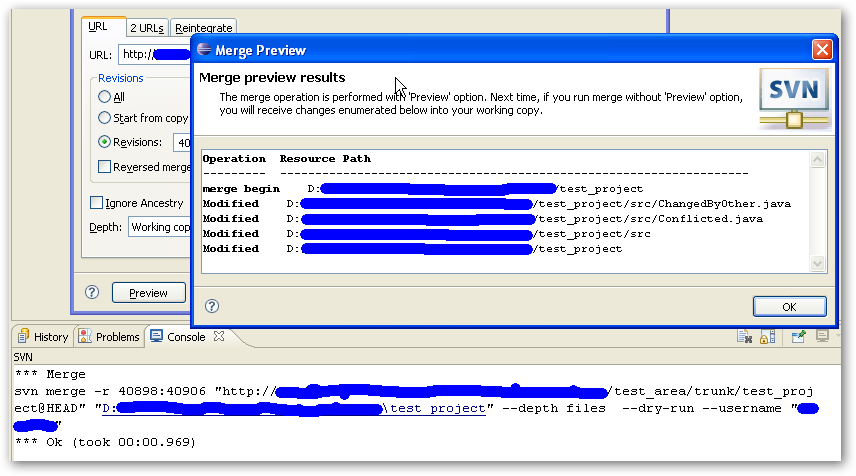
Click the Preview button and monitor the adequacy of the results that appear in the console and in the Merge Preview window.
Click the OK button.
At this point, the following actions will automatically occur:
Three service files will be created for each conflict file in the project folder:
The “Synchronize” view will display the results of the svn merge command:
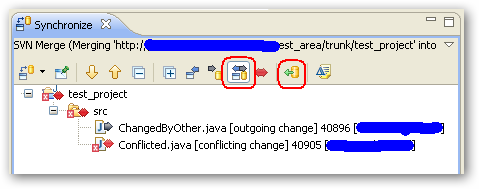
First, we process the updated files that have not been changed by us. Since our task is to upload changes from the trunk to our branch, it makes sense to click the Accept All Incoming Changes button.
If you need to make a separate decision regarding each file, double click on it - the Compare Editor will open. The version of the file from the trunk will be displayed on the left side of the window, and the version of your branch will be displayed on the right.

To reject changes, you should enable the Two-Way Compare mode in the Compare Editor (the button should be pressed) and click the Copy All Non-Conflicting Changes from Right to Left button, then save the file (Ctrl-S). After saving, the file will disappear from the “Synchronize” view.
To accept the changes, in the “Synchronize” view, click the right button on the file and select Accept. The file will disappear from the “Synchronize” view.
Since our task is to upload the latest changes from the trunk to our branch, we should modify the conflicting files so that all changes made to the trunk are saved there. If you consider these changes to be unsuccessful, discuss it with their author, modify the trunk and repeat the merge process.
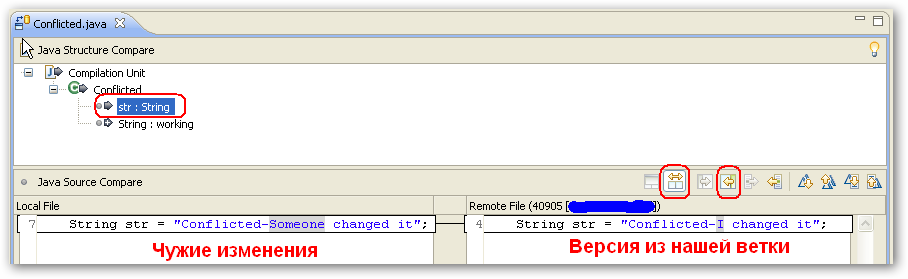
Processing each file, double click on it - the Compare Editor will open. It makes sense to select a specific change in the upper panel of the editor, then the conflict fragment from the trunk will be displayed in the left part of the window, and the conflict fragment from your branch will be displayed in the right.
To reject the changes, enable the Two-Way Compare mode in the Compare Editor (the button should be pressed), select the “Compilation Unit” element in the top panel of the editor and click the Copy All Non-Conflicting Button to save it. (Ctrl-S). Next, in the “Synchronize” view, click the right button on the file and select Mark As Merged. The file will disappear from the “Synchronize” view.
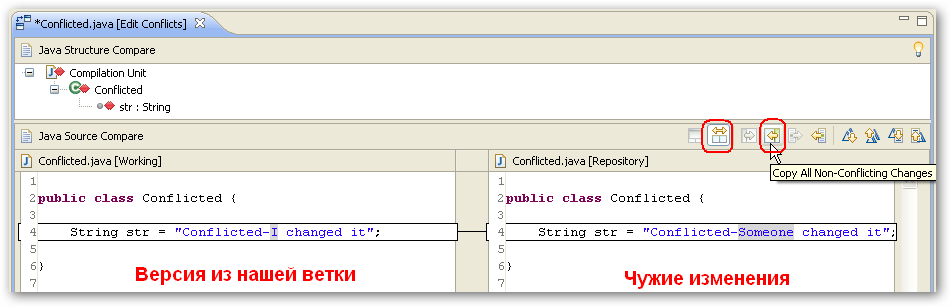
To accept the changes, in the “Synchronize” view, click the right button on the file and select “Edit Conflicts” - the Compare Editor will open in the “Edit Conflicts” mode. In it (surprise!), Your version of the file will be displayed in the left part of the window, the version from the trunk will be displayed in the right part. After that, in the Compare Editor, enable the Two-Way Compare mode (the button should be pressed) and click the Copy All Non-Conflicting Changes button from Right to Left, then save the file (Ctrl-S). In addition, the file can be edited manually in the left part of the window. Next, in the “Synchronize” view, click the right button on the file and select Mark As Merged. The file will disappear from the “Synchronize” view.
If they accidentally did something wrong, for example, they accepted changes instead of discarding (or vice versa), then everything can always be easily corrected.
To roll back to the version of files from your branch in the “Project Explorer” form, press the right button on your project and select Team-> Revert.
You can delete service files created during the merge process either manually or by pressing the right button on your project in the “Project Explorer” view and selecting Team-> Synchronize with Repository. After that, in the “Synchronize” form, on your project, click the “Override and Update ...” button and then update (F5) the “Project Explorer” view.
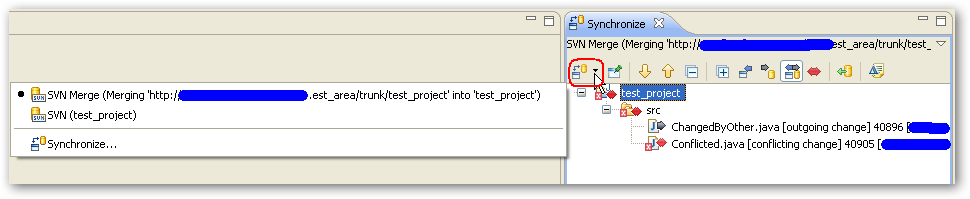
To restart a merge, there is no need to call the Merge dialog again. Just press F5 in the “Synchronize” view. If necessary, you must first select the desired synchronization screen by pressing the leftmost button of the toolbar in the “Synchronize” view:
After a decision has been made on each of the files, the following operations should be performed for your branch:
So, you downloaded the latest updates from the trunk into your branch. Regular execution of this operation will reduce the volume of problems arising from the merger.
Ps. Beyond the scope of the article deliberately made consideration of the differences between SVN 1.4 and SVN 1.5, and a description of ways to resolve more complex conflict situations.
The article is designed to use the following software:
- SVN 1.4.4
- Eclipse 3.4.2 SR2
- Subversive 0.7.7
- SVN Connector Native JavaHL 1.5.4
Branch life cycle
Consider the example of the life of a regular branch, in which you, as one of the developers, perform the task assigned to you.
At the beginning, only the main part of the code (trunk, hereafter “trunk”) is present in the repository, the current revision of which is r10. The state of trunk T1 corresponds to the version of the code at the time of the branch creation (branch, hereinafter referred to as the “branch”).
You create your own branch, which begins with revision r11. Next, parallel work begins on the code, during which you make the volume of changes B1 in your branch. At the same time, other developers are making the amount of T2 changes to the trunk.
Then you include in your thread the latest changes made in the trunk. The state of your branch is currently T1 + B1, so you are only interested in the changes that occurred in the trunk from the moment you created your branch. These changes (T2) are uniquely determined by the numbers of the initial and final revision, in our case it is r10 and r12. You are merging changes made in a trunk between 10 and 12 revisions with the current version of your branch and, if necessary, correcting errors, commit the result of the merge to your branch (revision r14).
Now you have all the latest changes from the trunk, and the status of your branch is T1 + B1 + T2.
Further development continues, and you make changes to your branch B2 changes, while other developers make the volume of changes T3 in the trunk.
You re-include the latest changes from the trunk in your thread. The status of your branch is T1 + B1 + T2 + B2, so you only need the amount of changes T3. When performing a merge, you set the final revision of the previous merge (r12) as the initial revision. Thus, you are merging changes made in a trunk between 12 and 15 revisions with the current version of your branch and, if you need to correct errors, commit the result of the merge to your branch (revision r17).
Assume that you have now solved the task assigned and it is time to implement the changes you have made to the trunk. The operation should not be very difficult due to the fact that you regularly brought your branch in line with the trunk and promptly solved the problems that arise. The state of your branch is now equal to T1 + B1 + T2 + B2 + T3 (plus the corrections B1 'and B2' that you made during the merge process). The trunk state is now T1 + T2 + T3. Therefore, you are merging changes made in your branch between 11 and 17 revisions with the current version of the trunk and, if necessary, correcting errors, commit the new version of the trunk (r18).
After that, it is recommended to delete your branch and, continuing your work, create a new branch.
Next, on a specific example, consider the merge process.
Initial repository state
Consider the following situation. There is a set of test_area projects in which there is a test_project project:
A branch was created from revision 40898 of the trunk, the initial revision of which became 40904. After that, changes were made to the trunk (revision 40906) and to the brunch (revision 40923). Next, we consider the process of merging branch with a trunk using the example of including the latest trunk changes into the branch.
There are three files in the project: ChangedByMe.java, ChangedByOther.java, and Conflicted.java.
You have changed the file ChangedByMe.java in your branch, adding the substring
"-I changed it" to the str field value. Even in your branch, you changed the Conflicted.java file, also adding the substring "-I changed it" to the str field value.Switching to the trunk, you (or someone else) changed the files ChangedByOther.java and Conflicted.java in the same way, adding the substring
"-Someone changed it" .Performing a merge
Step 1. Preparation
At this step, you should perform the following operations for your branch:
- make update;
- eliminate all compilation errors;
- make commit.
Be sure to ensure that your project targets the correct branch:
Merging is most conveniently performed in the “Team Synchronizing” perspective. Switch to this perspective and open the following views: “Synchronize”, “History”, “Console”, “SVN Repositories”, “Project Explorer”.
')
Step 2. Determine the initial and final revision of the trunk to merge
As the initial revision for the first merge, you should take the revision of the trunk from which the branch was created. In our case, this is 40898. You can determine this number by studying the history of the root folder of your branch and using the “Stop On Copy” button.
For greater clarity, it is recommended when creating a branch to write a comment like:
Branched from trunk@40898You should take the latest trunk revision, 40906, as the final revision. This number can be seen in the “SVN Repositories” form or in the URL dialog of the Merge dialog.
On subsequent merges, the initial trunk revision specified in the previous merge should be taken as the initial trunk revision. In order not to forget its number, when you commit the results of the merge, you should record a comment of the following form:
Merged with trunk@40898-40906Step 3. Filling the Merge dialog
Make the “Console” view visible.
In the “Project Explorer” form, we press the right button on our project and select Team-> Merge. Move the Merge dialog so that the console is visible.
In the URL, choose the path to the trunk: ... / test_area / trunk / test_project
In Revisions we ask: 40898-40906
Click the Preview button and monitor the adequacy of the results that appear in the console and in the Merge Preview window.
Click the OK button.
At this point, the following actions will automatically occur:
- Run the svn merge command.
- All local files that have been changed in the trunk but have not been changed in your branch (ChangedByOther.java) will be replaced with the version from the trunk. Thus, you will have a file from the trunk on the disk, and the previous version of this file, with which you worked, will be in svn in your branch.
- All local files that have been changed both in the trunk and in your branch (Conflicted.java) will be replaced with diff-files of the form:
public class Conflicted {
<br><<<<<<< .working
<br> String str = "Conflicted-I changed it";
<br>=======
<br> String str = "Conflicted-Someone changed it";
<br>>>>>>>> .merge-right.r40906
<br>}
Three service files will be created for each conflict file in the project folder:
| [filename] .merge-left.r [rev_number] | - contains the original version of the file (which was before your and others changes) |
| [filename] .merge-right.r [rev_number] | - contains the version of the file with external changes (from the trunk) |
| [filename] .working | - contains the version of the file with your changes |
The “Synchronize” view will display the results of the svn merge command:
Step 4. Handle external changes
First, we process the updated files that have not been changed by us. Since our task is to upload changes from the trunk to our branch, it makes sense to click the Accept All Incoming Changes button.
If you need to make a separate decision regarding each file, double click on it - the Compare Editor will open. The version of the file from the trunk will be displayed on the left side of the window, and the version of your branch will be displayed on the right.
To reject changes, you should enable the Two-Way Compare mode in the Compare Editor (the button should be pressed) and click the Copy All Non-Conflicting Changes from Right to Left button, then save the file (Ctrl-S). After saving, the file will disappear from the “Synchronize” view.
To accept the changes, in the “Synchronize” view, click the right button on the file and select Accept. The file will disappear from the “Synchronize” view.
Step 5. Conflict handling
Since our task is to upload the latest changes from the trunk to our branch, we should modify the conflicting files so that all changes made to the trunk are saved there. If you consider these changes to be unsuccessful, discuss it with their author, modify the trunk and repeat the merge process.
Processing each file, double click on it - the Compare Editor will open. It makes sense to select a specific change in the upper panel of the editor, then the conflict fragment from the trunk will be displayed in the left part of the window, and the conflict fragment from your branch will be displayed in the right.
To reject the changes, enable the Two-Way Compare mode in the Compare Editor (the button should be pressed), select the “Compilation Unit” element in the top panel of the editor and click the Copy All Non-Conflicting Button to save it. (Ctrl-S). Next, in the “Synchronize” view, click the right button on the file and select Mark As Merged. The file will disappear from the “Synchronize” view.
To accept the changes, in the “Synchronize” view, click the right button on the file and select “Edit Conflicts” - the Compare Editor will open in the “Edit Conflicts” mode. In it (surprise!), Your version of the file will be displayed in the left part of the window, the version from the trunk will be displayed in the right part. After that, in the Compare Editor, enable the Two-Way Compare mode (the button should be pressed) and click the Copy All Non-Conflicting Changes button from Right to Left, then save the file (Ctrl-S). In addition, the file can be edited manually in the left part of the window. Next, in the “Synchronize” view, click the right button on the file and select Mark As Merged. The file will disappear from the “Synchronize” view.
Step 6. Roll back failed changes
If they accidentally did something wrong, for example, they accepted changes instead of discarding (or vice versa), then everything can always be easily corrected.
To roll back to the version of files from your branch in the “Project Explorer” form, press the right button on your project and select Team-> Revert.
You can delete service files created during the merge process either manually or by pressing the right button on your project in the “Project Explorer” view and selecting Team-> Synchronize with Repository. After that, in the “Synchronize” form, on your project, click the “Override and Update ...” button and then update (F5) the “Project Explorer” view.
To restart a merge, there is no need to call the Merge dialog again. Just press F5 in the “Synchronize” view. If necessary, you must first select the desired synchronization screen by pressing the leftmost button of the toolbar in the “Synchronize” view:
Step 7. Commit to your thread
After a decision has been made on each of the files, the following operations should be performed for your branch:
- eliminate compile errors;
- make a commit project, be sure to write a comment like:
Merged with trunk@40898-40906
So, you downloaded the latest updates from the trunk into your branch. Regular execution of this operation will reduce the volume of problems arising from the merger.
Ps. Beyond the scope of the article deliberately made consideration of the differences between SVN 1.4 and SVN 1.5, and a description of ways to resolve more complex conflict situations.
Source: https://habr.com/ru/post/57591/
All Articles