Using SQLite in .NET applications

In some projects, quite often there is a need for data storage, the volume of which can no longer be called small, but at the same time it is too expensive to use any DBMS due to the complexity of the application deployment. And here comes to the aid of such a beautiful thing as SQLite - compact embedded database.
For those who write using the .NET platform, having a good time will be ready ADO.NET provider for working with SQLite, which can be downloaded from the site: http://sqlite.phxsoftware.com/ . This provider also allows you to use all the additional features of the latest versions of .NET, such as LINQ, Entity Framework.
')
Where to begin
The first thing to start with is the choice of the platform that the created application is aimed at. We must pay tribute to the developers of the provider for SQLite, which provided support for almost all available platforms. All you need to do is select the version of the System.Data.SQLite.dll assembly you need. The assembly itself is compiled in various variations:
- Managed Only is the best option for those who create applications that should work on both Windows and Linux-based operating systems. In this case, the assembly includes only the managed code of the provider, and depending on the OS, you will need the native version of the SQLite library (for example: sqlite3.dll on Windows), which can be obtained from http://www.sqlite.org .
- Compact Framework is a version for working in the .NET CF environment for mobile devices running Windows CE. Includes a wrapper for the unmanaged SQLite library and the implementation of the necessary ADO.NET interfaces. The uncontrollable library of the SQLite engine for Windows CE is located in the same place where the System.Data.SQLite.dll assembly is the SQLite.Interop.060.DLL file.
- Itanium is the version of the adapter for work on Intel Itanium processors. In this case, the application requires only the System.Data.SQLite.dll assembly, which already contains unmanaged SQLite engine code.
- x64 is a version for platforms with x64 architecture. Also contains managed and unmanaged parts in a single assembly.
- x86 is a version for platforms with x86 architecture. It is built in the same way as the x64 and Itanium versions and does not require any unmanaged versions of the library of the SQLite engine.
It is worth noting that the third, fourth and fifth versions use a number of specific features of C ++ with Managed Extensions, which allows you to compile the managed part of ADO.NET and the unmanaged part of the SQLite database engine itself as a single assembly. Because of this, the use of these assemblies is limited only to the Windows platform.
If you use the Visual Studio development environment (in particular, version 2008), then SQLite Designer can also come in handy, which allows you to use visual tools for working with SQLite databases: Query Builder, table editing, and a number of other features.
Well, in addition to everything, the provider library includes the System.Data.SQLite.Linq.dll assembly, which provides access to the LINQ technology.
Creating SQLite Database
You can create a SQLite database both programmatically and using Server Explorer, which is available in Visual Studio. Consider a programmatic way to create a database using the ADO.NET provider. As the simplest example, I will create a database and one table in which data will be stored on the workers of an abstract firm.
Creating a database and tables using ADO.NET:
using System;
using System.IO;
using System.Data;
using System.Data.Common;
using System.Data.SQLite;

class Program
{
static void Main( string [] args)
{
string baseName = "CompanyWorkers.db3" ;

SQLiteConnection.CreateFile(baseName);

SQLiteFactory factory = (SQLiteFactory)DbProviderFactories.GetFactory( "System.Data.SQLite" );
using (SQLiteConnection connection = (SQLiteConnection)factory.CreateConnection())
{
connection.ConnectionString = "Data Source = " + baseName;
connection.Open();

using (SQLiteCommand command = new SQLiteCommand(connection))
{
command.CommandText = @"CREATE TABLE [workers] (
[id] integer PRIMARY KEY AUTOINCREMENT NOT NULL,
[name] char(100) NOT NULL,
[family] char(100) NOT NULL,
[age] int NOT NULL,
[profession] char(100) NOT NULL
);" ;
command.CommandType = CommandType.Text;
command.ExecuteNonQuery();
}
}
}
}

* This source code was highlighted with Source Code Highlighter .
In this example, the SQLiteFactory, SQLiteConnection, SQLiteCommand classes are used to create the database file, connect to the data source, and execute SQL queries. These classes also implement support for the ADO.NET interfaces by inheriting the basic abstract classes of ADO.NET, this can be seen if you look at their prototypes in the Object Browser. Here are some of them:
public sealed class SQLiteFactory : DbProviderFactory, IServiceProvider
public sealed class SQLiteConnection : DbConnection, ICloneable
So, the SQLiteFactory class implements the DbProviderFactory functional, and the SQLiteConnection class implements the DbConnection functionality. The DbProviderFactory and DbConnection classes are part of the standard ADO.NET abstract classes, whose interfaces provide unified access to data regardless of the DBMS used.
You can make sure that the database was actually created using the Server Explorer mentioned above, simply by creating a connection to the database file:
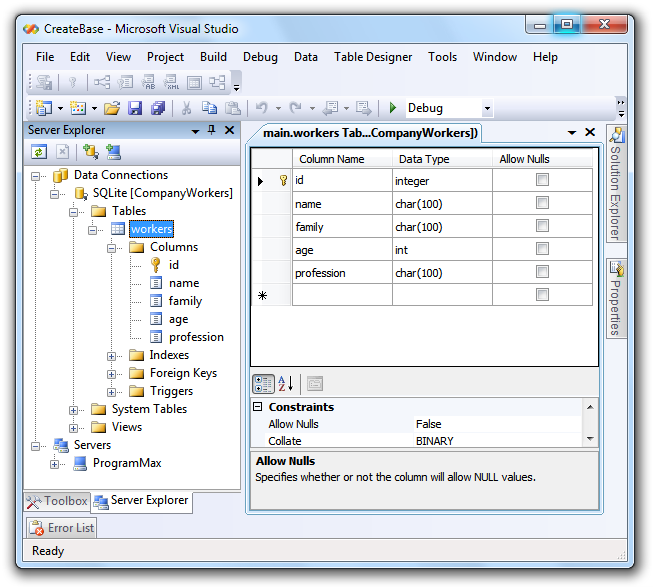
Fig. 1. View CompanyWorkers database through Server Explorer
In general, the provider for SQLite implements all the functionality that is necessary for working with databases at both the linked and unrelated levels of ADO.NET.
Editing SQLite Database
Editing the database, consider the example of the simplest Web Forms application. In general, working with SQLite in this case differs little from working with another DBMS, due to the use of the ADO.NET interface.
I'll create a simple ASP.NET page that uses a GridView control, DetailsView, and two SqlDataSource objects that provide access to the CompanyWorkers.db3 database. Further, I present only the most important points that are necessary for the operation of the application.
- Set up the first SqlDataSource1 object. In the editor, it is used only as a data source for the GridView1 object, so when setting up a connection to the database, it will be enough to specify that you only need to extract data from CompanyWorkers.db3, this is easy to do in the SqlDataSource1 settings window:

Fig. 2. Select all columns in the workers table.
- After configuring SqlDataSource1, you need to add an object of the GridView class to the form, which is done by simply dragging the control from the Toolbox onto the apsx page. For the resulting GridView1 object, select the data source SqlDataSource1. In the GridView1 settings, enable the Enable Selection option, which will be needed when editing the desired row.
- Next we add to the form an element of the DetailsView class and another object of the SqlDataSource class. The DetailsView1 element will be the main data editor for the workers table. Pre-configure the SqlDataSource2 to select the desired record from the table for DetailsView1 when you click Select opposite the employee of interest in GridView1. To do this, in the data source settings, go to WHERE and specify how the current item is selected for DetailsView1:
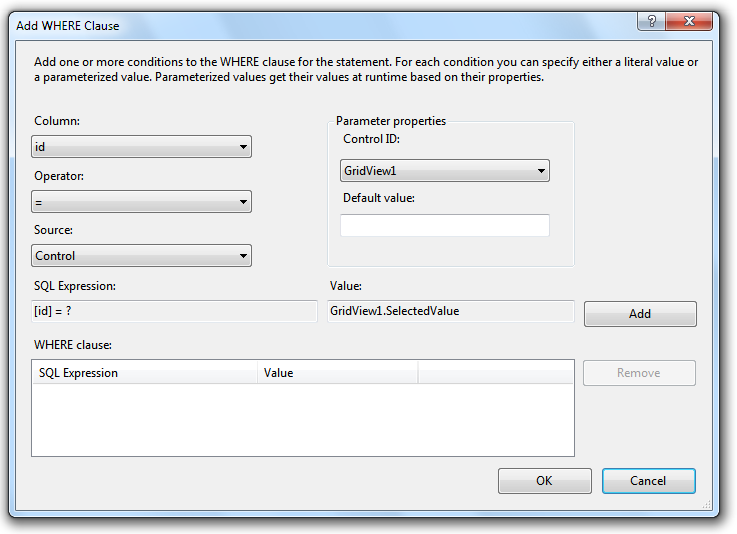
Fig. 3. We associate the selection of a record from the table with the value of the SelectedValue of the DataGrid1 element.
- We return to the previous window and in Advanced we set a checkbox to generate insert requests, update and delete records in the table:
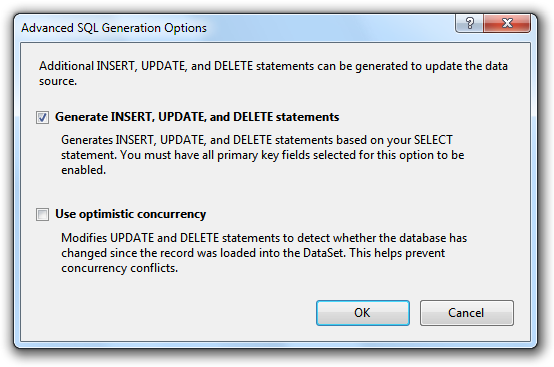
Fig. 4. Create insertion, update and delete requests.
- Set SqlDataSource2 as a data source for DetailsView1. In general, the application is already ready, but when working with it you can see that when adding and removing employees using DetailsView1 in DataGrid1, the data is not updated, in order to fix this you need to add handlers in DetailsView1 for the ItemDeleted, ItemUpdated and ItemIserted events that link DataGrid1 to updated data:
using System;
using System.Collections;
using System.Configuration;
using System.Data;
using System.Web;
using System.Web.Security;
using System.Web.UI;
using System.Web.UI.HtmlControls;
using System.Web.UI.WebControls;
using System.Web.UI.WebControls.WebParts;
using DataEditor.CompanyWorkersTableAdaptersTableAdapters;

namespace DataEditor
{
public partial class _Default : System.Web.UI. Page
{
private void GridViewDataBind()
{
// GridView1
this .GridView1.DataBind();
}

protected void DetailsView1_ItemDeleted( object sender, DetailsViewDeletedEventArgs e)
{
GridViewDataBind();
}

protected void DetailsView1_ItemUpdated( object sender, DetailsViewUpdatedEventArgs e)
{
GridViewDataBind();
}

protected void DetailsView1_ItemInserted( object sender, DetailsViewInsertedEventArgs e)
{
GridViewDataBind();
}
}
}
Now the application is fully ready for use. The final view of the editor for editing the workers table from the CompanyWorkers.db3 database:
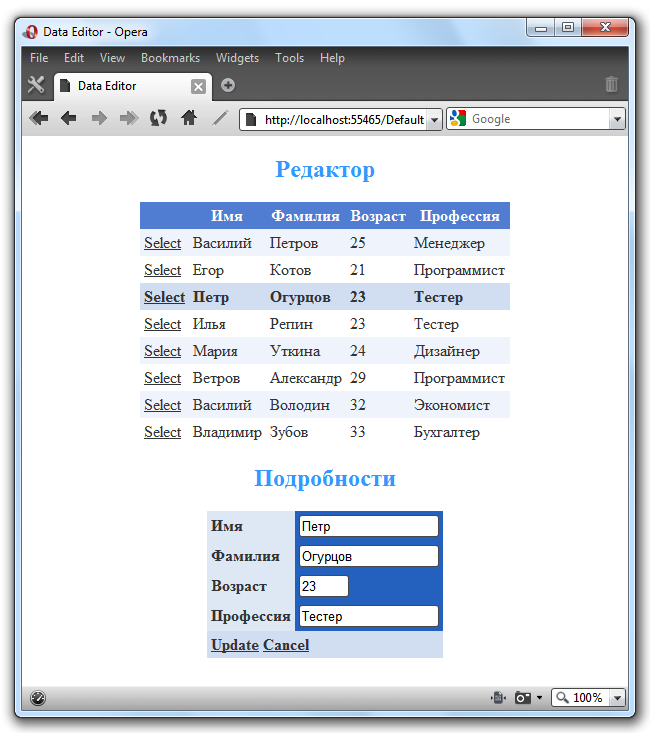
Fig. 5. Editor ready to work.
Thanks to SQLite, I didn’t need to deploy any services to work with the database.
Conclusion
I think the SQLite capabilities should be enough for a sufficiently wide range of tasks. At the same time, you should not try to use it in any serious projects with very large amounts of data and a large number of users, since this DBMS is not intended for this: there is no support for multiprocessing and the levels of isolation for transactions are limited. In general, for medium projects, such as a database of a small company or a telephone directory, the most appropriate tool.
PS: I used the x86 version of the System.Data.SQLite.dll assembly in my examples.
Source: https://habr.com/ru/post/56694/
All Articles