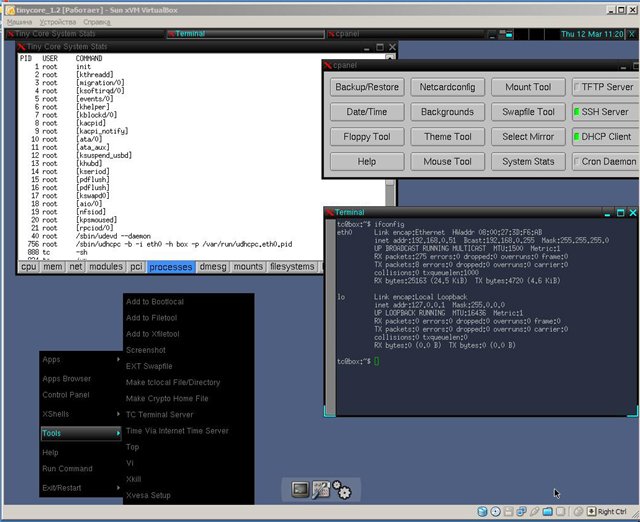
Announcement of Tiny Core Linux 1.2 - a minimalist Linux distribution with a weight of 10 MB.
Robert Shingdecker introduced
new release of Tiny Core Linux 1.2 - Linux minidistributive (only 10 MB in size), expandable by installing additional applications from network archives
- use JWM window manager, Tiny X, and FLTK graphical user interface;
- the new tcz-symlinker speeds up the initial loading and processing of TCZ;
- Advanced udev allows you to more quickly interact with USB;
- mnttool has been modernized to better support other devices;
- removed unused files;
- added missing application menu from / opt;
- suid is involved when mounting tclocal.
download here
')
for those wishing to install instructions ( fluent translation ):
It is assumed that Tiny Core was downloaded from the LiveCD, and is already running on the target system with Internet access.
1. Getting cfdisk and GRUB using appbrowser
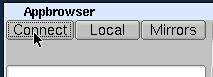
Click on the wbar Apps icon, or from the Apps Browser context menu

Choose Connect > TCE
On the left side there will be a list of available applications. Select cfdisk.tce from the list.
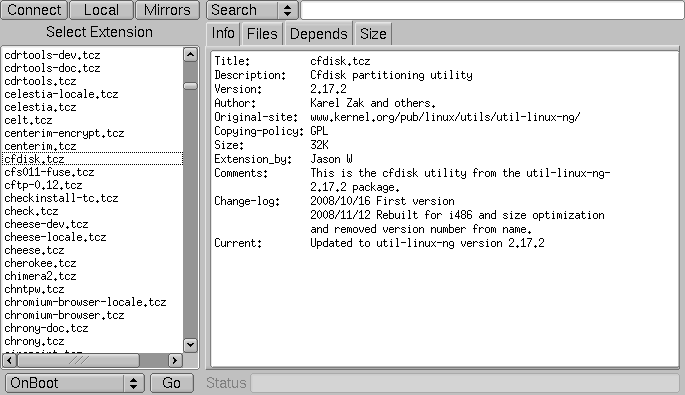
Click the Install button ( Install Selected ), a successful installation will display a notification

Repeat the process of choosing and installing GRUB-0.97-splash.tce .
2. Open root shell

3. Markup
The following command will list your drives and their current partitions.
fdisk -l
For the purposes of this tutorial, / dev / hda will be used.

Use Cfdisk to partition your hard drives:
cfdisk / dev / hda
Use the left and right arrow keys on the keyboard to navigate through the menu at the bottom and press the ENTER key to select an option.
Navigate and select ( New )

Choose ( Primary )

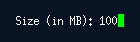
Select the size by, or accept the default value.
Press Enter to confirm. For the demonstration used 100 MB .
Choose where to put a new section

We make a new section bootable ( Bootable ) for demonstrating hda1 .
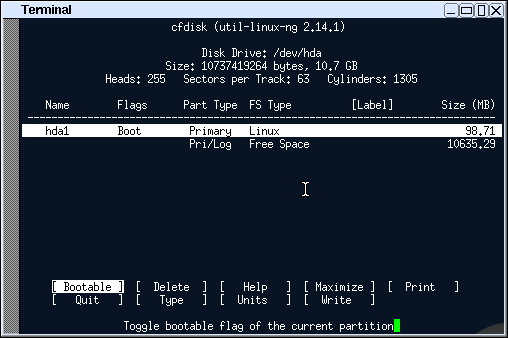
write changes

confirm changes ( yes )

we leave

4. Formatting
Format the new section ( for ext3 demonstration )
mkfs.ext3 / dev / hda1
5. Copy the Tiny Core system files
we mount a new section
mount / mnt / hda1
create directories for Tiny Core and GRUB files:
mkdir -p / mnt / hda1 / boot / grub
mount the original bootable media. To demonstrate, Tiny Core was downloaded from IDE CD-ROM :
mount / mnt / hdc
we copy files
cp -p / mnt / hdc / boot / * / mnt / hda1 / boot /
6. Installing GRUB
copy GRUB files
cp -p / usr / lib / grub / i386-pc / * / mnt / hda1 / boot / grub /
Create menu.lst: (note that "LST" contains the letters 'L')
VI / mnt / hda1 / boot / grub / menu.lst
press i (input mode) and enter the following
default 0
timeout 10
title tinycore
kernel / boot / bzImage quiet
initrd /boot/tinycore.gz
You can add other options if you wish.
press (esc) when done and (x) (save and exit)
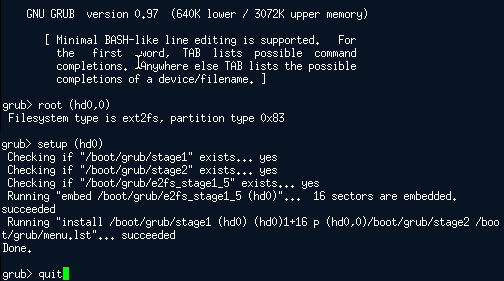
Running GRUB:
Note that GRUB uses HD numbers in the form (hdM, n) and (hdM), instead of hdXy and hdX.
M corresponds to a number from '0', which represents 'a' for X.
For each letter after, add one.
'B' is '1', 'C' is '2', 'd' is '3', etc.
n corresponds to a number from '0', which represents '1' for y.
Subtract 1 from y to get n.
'1' becomes' 0 ',' 2 'becomes' 1', '3' becomes'2 ', etc.
For the demonstration, hda1 is used for hdXy, which means that (hdM, n) is (hd0, 0)
and that using hda on the hdX (hdM) principle is (hd0)
In the grub line
root (hd0,0)
setup (hd0)
quit
7. Testing
Tiny Core and GRUB are already installed.
unmount the original bootable media
umount / mnt / hdc
eject / dev / hdc
To verify operation, reboot the system.
reboot
via , via , via
new release of Tiny Core Linux 1.2 - Linux minidistributive (only 10 MB in size), expandable by installing additional applications from network archives
- use JWM window manager, Tiny X, and FLTK graphical user interface;
- the new tcz-symlinker speeds up the initial loading and processing of TCZ;
- Advanced udev allows you to more quickly interact with USB;
- mnttool has been modernized to better support other devices;
- removed unused files;
- added missing application menu from / opt;
- suid is involved when mounting tclocal.
download here
')
for those wishing to install instructions ( fluent translation ):
It is assumed that Tiny Core was downloaded from the LiveCD, and is already running on the target system with Internet access.
1. Getting cfdisk and GRUB using appbrowser
Click on the wbar Apps icon, or from the Apps Browser context menu
Choose Connect > TCE
On the left side there will be a list of available applications. Select cfdisk.tce from the list.
Click the Install button ( Install Selected ), a successful installation will display a notification
Repeat the process of choosing and installing GRUB-0.97-splash.tce .
2. Open root shell
3. Markup
The following command will list your drives and their current partitions.
fdisk -l
For the purposes of this tutorial, / dev / hda will be used.
Use Cfdisk to partition your hard drives:
cfdisk / dev / hda
Use the left and right arrow keys on the keyboard to navigate through the menu at the bottom and press the ENTER key to select an option.
Navigate and select ( New )
Choose ( Primary )
Select the size by, or accept the default value.
Press Enter to confirm. For the demonstration used 100 MB .
Choose where to put a new section
We make a new section bootable ( Bootable ) for demonstrating hda1 .
write changes
confirm changes ( yes )
we leave
4. Formatting
Format the new section ( for ext3 demonstration )
mkfs.ext3 / dev / hda1
5. Copy the Tiny Core system files
we mount a new section
mount / mnt / hda1
create directories for Tiny Core and GRUB files:
mkdir -p / mnt / hda1 / boot / grub
mount the original bootable media. To demonstrate, Tiny Core was downloaded from IDE CD-ROM :
mount / mnt / hdc
we copy files
cp -p / mnt / hdc / boot / * / mnt / hda1 / boot /
6. Installing GRUB
copy GRUB files
cp -p / usr / lib / grub / i386-pc / * / mnt / hda1 / boot / grub /
Create menu.lst: (note that "LST" contains the letters 'L')
VI / mnt / hda1 / boot / grub / menu.lst
press i (input mode) and enter the following
default 0
timeout 10
title tinycore
kernel / boot / bzImage quiet
initrd /boot/tinycore.gz
You can add other options if you wish.
press (esc) when done and (x) (save and exit)
Running GRUB:
Note that GRUB uses HD numbers in the form (hdM, n) and (hdM), instead of hdXy and hdX.
M corresponds to a number from '0', which represents 'a' for X.
For each letter after, add one.
'B' is '1', 'C' is '2', 'd' is '3', etc.
n corresponds to a number from '0', which represents '1' for y.
Subtract 1 from y to get n.
'1' becomes' 0 ',' 2 'becomes' 1', '3' becomes'2 ', etc.
For the demonstration, hda1 is used for hdXy, which means that (hdM, n) is (hd0, 0)
and that using hda on the hdX (hdM) principle is (hd0)
In the grub line
root (hd0,0)
setup (hd0)
quit
7. Testing
Tiny Core and GRUB are already installed.
unmount the original bootable media
umount / mnt / hdc
eject / dev / hdc
To verify operation, reboot the system.
reboot
via , via , via
Source: https://habr.com/ru/post/54229/
All Articles