iManiac or Trepanation of the Aluminum Box
I will say straight away that I personally do not recommend doing everything that is written and done here on my own. If you suddenly want to do the same, then entrust it to SC specialists or to me;)
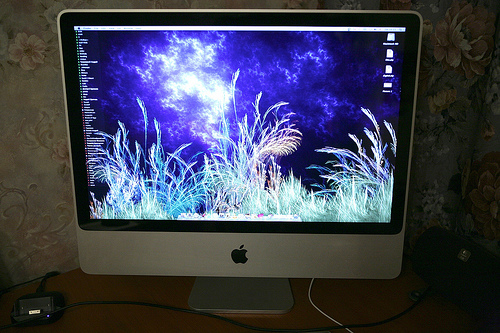
When I bought myself an iMac 24 "after NG'08-'09, [mid.2008] I was very pleased that now I don’t have this healthy coffin, which stands on the floor near the table and collects dust. Now I have an elegant, powerful and well-functioning computer with HD display. Yes, and all-in-one.
By the way, just make a reservation. "The problem of a glossy display" in the new iMac-sucked from the finger. It all depends on how well the computer is located in the room / office. It's my personal opinion. You can think whatever you want, but everything suits me more than.
')
IMac has everything you need to just work. There is even a minimal opportunity to upgrade for "housewives." But what I want to talk about is a more complicated procedure of a more complex upgrade. However, it is quite doable for a person whose hands are not “out of ass.”
In general, it was not enough for me to 320Gb "Out Of The Box" HDD and I decided to put MORE! :) (After all, like money, there is not a lot of RAM or a lot of space on hard!)
For the upgrade, an excellent HDD Western Digital 1TB WD10EADS Caviar Green series was chosen, due to low power consumption, very low heat dissipation (and this is true, because the iMac-e hard drive is right behind the monitor), a large buffer of 32mb and a great combination of price quality-volume (in St. Petersburg at the moment ~ 4500r.)

Okay. HDD purchased and waiting in the wings. Now the most important and interesting thing is trepanning itself.
If you look at the iMac from all sides - you will not see a single screw (although there isn’t - there is one after all - this is the screw that secures the memory compartment lid - unscrew it first and remove the memory bar):

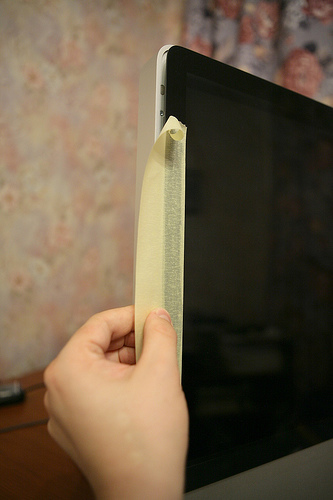
The whole construction is very competent and monolithic. However, everything is not so difficult. All screws fastening the case are under the protective glass, which in turn is fixed in iMac with the help of strong magnets placed along the perimeter of the case and guide pins attached to the back side of the glass. DO NOT use a screwdriver or something flat metal to remove the glass IN ANY CASE, as many techies like to do;) Many English-speaking resources are advised to use industrial suckers. Well, for their lack - here is a simple hint. I used a strip of wide paper tape - it is firmly attached and easily peeled off without leaving any glue marks on the glossy glass:
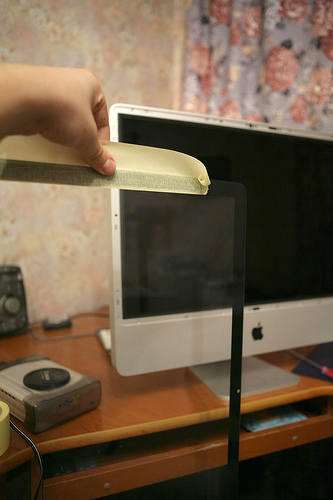
Carefully remove the glass and carry in the bathroom - the least dusty room of almost any apartment because of the high humidity, usually high.
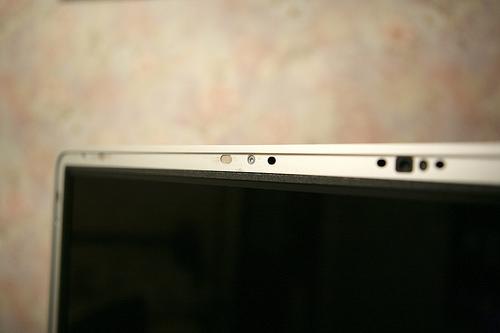
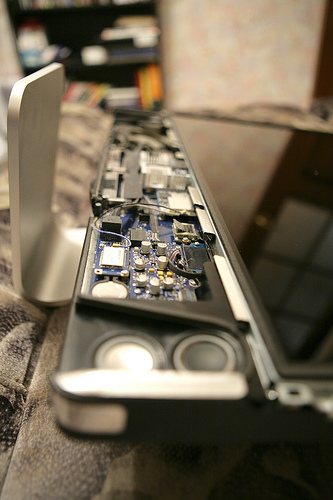
This picture just shows (right in the center) on the left - one of the powerful neodymium magnets, the mounting screw, the hole for the guide pin:
Then the computer was placed on the sofa and all the screws fastening the case are unscrewed. The screws under the star head screwdriver - keep in mind. Either look for a set of "star-shaped 6-beam" screwdrivers, or use flat-head screwdrivers with the appropriate width of the tip. Distracted ...
The lid is removed quite simply - first the upper part is raised, then the lower. Be careful - a microphone is attached to the top of the aluminum cover.
The lid rises and, if you do not want to unstick the microphone, leans back up.
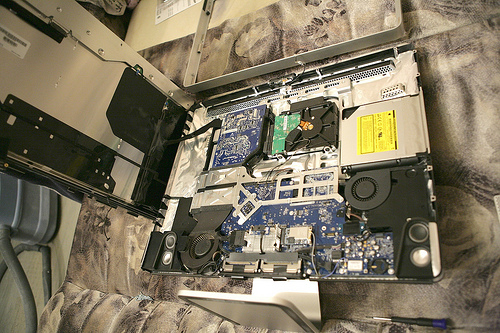
Half way is passed - that's what we see right away. Not a very nice sight, huh? I, as I saw, immediately worked with a vacuum cleaner. :)

This is just another picture - I love to dissect;)
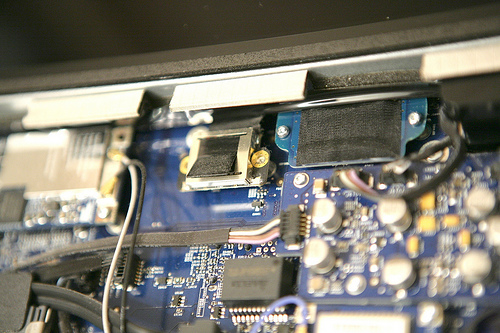
The display matrix (by the way, judging by the sticker, now I know firsthand that PHILIPS makes them) is fixed in the case of the 8th again with star-shaped screws. After unscrewing them and before raising the matrix, the main thing is to remember to disconnect the connector of the cable. Here it is in the middle (already without screws - unscrewed):
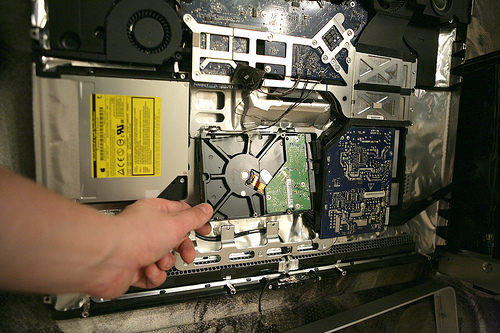
Gently lift the matrix to the left (there is another loop under it and I don’t know how to turn it off - that's why I didn’t bother) and set. She's a bitch hard - I asked my father to help hold while I finish everything else. After all, quite a bit left! Here it is, native HDD (by the way, too, brand WD), right in the middle on the cushioning chassis:
We unstuck the thermal sensor, unscrew the screws holding the HDD in the chassis, and we change it. Do not forget to glue the temperature sensor to the new screw!
Whew! Well, almost everything. The assembly process is reversed. The main thing is not to forget to fasten all the screws, connect all the cables and watch carefully during the assembly, so that no wires fall into the inappropriate slot for it and would not be squeezed and broken.
After all this, I, crossing my fingers, plugged the computer into an outlet, turned on the keyboard-mouse and pressed POWER. Hooray! It all worked. Then the sad installation of makosi on a new screw, during which I managed to smoke a couple of cigarettes and drink 100 grams of cognac for joy that I didn’t kill my dear tsatsku, I had a successful grade for my straight arms!
PS: Who is not visible - all the pictures you can look larger if you click on them.
PPS: If this article could help someone - I am very happy. If you want to use it somewhere else - please kindly leave a link here to the original. Thank!
When I bought myself an iMac 24 "after NG'08-'09, [mid.2008] I was very pleased that now I don’t have this healthy coffin, which stands on the floor near the table and collects dust. Now I have an elegant, powerful and well-functioning computer with HD display. Yes, and all-in-one.
By the way, just make a reservation. "The problem of a glossy display" in the new iMac-sucked from the finger. It all depends on how well the computer is located in the room / office. It's my personal opinion. You can think whatever you want, but everything suits me more than.
')
IMac has everything you need to just work. There is even a minimal opportunity to upgrade for "housewives." But what I want to talk about is a more complicated procedure of a more complex upgrade. However, it is quite doable for a person whose hands are not “out of ass.”
In general, it was not enough for me to 320Gb "Out Of The Box" HDD and I decided to put MORE! :) (After all, like money, there is not a lot of RAM or a lot of space on hard!)
For the upgrade, an excellent HDD Western Digital 1TB WD10EADS Caviar Green series was chosen, due to low power consumption, very low heat dissipation (and this is true, because the iMac-e hard drive is right behind the monitor), a large buffer of 32mb and a great combination of price quality-volume (in St. Petersburg at the moment ~ 4500r.)
Okay. HDD purchased and waiting in the wings. Now the most important and interesting thing is trepanning itself.
If you look at the iMac from all sides - you will not see a single screw (although there isn’t - there is one after all - this is the screw that secures the memory compartment lid - unscrew it first and remove the memory bar):
The whole construction is very competent and monolithic. However, everything is not so difficult. All screws fastening the case are under the protective glass, which in turn is fixed in iMac with the help of strong magnets placed along the perimeter of the case and guide pins attached to the back side of the glass. DO NOT use a screwdriver or something flat metal to remove the glass IN ANY CASE, as many techies like to do;) Many English-speaking resources are advised to use industrial suckers. Well, for their lack - here is a simple hint. I used a strip of wide paper tape - it is firmly attached and easily peeled off without leaving any glue marks on the glossy glass:
Carefully remove the glass and carry in the bathroom - the least dusty room of almost any apartment because of the high humidity, usually high.
This picture just shows (right in the center) on the left - one of the powerful neodymium magnets, the mounting screw, the hole for the guide pin:
Then the computer was placed on the sofa and all the screws fastening the case are unscrewed. The screws under the star head screwdriver - keep in mind. Either look for a set of "star-shaped 6-beam" screwdrivers, or use flat-head screwdrivers with the appropriate width of the tip. Distracted ...
The lid is removed quite simply - first the upper part is raised, then the lower. Be careful - a microphone is attached to the top of the aluminum cover.
The lid rises and, if you do not want to unstick the microphone, leans back up.
Half way is passed - that's what we see right away. Not a very nice sight, huh? I, as I saw, immediately worked with a vacuum cleaner. :)
This is just another picture - I love to dissect;)
The display matrix (by the way, judging by the sticker, now I know firsthand that PHILIPS makes them) is fixed in the case of the 8th again with star-shaped screws. After unscrewing them and before raising the matrix, the main thing is to remember to disconnect the connector of the cable. Here it is in the middle (already without screws - unscrewed):
Gently lift the matrix to the left (there is another loop under it and I don’t know how to turn it off - that's why I didn’t bother) and set. She's a bitch hard - I asked my father to help hold while I finish everything else. After all, quite a bit left! Here it is, native HDD (by the way, too, brand WD), right in the middle on the cushioning chassis:
We unstuck the thermal sensor, unscrew the screws holding the HDD in the chassis, and we change it. Do not forget to glue the temperature sensor to the new screw!
Whew! Well, almost everything. The assembly process is reversed. The main thing is not to forget to fasten all the screws, connect all the cables and watch carefully during the assembly, so that no wires fall into the inappropriate slot for it and would not be squeezed and broken.
After all this, I, crossing my fingers, plugged the computer into an outlet, turned on the keyboard-mouse and pressed POWER. Hooray! It all worked. Then the sad installation of makosi on a new screw, during which I managed to smoke a couple of cigarettes and drink 100 grams of cognac for joy that I didn’t kill my dear tsatsku, I had a successful grade for my straight arms!
PS: Who is not visible - all the pictures you can look larger if you click on them.
PPS: If this article could help someone - I am very happy. If you want to use it somewhere else - please kindly leave a link here to the original. Thank!
Source: https://habr.com/ru/post/53979/
All Articles