iPod Touch 2g Jailbreak
In this article I want to share with the habrasoobshchestvu their experience of applying jailbreak to your iPod Touch 2g.

I think the following should be noted: I use Windows Vista SP1 32-bit, iTunes 8.0.2.20, iPod firmware version 2.2.1.
The guys from the http://redsn0w.com/ team made a Jailbreak for the iPod Touch 2g, but it doesn't have a graphical interface, everything is done according to the manual.
Comrade Cyw00d from the forum ipodtouchfans made a GUI, which we will use.
Immediately I warn you: after the flashing, nothing will be saved: there will be no programs, no music, no video. At the exit, get a clean iPod. Only settings can be saved if you make a backup.
First we need:
Make a backup in iTunes and proceed.
')
0. Unpack Cyw00d_V17.zip to any directory, save the file with firmware 2.2.1 iPod2,1_2.2.1_5H11a_Restore.ipsw to the root of this directory, run Cyw00d Jailbreak Helper.exe .
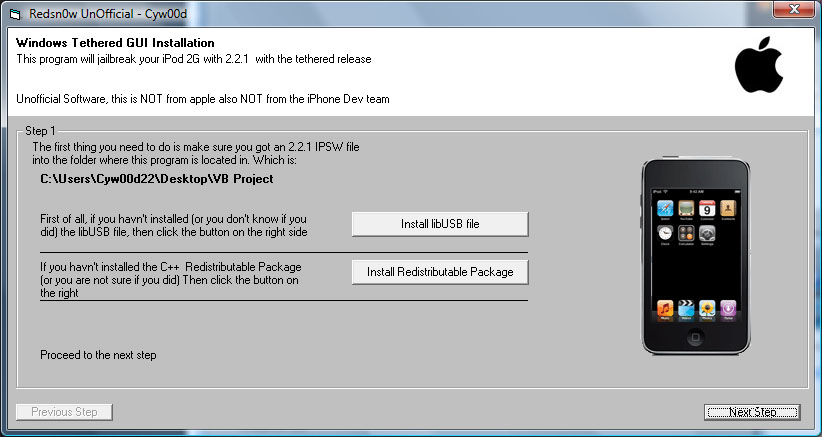
1. IMPORTANT! Users of Vista and Windows 7 should definitely set the \ Install \ libusb-win32-filter-bin-0.1.12.1.exe file to be compatible with Windows XP SP2 (otherwise, after installing the patch, all usb devices will not work.)
Users of 64-bit versions go here .
Alternately, install patches (if not, or are not sure that they were installed): click on the Install libUSB file and Install Redustributable Package buttons , click Next Step.
2. From the list, select the iPod2,1_2.2.1_5H11a_Restore.ipsw file and click Start making IPSW file . (be patient)
3. A connected iPod with iTunes running is translated into “Stabilization Mode” (DFU). To do this, simultaneously hold down the power button and the Home button for 10 seconds, then release the power button while holding the Home button for 8 seconds. ( There is an illustration in the program ). The screen should be black, iTunes will report that the iPod is connected in Stabilization mode.
Click the Upload DFU file button, disconnect the iPod for a couple of seconds, then connect (the screen should now be white) and click the Upload 0wn Patch (bin) button and proceed to the next step.
4. Press the Press Me button, the command line will open. At the command prompt, click the right mouse button and select Paste.
After executing the commands, open iTunes, select your iPod and hold the Shift key and click the Restore button. Select the JailBrokenIPSW.ipsw file in the root of the directory where the Jailbreak Helper was unpacked. Go to the next step.
5. Transfer iPod to DFU again, click the button Upload DFU file. Turn off the iPod for a couple of seconds, then connect (now the screen should be white), click the button Upload 0wn Patch (bin) and go to the next step.
6. Press the Press Me button, the command line will open. At the command prompt, click the right mouse button and select Paste. At the end of the program, go to the next step.
7. The final stage. We press the buttons one by one, on 2 and 4 in the console you will need to enter go , then, / exit
Then, iPod will reboot already with jailbreak firmware, Installer and Cydia.
Next, iTunes will offer to recover from backup. I recovered and repeated steps 5-7.
A significant drawback of the firmware from redsn0w is the inability of self-loading after a complete shutdown (for example, after a full battery discharge). To do this, the player was previously transferred to DFU and underwent some flashing step (with erasing data).
To prevent this from happening, you need to add a bootloader, which we will do.
0. It is necessary to download the Downloader with iRecovery ( For detailed information, see the source )
1. Put your iPod in DFU mode
2. Run the command line, go to the folder with iRecovery
3. Run the command
4. Turn off the player for a couple of seconds and plug it back in.
5. Execution of the following commands requires entering (copy-paste) of each line separately, after entering each line, press Enter
6.
or if encountered Error 6:
7
8.
At this stage, the first time I did not work (the player should boot into DFU mode with a white screen), I had to repeat everything from the first step, for the third time it worked :).
9. Now open iTunes, select your player and, holding down the Shift key, click the Restore button and select the run_rs.ipsw file.
Again, a problem step.
10. iPod should boot into DFU.
11. Continue to execute commands.
And do not forget that each line is one team.
12.
13.
14.
15. Close the console.
Everything, now it is possible to use any program, "ground" under run rs, for example, Boot .
I think the following should be noted: I use Windows Vista SP1 32-bit, iTunes 8.0.2.20, iPod firmware version 2.2.1.
Jailbreak process
The guys from the http://redsn0w.com/ team made a Jailbreak for the iPod Touch 2g, but it doesn't have a graphical interface, everything is done according to the manual.
Comrade Cyw00d from the forum ipodtouchfans made a GUI, which we will use.
Immediately I warn you: after the flashing, nothing will be saved: there will be no programs, no music, no video. At the exit, get a clean iPod. Only settings can be saved if you make a backup.
First we need:
- Jailbreak redsn0w with GUI v1.7
- Firmware 2.2.1 for assembly
- A source. Video tutorials, problem solving.
Make a backup in iTunes and proceed.
')
0. Unpack Cyw00d_V17.zip to any directory, save the file with firmware 2.2.1 iPod2,1_2.2.1_5H11a_Restore.ipsw to the root of this directory, run Cyw00d Jailbreak Helper.exe .
1. IMPORTANT! Users of Vista and Windows 7 should definitely set the \ Install \ libusb-win32-filter-bin-0.1.12.1.exe file to be compatible with Windows XP SP2 (otherwise, after installing the patch, all usb devices will not work.)
Users of 64-bit versions go here .
Alternately, install patches (if not, or are not sure that they were installed): click on the Install libUSB file and Install Redustributable Package buttons , click Next Step.
2. From the list, select the iPod2,1_2.2.1_5H11a_Restore.ipsw file and click Start making IPSW file . (be patient)
3. A connected iPod with iTunes running is translated into “Stabilization Mode” (DFU). To do this, simultaneously hold down the power button and the Home button for 10 seconds, then release the power button while holding the Home button for 8 seconds. ( There is an illustration in the program ). The screen should be black, iTunes will report that the iPod is connected in Stabilization mode.
Click the Upload DFU file button, disconnect the iPod for a couple of seconds, then connect (the screen should now be white) and click the Upload 0wn Patch (bin) button and proceed to the next step.
4. Press the Press Me button, the command line will open. At the command prompt, click the right mouse button and select Paste.
After executing the commands, open iTunes, select your iPod and hold the Shift key and click the Restore button. Select the JailBrokenIPSW.ipsw file in the root of the directory where the Jailbreak Helper was unpacked. Go to the next step.
5. Transfer iPod to DFU again, click the button Upload DFU file. Turn off the iPod for a couple of seconds, then connect (now the screen should be white), click the button Upload 0wn Patch (bin) and go to the next step.
6. Press the Press Me button, the command line will open. At the command prompt, click the right mouse button and select Paste. At the end of the program, go to the next step.
7. The final stage. We press the buttons one by one, on 2 and 4 in the console you will need to enter go , then, / exit
Then, iPod will reboot already with jailbreak firmware, Installer and Cydia.
Next, iTunes will offer to recover from backup. I recovered and repeated steps 5-7.
Add a bootloader
A significant drawback of the firmware from redsn0w is the inability of self-loading after a complete shutdown (for example, after a full battery discharge). To do this, the player was previously transferred to DFU and underwent some flashing step (with erasing data).
To prevent this from happening, you need to add a bootloader, which we will do.
0. It is necessary to download the Downloader with iRecovery ( For detailed information, see the source )
1. Put your iPod in DFU mode
2. Run the command line, go to the folder with iRecovery
3. Run the command
iRecovery -f ibss211.dfu4. Turn off the player for a couple of seconds and plug it back in.
5. Execution of the following commands requires entering (copy-paste) of each line separately, after entering each line, press Enter
iRecovery -s
arm7_stop
mw 0x9000000 0xe59f3014
mw 0x9000004 0xe3a02a02
mw 0x9000008 0xe1c320b0
mw 0x900000c 0xe3e02000
mw 0x9000010 0xe2833c9d
mw 0x9000014 0xe58326c0
mw 0x9000018 0xeafffffe
mw 0x900001c 0x2200f300
arm7_go
arm7_stop
/exit
6.
irecovery -f ibss221pwn.dfuor if encountered Error 6:
irecovery -s
/sendfile ibss221pwn.dfu
7
/exit
irecovery -s
8.
goAt this stage, the first time I did not work (the player should boot into DFU mode with a white screen), I had to repeat everything from the first step, for the third time it worked :).
9. Now open iTunes, select your player and, holding down the Shift key, click the Restore button and select the run_rs.ipsw file.
Again, a problem step.
10. iPod should boot into DFU.
11. Continue to execute commands.
/exit
irecovery -s
And do not forget that each line is one team.
12.
setenv rs "arm7_stop;mw 0x9000000 0xe59f3014;mw 0x9000004 0xe3a02a02;mw 0x9000008 0xe1c323b4;run rs1"

setenv rs1 "mw 0x900000c 0xe59f300c;mw 0x9000010 0xe3e02000;mw 0x9000014 0xe503223f;run rs2"

setenv rs2 "mw 0x9000018 0xeafffffe;mw 0x900001c 0x0ff1a100;mw 0x9000020 0x0ff2afff;arm7_go;run rs3"

setenv rs3 "sha1 0x8000000 0x3000000;arm7_stop;mw 0xff006d4 0x21906943;mw 0xff006d8 0x68da6898;run rs4"

setenv rs4 "mw 0xff006dc 0x9300699b;mw 0xff006e0 0x69c40509;mw 0xff006e4 0x47a02300;run rs5"

setenv rs5 "mw 0xff006e8 0xf0002000;mw 0xff006ec 0xe002fde3;tsys"

saveenv

/exit
13.
irecovery -s14.
run rs15. Close the console.
Everything, now it is possible to use any program, "ground" under run rs, for example, Boot .
Source: https://habr.com/ru/post/53301/
All Articles