Java instead of javascript (gwt + netbeans)
When I saw gwt and gwt-ext, I thought that I was deceived somewhere when I wasn’t told about it before. The torment with debugging scripts using ExtJS was long, we used Java as a server platform, manually handled the serialization / deserialization of server objects, adjusted blocks with css and did many other things that took a lot of time. However, all this can be left behind. Now you can draw beautiful windows with Java code (not js)! GWT is a great thing. It allows us to get away from writing js-code, because it generates js-code on its own; and the programmer can even not watch it, because it can also be debugged in the source code in Java! Next, I will try to tell you how to configure gwt under netbeans.

We put on the Netbeans plugin for GWT: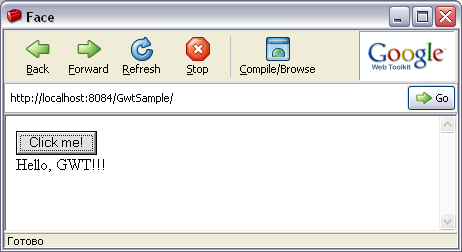
')
In this case, the following code was created for the client: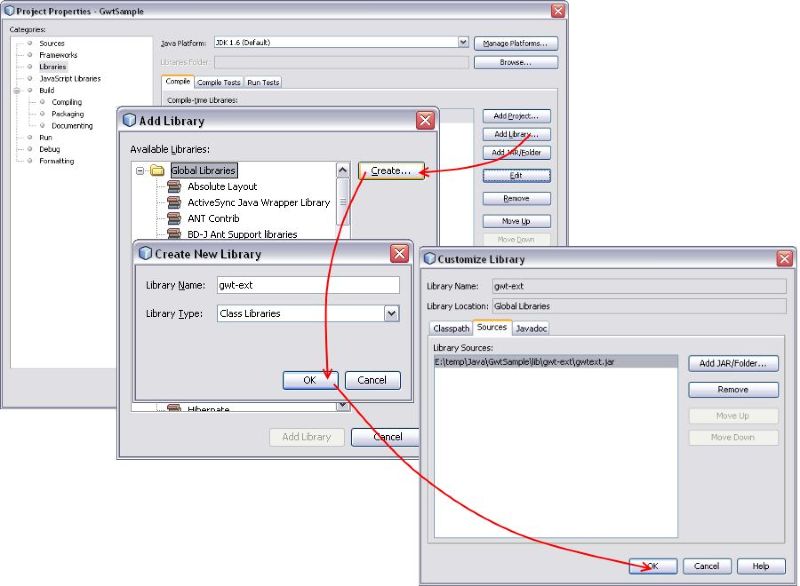
You also need to remember to throw ExtJS 2.0.2 into the web / js / ext folder. And to top it off, you need to tell the module that it has new components related to extJs. To do this, open our / sample / Face.gwt.xml file and fix it as follows:
I note only that in order to compile a war-file for the web server, you need to exclude from the libraries of the project gwt-dev-windows.jar.
And, lastly, you can afford a little self-criticism and comments.
upd: so that all this does not seem empty and unnecessary, you can see examples on gwt-ext .
Getting started
So, the goal is to create a web application in java. Without further ado, we will hang the interface on extJS, the server logic on java, and we will work with DB using hibernate. Getting the components We will need the following components:- Netbeans 6.5 Java or All (for Windows 212 and 249 MB, respectively, for other OSs the size should not differ much) ;
- ExtJs version 2.0.2 , and no older ;
- Google Web Toolkit 1.5 ;
- hibernate core ;
- gwt-ext 2.0.5 .
Required options when installing Netbeans.
We put on the Netbeans plugin for GWT:
- open the menu Tools-> Plugins;
- open the Available Plugins tab;
- We are looking for the Gwt4Nb plugin (you can use the search).
Naked gwt
After that we create a new web project ( File -> New project -> Java web -> Web application ). The project must be given a name and indicate the place where it will be saved. We specify Tomcat as the server (or, by preference, another one). On the last page are the frameworks necessary for our project. Turn on Google Web Toolkit and Hibernate. In this case, for GWT, you must select the directory where we unpacked gwt. I selected the $ ProjectPath / lib / gwt folder for this. You also need to specify the name of the module GWT, which we will develop. Let be our.sample.Face. You also need to configure the hibernate connection, I will not describe this process, a lot has already been said about it, for example, you can see the article by the respected habrachelovek garbuz . Next, click Finish, and you can continue. Immediately I recommend setting an option for the execution environment that increases the memory limits for execution. This is done in the project properties, Run -> VM Options set to "-Xmx512m". You also need to increase the maximum memory for the compiler, and here you have to go for a little trick - you need to open the netbeans / build-gwt.xml file and change it to look like this:....<br/> < java classpath ="${javac.classpath}:${src.dir}" failonerror ="true" <br/> classname ="com.google.gwt.dev.GWTCompiler" fork ="true" > <br/> < arg value ="-out" /> <br/> < arg path ="${build.web.dir}/" /> <br/> < arg value ="-style" /> <br/> < arg value ="${gwt.compiler.output.style}" /> < arg value ="-logLevel" /> <br/> < arg value ="${gwt.compiler.logLevel}" /> <br/> < arg value ="${gwt.module}" /> <br/> < jvmarg value ="-Xmx512m" /> <br/> </ java > <br/>.... < target name ="debug-connect-gwt-shell" if ="netbeans.home" depends ="init" > http://bankinform.ru/habraeditor/images/yu-logo.png<br/>... <br/> < java fork ="true" classname ="com.google.gwt.dev.GWTShell" failonerror ="true" > <br/> < jvmarg value ="-Xmx512m" /> <br/> ....<br/> </ java > <br/> </ target > <br/>.... <br/><br/> * This source code was highlighted with Source Code Highlighter .Trial run.
')
In this case, the following code was created for the client:
package our.sample.client;<br/><br/>import com.google.gwt.core.client.EntryPoint;<br/>import com.google.gwt.user.client.ui.Button;<br/>import com.google.gwt.user.client.ui.ClickListener;<br/>import com.google.gwt.user.client.ui.Label;<br/>import com.google.gwt.user.client.ui.RootPanel;<br/>import com.google.gwt.user.client.ui.Widget;<br/><br/><br/> public class MainEntryPoint implements EntryPoint {<br/> // <br/> public void onModuleLoad() {<br/> // <br/> final Label label = new Label( "Hello, GWT!!!" );<br/> // <br/> final Button button = new Button( "Click me!" );<br/> <br/> // , . <br/> button.addClickListener( new ClickListener(){<br/> public void onClick(Widget w) {<br/> label.setVisible(!label.isVisible());<br/> }<br/> });<br/> <br/> // "" . <br/> RootPanel. get ().add(button);<br/> RootPanel. get ().add(label);<br/> }<br/>} <br/><br/> * This source code was highlighted with Source Code Highlighter .GWT-Ext>
Next, you need to connect the gwt-ext library itself, because the bare standard web components will not suit us. To do this, open the project properties (context menu Properties with the right click on the root of the project tree), then in Libraries -> Add Library -> Create ; Next, enter the name: “gwt-ext”, and the classes (tab Classpath) and source (tab Sources) indicate the file gwtext.jar from the archive Gwt-ext. Next, click Add Library.Connecting the gwt-ext library.
You also need to remember to throw ExtJS 2.0.2 into the web / js / ext folder. And to top it off, you need to tell the module that it has new components related to extJs. To do this, open our / sample / Face.gwt.xml file and fix it as follows:
<? xml version ="1.0" encoding ="UTF-8" ? > <br/> < module > <br/> < inherits name ="com.google.gwt.user.User" /> <br/> < inherits name ='com.gwtext.GwtExt' /> <br/> < entry-point class ="our.sample.client.FaceEntryPoint" /> <br/><br/> < stylesheet src ="js/ext/resources/css/ext-all.css" /> <br/> < script src ="js/ext/adapter/ext/ext-base.js" /> <br/> < script src ="js/ext/ext-all.js" /> <br/> </ module > <br/> <br/> * This source code was highlighted with Source Code Highlighter .package our.sample.client;<br/><br/>import com.google.gwt.user.client.rpc.IsSerializable;<br/><br/> // Person, <br/> // IsSerializable, . <br/> public class Person implements IsSerializable {<br/> private String name;<br/> private String surname;<br/> private String patronymic;<br/> private String email;<br/> private int age;<br/> // .... <br/> // - <br/> // .... <br/>}<br/> <br/> * This source code was highlighted with Source Code Highlighter .package our.sample.client;<br/><br/>import com.google.gwt.user.client.rpc.ServiceDefTarget;<br/>import com.google.gwt.user.client.rpc.RemoteService;<br/>import com.google.gwt.core.client.GWT;<br/> public interface PersonService extends RemoteService{<br/> public Person loadPerson( int someValue);<br/> <br/> public static class App {<br/> private static final PersonServiceAsync ourInstance;<br/> static {<br/> ourInstance = (PersonServiceAsync) GWT.create(PersonService. class );<br/> ((ServiceDefTarget) ourInstance).setServiceEntryPoint(GWT.getModuleBaseURL() + "PersonService" );<br/> }<br/> public static PersonServiceAsync getInstance()<br/> {<br/> return ourInstance;<br/> }<br/> }<br/>} <br/><br/> * This source code was highlighted with Source Code Highlighter .package our.sample.client;<br/>import com.google.gwt.user.client.rpc.AsyncCallback;<br/><br/> public interface PersonServiceAsync {<br/> public abstract void loadPerson( int someValue, AsyncCallback<Person> asyncCallback);<br/>}<br/> <br/><br/> * This source code was highlighted with Source Code Highlighter .package our.sample.server;<br/>import com.google.gwt.user.server.rpc.RemoteServiceServlet;<br/>import our.sample.client.Person;<br/>import our.sample.client.PersonService;<br/><br/> public class PersonServiceImpl extends RemoteServiceServlet implements PersonService {<br/> <br/> public Person loadPerson( int someValue) {<br/> Person person = new Person();<br/> person.setSurname( "Some" );<br/> person.setName( "Usual" );<br/> person.setPatronymic( "Man" );<br/> person.setAge(someValue);<br/> person.setEmail( "man@domain.com" );<br/> return person;<br/> }<br/>}<br/> <br/> * This source code was highlighted with Source Code Highlighter .package our.sample.client;<br/><br/>import com.google.gwt.core.client.EntryPoint;<br/>import com.google.gwt.user.client.rpc.AsyncCallback;<br/>import com.google.gwt.user.client.ui.RootPanel;<br/>import com.gwtext.client.core.EventObject;<br/>import com.gwtext.client.core.Position;<br/>import com.gwtext.client.widgets.Button;<br/>import com.gwtext.client.widgets.MessageBox;<br/>import com.gwtext.client.widgets.Panel;<br/>import com.gwtext.client.widgets. event .ButtonListenerAdapter;<br/>import com.gwtext.client.widgets.form.*;<br/><br/><br/> public class FaceEntryPoint implements EntryPoint {<br/><br/> public FaceEntryPoint() {<br/> }<br/><br/> final static TextField txtName = new TextField( "" , "name" , 190);<br/> final static TextField txtSurname = new TextField( "" , "surname" , 190);<br/> final static TextField txtPatronymic = new TextField( "" , "patronymic" , 190);<br/> final static TextField txtEmail = new TextField( "Email" , "email" , 190);<br/> final static TextField txtAge = new TextField( "" , "age" , 190);<br/><br/> public void onModuleLoad() {<br/> Panel panel = new Panel();<br/> panel.setBorder( false );<br/> panel.setPaddings(15);<br/><br/> final FormPanel formPanel = new FormPanel(Position.CENTER);<br/> formPanel.setFrame( true );<br/> formPanel.setTitle( " " );<br/> formPanel.setWidth(500);<br/> formPanel.setLabelWidth(100);<br/><br/> FieldSet fieldSet = new FieldSet( "" );<br/> fieldSet.add(txtName);<br/> fieldSet.add(txtSurname);<br/> fieldSet.add(txtPatronymic);<br/> fieldSet.add(txtEmail);<br/> fieldSet.add(txtAge);<br/> txtEmail.setVtype(VType.EMAIL);<br/> txtAge.setVtype(VType.ALPHANUM);<br/><br/> fieldSet.setWidth(formPanel.getWidth() - 20);<br/> final Button btnLoad = new Button( "" , new ButtonListenerAdapter() {<br/> public void onClick(Button button, EventObject e) {<br/> PersonService.App.getInstance().loadPerson(29, new AsyncCallback<Person>() {<br/><br/> public void onFailure(Throwable caught) {<br/> MessageBox.alert( ", - !" );<br/> }<br/><br/> public void onSuccess(Person result) {<br/> txtName.setValue(result.getName());<br/> txtSurname.setValue(result.getSurname());<br/> txtPatronymic.setValue(result.getPatronymic());<br/> txtAge.setValue( String .valueOf(result.getAge()));<br/> txtEmail.setValue(result.getEmail());<br/> }<br/> });<br/> }<br/> });<br/> formPanel.add(fieldSet);<br/> formPanel.addButton(btnLoad);<br/> panel.add(formPanel);<br/> RootPanel. get ().add(panel);<br/> }<br/>}<br/> <br/> * This source code was highlighted with Source Code Highlighter .- fields are declared in a class, and they are declared static. Why, we will see a little lower;
- create and customize a set of fields, place them on panels, customize their behavior and display;
- on the button we hang up the onClick event handlers; the handler is an anonymous class that implements the ButtonListenerAdapter interface. Since this is a separate class, and in it we need to work with fields from the class FaceEntryPoint, we declared these fields static.
- inside the button click handler there is a call to our noticeable service. The service is also an implementation of the interface, this time - AsyncCallback. If successful, the onSuccess method is called, and on error, the onFailure method is called. The onSuccess parameters are referenced by template parameters.
I note only that in order to compile a war-file for the web server, you need to exclude from the libraries of the project gwt-dev-windows.jar.
And, lastly, you can afford a little self-criticism and comments.
- The gwt4nb plugin is somewhat damp, as can be seen from the tricks to which it was necessary to resort.
- gwt 1.6 m1 has already been released, the article is focused on gwt 1.5.
upd: so that all this does not seem empty and unnecessary, you can see examples on gwt-ext .
Source: https://habr.com/ru/post/51894/
All Articles